2)Lower: L The landing l gearr will lower to its lowestt position fo or landing. Deforma ation of aircrafft on the groun nd do not use function, so as a not to damage the camera. RTH H Button:Press P and ho old this buttton to start the Return to Home (R RTH) proced dure. Thee LED around the RTH H Button willl blink whiite to indicaate the aircra aft is enttering RTH mode. The aircraft a will then return n to the last recorded Home H Poiint.
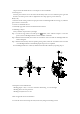
Step 4: Connect the mobile device to C1 USB port via micro‐USB cable. 4. Powering on C1 Press the power button once to check the current battery level. Press once and then press again and hold for 2 seconds to power on the C1. (Repeat the above steps again to power off the C1) Ready to Fly 1. Place the aircraft on flat ground in an open place with rear LED flight indicators facing you, and then power on the C1 and aircraft. 2. Connect C1 and mobile device. 3.
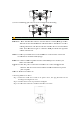
Flight 1. Taking off:Start motors by pulling both control sticks to the bottom corners. Release sticks once motors start. Slowly push the left(throttle) stick up to take off. Landing:Switch the transformation switch to lower position before landing. Gently pull the left (throttle) stick down to lower the aircraft until it touches the ground. When landing on the ground, pull the throttle stick to the bottom, then pull both sticks to bottom corners to stop motors.
position n for a largeer pitch ang gle (maximu um 35˚) and fastter flight. Moving the right stick contrrol left and d right changess the aircraft’’s left and rig ght pitch. Push lefft to fly left and right to o fly right. The T DJI Inspire 1 will hover in place if th he stick is cen ntered. Push th he stick further away y from the center position n for a largeer pitch ang gle (maximu um 35˚) and fastter flight. Gimbal Dial: Turn the dial to the right, and a the camera will shift to o point upwards.
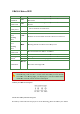
GL L658A Status S LE ED Statuss LED Solid Red Solid Green Allarm C1 Statu us None The GL658A is functioniing normallly but is not connected T d with th he aircraft. None The GL658A is functioniing normallly and is con T nnected witth the aiircraft. None Solid yellow Slow Blinkiing Red The C1 hass been set ass the slave B‐‐B‐B… … G GL658A errorr. Launch th he Assistant software to learn more. BB BBB W Warning thatt the aircraftt has low batttery level.
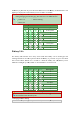
the battery b is po owered off, press the Po ower Button n once. The Battery B Leveel Indicatorss will ligh ht up to display the curreent battery level. l See beelow for detaails. The Batteery Level In ndicators willl also show w the curren nt battery leevel during ch harging and discharging g. The indica ators are deffined below. :LED is on. :LED is flashing. :LED is off. Battery Level L LED1 L LED2 LED D3 LED4 Battery Level 87.5%~~100% 75%~887.5% 62.5%~~75% 50%~662.5% 37.5%~~50% 25%~337.5% 12.
2. O Open the Prrotection Caap and conneect the Smarrt Battery to the Battery C Charger. If the t battery level is abov ve 75%, turn on the batteery before c charging. 3. The T Battery Level Indicator will dissplay the currrent battery y level durin ng c charging. 4. The T Smart Battery B is fullly charged when w Batterry Level Ind dicators are aall o off.
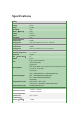
Specifications Battery Model (Standard) Voltage Energy Net Weight Model (Option) Voltage Energy Net Weight Charger (Standard) Output Power Charging Time Charger (Option) Output Power Charging Time Camera Operating Temperature Resolution FOV (Field of View) CMOS Lens Shooting Mode HD Recording Mode Supported File Format Support SD Card Types GL658A Operating Frequency Transmitting Distance (outdoor and unobstructed) Receiver(1%PER) TB47 22.2V 99.9Wh 570g TB48 22.8V 129.
Working Current / Voltage Battery capacity 1.2A@7.4V 6000mAH Optical Flow Sensor Frequency 50HZ Velocity Range <8m/s ( 2m above ground) Altitude Range 5cm‐500cm Operating Environment Operating Range FAQ 。 。 。 。 。 。 Standard Logo Rich pattern surface with adequate lighting (Lux > 15) 0‐2.
DJI Inspire 1 should be installed and operated with minimum distance 20cm between the radiator& your body. DJI Inspire 1 should be installed and operated with minimum distance 20cm between the radiator& your body.