Osmo User Manual V1.0 2015.
Naviigating to a To opic View w a complete list of topics in the table of o contents. Click C on a top pic to navigatee to that secttion. Searrching for Keyywords Searrch for keywo ords such as “battery” “ and d “install” to find f a topic. If you are usin ng Adobe Acrrobat Read der to read this documeent, press Ctrl+F on Wind dows or Com mmand+F on n Mac to beggin a searrch.
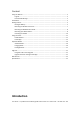
Content Using this Manual ............................................................................................................................. 2 Legend ....................................................................................................................................... 2 Download DJI GO App ............................................................................................................... 2 Introduction ..................................................................
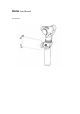
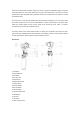
shoots sharp 12mp stills and stable video at up to 4K. The light and portable design, along with accessible buttons on the handle allows you to capture the world from a personal and unique perspective. A high speed WiFi video downlink connects your mobile device that offers a live HD view while filming. The Osmo uses a 3‐axis gimbal coupled with SmoothTrack technology to iron out camera shake from hand movement. It can be set in Locked Mode, in which camera motion is be fixed.
16. Built‐in Microphone 17. Gear Mount 18. Battery Cover 19. Lanyard Hole 20. Trigger 21. External Microphone Input 22. Lens Cover Getting Started Intelligent Battery Before you start using your Osmo, be sure to fully charge the Intelligent Battery. The battery has a capacity of 980mAh, and can power the Osmo for about 65 minutues. Intelligent Battery Functions Battery Balancing The battery balances the voltage of each cell during charging.
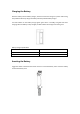
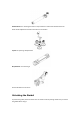
Charging the Battery Place the battery into the battery charger, and then connect the charger to a power outlet using the provided cable. Only charge the battery with the provided battery charger. The LED indicator on the battery charger glows green when in standby, and glows red when charging. After the battery is fully charged, the LED indicator will change from red to green. Battery Charger Specifications Model SOY015A‐1260120 Input 100‐240V, 50/60Hz Output 12.6V, 1.
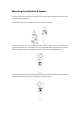
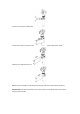
Mounting the Gimbal and Camera The Osmo comes with the Zenmuse X3 gimbal and camera, which should be mounted onto the handle before using the Osmo. 1. Remove the gimbal cover handle cover. Loosen the gear mount cover. 2. Rotate the Gimbal Lock to the unlocked position (with the white mark on the Gimbal Lock aligned to the white line on the handle), then insert the gimbal by aligning the white mark on the gimbal with white mark on the Gimbal Lock. Make sure the two ends make good contact. 3.
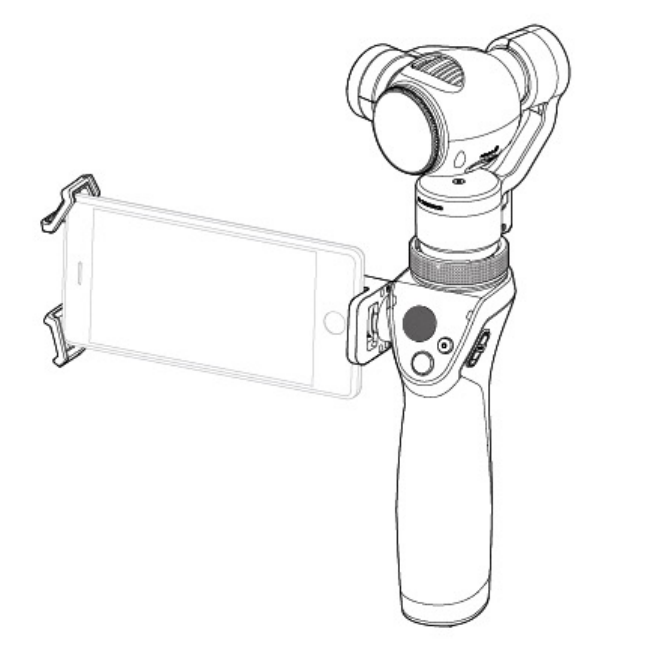
The Osmo supports the more powerful DJI Zenmuse X5 gimbal and camera which can be mounted onto the Osmo through an adaptor. Refer to the Zenmuse X5 User Manual for more details. Mounting the Mobile Device Holder 1. Attach the end of the mobile device holder to the gear mount. 2. Tighten the knob to secure. Mounting your Mobile Device 1. Release the two clamps on the mobile device holder. 2. Rotate the clamps to the desired position.
3. Place one end of your mobile device into the clamps. 4. Extend the clamps so that your entire mobile device fits into the mobile device holder. 5. Release your mobile device to secure it in place. Different types of adapters can be attached to the gear plate of the Osmo filming conditions. Extend Handle: the distance between your hand and Osmo can be adjusted convenience when using the extend handle.
Vehicle Mount: For mounting the Osmo on top of vehicles or behind the window where the Osmo will be subjected to extreme movement or acceleration. Tripod: For capturing steady footage. Bicycle Mount: For mounting the Osmo on a bicycle. Visit the DJI Store to learn more. Unlocking the Gimbal To protect the gimbal, the three motor axes are locked out of the package. Make sure you unlock the gimbal before using it.
1. Geently rotate the t tilt motorr until it can rotate r freely. Then do the same for thee roll motor. Be sure to unlock the tilt motor prior p to unlocck the roll motor every time, otherwisse it may cause friction to the camera lens. l ● Only ro otate the mottors a few ran nge to unlock them. ● 2. Slide the switcch on the pan axis upwards to unlock th he pan axis. Ussing th he Osm mo Ha andle Bu uttons Pow wer Switch To turn on or tu urn off the Osmo, pull thee power swittch down, ho old for 1.
Ensure thaat the gimbal is unlocked and a the three e motor axes can rotate freeely before pow wering on the Osmo. Conttrol Stick Conttrols the pan and tilt motions of the caamera. Push left or right to o pan, up or d down to tilt. Shuttter Button Presssing this buttton will take photos based d on your setttings in the DJI D GO app. ord Button Reco Presss this button once to startt recording viideo, and agaain to stop recording. mera Status LEED Cam Indiccates the cam mera’s system m status.
Camera Status LED Description Solid Green Camera is functioning normally / Successful firmware upgrade. Solid Red Camera is not mounted on Osmo properly / Firmware upgrade or operation error. Blinks Green Shooting Photo. Blinks Green slowly Delay in shooting. Blinks Green for each shot Burst shooting. Blinks Red and Green alternately Upgrading firmware. Blinks Yellow Micro SD card warning (such as formatting initialization) Solid Yellow Micro SD card error. Blinks Red twice Camera error.
Triggger Button The SmoothTrackk mode is enaabled by defaault. When th he handle is ro otated left orr right, the camera will smoo othly pan and d slow down to t stop, when n the handle is rotated up p or down, the e camera will smoo othly tilt and slow down to o stop. Presss the Trigger Button and hold h will enab ble Lock Mod de. The camera will stay att the current position, no mattter how the handle h is rotaated. The Osm mo will switch h back to Smo oothTrack mo ode oncee the button is release.
DJI GO App You may see what the camera sees in your mobile device in a real time HD through DJI GO app, camera settings and gimbal settings can be configured in the app too. Download Search ‘DJI GO’ on the App Store or Google Play and download the app to your mobile device. Connecting to the DJI GO App 1. Pull down the power switch and hold for 1.5 seconds, then release to turn on the Osmo. Do not touch the gimbal during self‐check. 2.
DJI GO App Settings 1. Equipment-> Enter Camera View [1] Osmo Information Display ISO, Shutter Speed, EV, Current Battery Level, Wi‐Fi signal Strength. [2] Photo or Video Slide to switch photo or video mode. [3] Photo/Video Settings Photo Settings Single Single shoot, delay 5 sec or delay 10 sec shoot. Multiple Burst shooting 3/5/7 frames or Auto Exposure Bracketing (AEB) 3/5 bracketed frames at 0.7EV Bias. PANO Auto: The camera will automatically rotate 360 degree to take a panoramic photo.
Time Lapse: The video can be recording after the setting delay time. Slow Motion: The video can be recording in slow motion. [4] Shutter Button and Start/Stop Recording Button Tap once to shoot or start/stop recording. [5] Camera Parameters Settings Setting Camera mode, Iris (available when using Zenmuse X5 on Osmo), ISO, EV, and WB. [6] Play Back Button Tap to view your photo or video. [7] Time Bar Display the video recording time and remain recording time.
Smoothing affects the deceleration of the gimbal. A low smoothing value will cause the gimbal to stop abruptly. Max Control Stick Speed This setting represents the maximum speed of the tilt and pan axis when the stick is push all the way in any given direction. Roll Axis Adjustment Adjust the roll axis angle here. Increasing the positive value will rotate the roll axis clockwise while increasing the negative value will rotate the roll axis counter clockwise.
Synchronization All of the photos and videos will be automatically cached to your mobile device. Tap the □ icon on the right up corner and choose the video or photo to download to your local album. Edit Video 1. Original Footage All of the videos you have record will be show up in the Original Footage. Watch one of the videos by tapping it. Extract your best footage within the yellow rectangle by tapping the scissor button. The time of the yellow rectangle can be adjust from 6 seconds to 60 seconds.
4. Me If you already have a DJI account, you will be able to participate in forum discussions, earn Credits in the DJI Store, and share your artwork with the community. If you have any further questions, contact DJI on this page. Operation Modes Standard Mode Standard Mode can be used without any user input. Hanging Mode Holding the Osmo upside down will cause it to enter Hanging Mode, the camera will be able to capture in lower position while the footage is seen normal.
Flashlight Mode Rotate the Osmo for 90 degrees from the Stand Mode will enter to Flashlight Mode. Upgrade Using Micro SD card to Upgrade 1. Ensure the battery has at least 50% power and there is enough free space on the Micro SD card. 2. Download the newest firmware update package from download page of Osmo product page on DJI website. 3. Insert the SD card into your computer. Extract the .bin file into the root directory of the SD card.
‘Di‐Di‐Di‐Di” during the procedure. The gimbal will sounds ‘Di‐DiDi’ when upgrade successfully. If the upgrade is failed, the gimbal will sounds ‘Di‐‐‐‐‐‐‐“, please try to upgrade again. You may read the .txt file on the SD card to confirm the upgrade result. Maintenance It is recommend to lock the Osmo during transportation to protect the gimbal.
Mobile Device Holder Dimensions Tripod Weight Tripod Size (Folded) Gimbal ‐ ZENMUSE X3 Weight Output Power (With Camera) Angular Vibration Range Mounting Controllable Range Mechanical Range Max Controllable Speed Camera ‐ X3/FC350h Sensor Photo Resolution ISO Range Electronic Shutter Speed Max Image Size Still Photography Modes Video Recording Modes Max Video Bitrate Supported File Formats Supported SD Cards Operating Temperature Audio Output Intelligent Battery Model Type Capacity Charging Temperature O
FCC Warning Message Any Changes or modifications not expressly approved by the party responsible for compliance could void the user’s authority to operate the equipment. This device complies with part 15 of the FCC Rules. Operation is subject to the following two conditions: (1) This device may not cause harmful interference, and (2) this device must accept any interference received, including interference that may cause undesired operation.
This equipment complies with IC RF radiation exposure limits set forth for an uncontrolled environment. This transmitter must not be co‐located or operating in conjunction with any other antenna or transmitter. Any Changes or modifications not expressly approved by the party responsible for compliance could void the user’s authority to operate the equipment. KCC Warning Message “해당무선설비는 운용 중 전파혼신 가능성이 있으므로 인명안전과 관련된 서비스는 할 수 없습니다.