Ronin User Manual V1.0 2014.
Disclaimers and Warnings Congratulations on purchasing your new DJI product. Please read this manual and disclaimer carefully before using this product. By using this product, you hereby agree to this disclaimer and signify that you have read it in full. You agree that you are responsible for your own conduct and any content created while using this product, and for any consequence thereof.
Ronin User Manual Clean battery terminals with a clean, dry cloth. Do not expose batteries to extreme temperatures, including excessive heat. Do not leave the batteries inside vehicles on hot days. Do not allow batteries to come into contact with any kind of liquid. Do not leave batteries out in the rain or near a source of moisture. Do not leave batteries in a microwave oven or in a pressurized container. Do not attempt to dismantle, pierce or cut a battery. Do not attempt to repair batteries yourself.
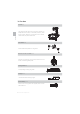
Contents Disclaimers and Warnings Using Lithium Polymer (LiPo) Batteries Usage and Storage Battery Disposal Using this manual Legend Download DJI Ronin Assistant App Introduction Package & Instruction Sheet In the box Gimbal Description Getting Started Smart Battery Tuning Stand Installing the Handle Bar onto the Gimbal Smart Battery Installation Mounting the Camera Handle Bar Adjustment Balancing Step1: Balancing the Tilt Axis Step2: Balancing the Roll Axis Step3: Balancing the Vertical Tilt Step4: Bala
Introduction Package & Instruction Sheet Air pressure may be built up during air transportation or during extreme barometric pressure changes. Loosen the pressure valve knob on the side of the case prior to transportation in these circumstances to prevent pressure build up. Pressure Valve Below is the layout of the items inside the case. Not every item in this sheet is provided by DJI. There are pre-cut slots for some additional accessories.
In the box Gimbal × 1 In the box The gimbal includes built-in DJI motor drive modules, an independent IMU module, a 32-bit DSP processor, power supply module, Bluetooth, transmitter/receiver module, camera shelf, and power breakout box. Handle Bar × 1 Customizable handle platform for the gimbal. Remote Control- 2.4 GHz × 1 Controls the movements of the gimbal, switches the work modes, and selects gimbal speed. Tuning Stand × 1 For suspending or storing the gimbal.
Ronin User Manual Cables × 3 ANSI & JIS & CE cables. Plug Adaptors × 2 In the box SAA & BS adaptors. Micro-USB Cable × 1 $ Camera Mounting Plate × 1 For mounting your camera onto the gimbal. Extension Rod Holder × 1 For installing extension accessories with the extension rods. Adjustable Length Extension Rod × 6 For installing extension accessories with the extension rod holder.
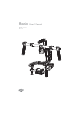
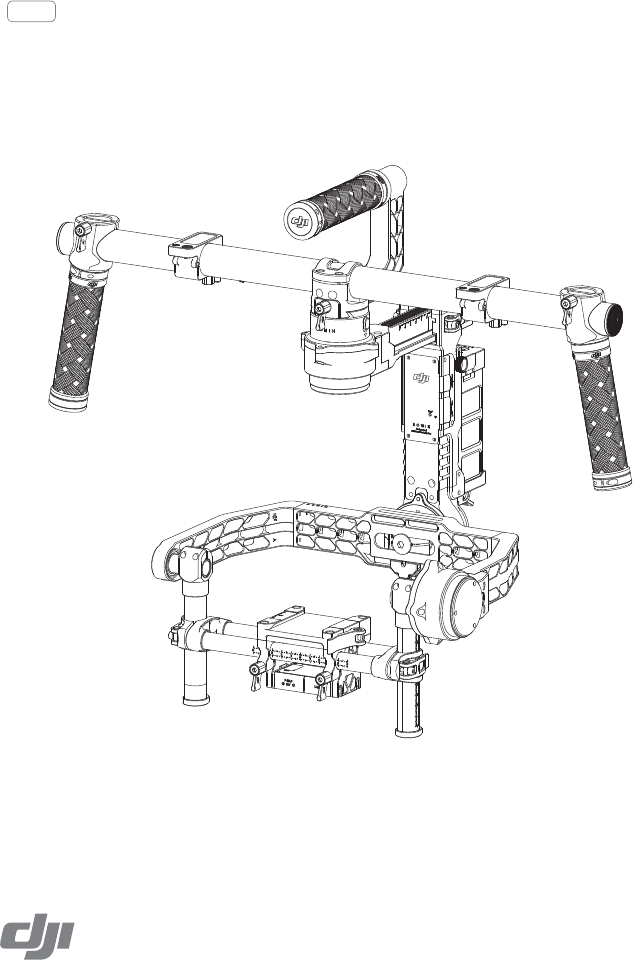
Gimbal Description [1] [2] [3] [4] [5] [6] [8] [7] [9] [10] Gimbal Description / Getting Started [11] [13] [12] [16] [14] [15] [17] [18] [19] [20] [21] [1] Top Handle Bar [2] Side Handle [3] Quick Release Mount [4] Pan Motor [5] Pan Adjustment Slider [6] D-BUS/PPM Receiver Port [7] USB port & Can Bus Port [8] Bind Button [9] Gimbal LED Indicator light [10] Smart Battery [11] Roll Motor [12] [13] [14] [15] [16] [17] [18] [19] [20] [21] Tilt Motor Fore and Aft Adjustment Tilt Vertical Adjustmen
Ronin User Manual DJI Smart Battery Functions Automatically balances the voltage of each battery cell during charging. Capacity Display Displays current battery levels. Overcharge Protection Charging stops automatically when the battery voltage reaches 16.8V to prevent overcharge damage. Over Discharge Protection Discharging stops automatically when battery voltage reaches 12V to prevent over discharge damage.
Ronin User Manual Using the Smart Battery [6] [1] [2] [3] [4] [5] [1] [2] [3] [4] LED indicator lights [5] Power Button (with one LED battery power indicator.) [6] Thumb Screws Getting Started Checking the battery level: When the battery is powered off, pressing the battery power button once will display the current battery level. Powering on: When the battery is powered off, press and hold for 1 second to turn on the smart battery.
Ronin User Manual [2] [3] [4] [1] Getting Started Installing the Handle Bar onto the Gimbal 1. The turn knobs on the handles are loose by default. Adjust the grips to the desired position and tighten the screws to secure their position. 2. Place the handle bar in the position as shown below. 3. Push the lock [1]downward on the pan motor, and slide the handle bar into the gimbal. Then tighten the lock-knob [2]. 4.
Ronin User Manual Smart Battery Installation 1. Loosen the thumb screws on either side of the battery. Slide the battery directly into the gimbal and then slide down. Be sure the battery’s thumb screws go down into their locating slots making full contact with the gimbal’s electrical leads. 2. Tighten the thumb screws on the battery to lock it in place. Getting Started Make sure the battery is powered off during the installation.
Ronin User Manual The lens support can be installed either facing outward or inward to accommodate different lens types. Ensure alignment of the camera plate and then tighten the screw prior to tightening the lens support. 3. If using follow focus or other accessories, insert the extension rod into the extension rod holder and { 4.