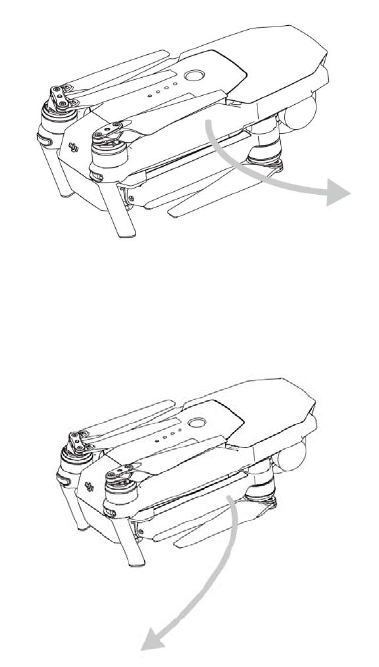
User Manual Setting Up Aircraft and Batteries The arms of the aircraft is folded on its delivery. Follow the instructions below to unfold the arms of the aircraft. Setting Up Aircraft 1. Rotate anti‐clockwise to unfold front arms towards the nose of the aircraft. 2. Rotate anti‐clockwise to unfold rear arms of the aircraft. 3. Unfold all propeller blades and ensure all blades are aligned.
4. Ensure the Intelligent Flight Battery securely attached to the aircraft. The Intelligent Flight Battery must be fully charged on its first use. Setting Up Remote Controller Unfold the mobile holder clamps and adjust the position of the antennas. 1. Insert the mobile devices into the space between the two mobile holder clamps.
2. Push the mobile holder clamps against the mobile device to secure its position. 3.Connect your mobile device with the a USB cable. You may also connect the mobile device to the charging port of the remote controller with the supplied multi‐purpose USB cable. Aircraft Diagram 1. 2. 3. 4.
5. 6. 7. Front LED Indicator Vision Positioning Sensors Aircraft Status Indicator 8. Control Mode Switch 9. Camera Micro SD Card Slot 10.
11. Camera Micro SD Card Slot Remote Controller Diagram [1] Antennas Relays aircraft control and video signal.
[3]Control Stick Controls the orientation and movement of the aircraft. [4] App Button Gain quick access to the feature in the DJI GO app. [5] Mobile Holder Clamp Adjust its width to accommodate the mobile device. [6] Intelligent Flight Pause Button Press once to allow the aircraft to exit from TapFly, ActiveTrack and Advanced mode. [7] Return Home (RTH) Button Press and hold the button to initiate Return to Home (RTH). [8] Remote Controller Status Screen Display system status of the remote controller.
[13] Video Recording Button Press to start recording video. Press again to stop recording. [14] Gimbal Dial Use this dial to control the tilt of the gimbal. [15] C1 Button Press C1 button once to launch the DJI GO app from the mobile device. [16] Lanyard Hole Used to secure the position of your lanyard. [17] Flight Mode Switch Switch between P‐mode, S‐mode [18] Charging Port Connect to the supplied charging cable for charging the battery.
Using Remote Controller Remote controller comes with a rechargeable battery. The battery level is displayed on the remote controller system status screen. Follow the steps below to power on the remote controller: 1. Press once and release to check the current battery level. 2. Press and hold the Power Button to turn on the remote controller. 3. The remote controller will beep when it is turned on, in addition, the battery level is displayed on the remote controller status screen. 4.
Charging 1.Connect the Battery Charger to a power source (100‐240 V 50/60 Hz). 2.Connect one end of the charger to the Intelligent Flight Battery to the Battery Charger. If the battery level is above 95%, turn on the battery before charging. 3.The Battery Level Indicator will display the current battery level as it is charging. 4.The Intelligent Flight Battery is fully charged when the Battery Level Indicators are all off. Disconnect the Intelligent Flight Battery from the Battery Charger. 5.
3. Launch the DJI GO app and enter the “Camera” view. Starting and Stopping the Motors Starting the Motors Push both sticks to the bottom inner or outer corners to start the motors. Once the motors have started spinning, release both sticks simultaneously. Stopping the Motors There are two methods to stop the motors. When the aircraft has landed, push the throttle down ① , then conduct the same CSC that was used to start the motors, as described above . Motors will stop immediately.
1. Power off the Intelligent Flight Battery then slide the Control Mode Switch to enable controlling the aircraft through mobile device. 2. Power on the remote controller then power on the Intelligent Flight Battery. 3. Enable WiFi connection on the mobile device, select “DJI Aircraft” from WiFi network list, and enter the default password “12341234”. 4. Launch DJI GO app from the mobile device and select “Camera” view. Connection is established if live view from the camera is displayed on the screen. 5.
Sensor 1/2.3” Effective pixels:12 M Lens FOV ( Field Of View ) 94° 20 mm ( 35 mm format equivalent ) f/2.8 focus at ∞ ISO Range 100‐3200(video) 100‐1600(photo) Electronic Shutter Speed 1/8 ‐ 1/8000 s Max Image Size 4000×3000 Still Photography Mode ingle shot Burst shooting: 3/5/7 frames Auto Exposure Bracketing (AEB) Time‐lapse HDR Video Recording Modes UHD: 4096×2160(4K) 24 / 25p 3840×2160(4K) 24 / 25 / 30p 2704×1520(2.
Capacity 3830 mAh Voltage 11.4 V Battery Type LiPo 3S Energy 43.6 Wh Weight around 235 g Operating Temperature 32° to 104° F ( 0° to 40° C ) Max Charging Power 100 W FCC Compliance Notice This device complies with Part 15 of the FCC Rules. Operation is subject to the following two conditions: (1) This device may not cause harmful interference, and (2) This device must accept any interference received, including interference that may cause undesired operation.
RF Exposure E Info ormation This M1X complies with FCC radiation r exp posure limits set forth for an uncontrolled environm ment. In order to avoid d the possibiility of exceeeding the FCC C radio frequ uency exposu ure limits, hu uman proxximity to the antenna a shall not be less than t 20cm du uring normal operation. ISED DC RSS Warniing This device complies with ISSEDC licence‐‐exempt RSS standard (s)).