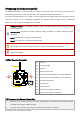
5Preparing the Remote Controller The PHANTOM 2 VISION+ remote controlleris a wireless communication device that uses the 5.8GHz frequency band. The link between the remote controller and aircraft isalready established before delivery. The remote controller default is set to Mode 2 and CE compliance before delivery. Both the operating mode and compliance version can be configuredin PHANTOM RC Assistant Software. Please referto and for details.
3. 4. Toggle the power switch to right end to switch on the power. There is a power on indicator beep. If the remote controller is set to be CE compliant, then there will be one beep while the FCCcompliant version will emit 2 beeps. The power indicator blinks greenquickly indicating the remote controller and receiver are binding. Once binding is completed, the power indicator will change to a solid green.
5.4 AntennaOrientation Try to keep the antenna pointingskyward, perpendicular to the ground, in order to achieve the maximum communication range during flight. The rem ote controller’ s antenna should be pointing skyw ard w ith no obstacles in the w ay.O therw ise, the Failsafe function m ay initialize prem aturely during flight. The M obile D evice and R ange Extender should not block the antenna. 5.
The yaw stickcontrols the aircraft rudder. Push the stickleft and the aircraft will rotate counter clock-wise. Push the stickright and the aircraft willrotate clock-wise.If the stick is centered, the aircraft will always fly in the same direction. The command stick controls the rotating angular velocity of the aircraft. Increasing movement of the command stick results in fasteraircraft rotation velocity. The pitchstickcontrols the aircraft’sfront & back pitch.
(2) For ‘Ready to Fly (non-GPS)’ the aircraft will keep the aircraft level without horizontal positioning when all sticks are released. 5.6 Link between the Remote Controller and Receiver A5.8G receiver is built-in PHANTOM 2 VISION+, its link button and indicator locatedon the bottom of the aircraft as illustrated in the following diagram. The link between the remote controller andreceiver isalready established before delivery.
position. Users should follow their local regulations accordingly. CE FCC (1) When adjusting the potentiometer knob to its limit position, be very careful to prevent damaging the potentiometer knob. Do not apply too much force during this adjustment. Also be sure to use the correct sized screwdriver. (2) CE compliant devices have an effective communication range of 300 meters in open spaces due to power limitations.
6Preparing the Range Extender The PHANTOM 2 VISION+ range extender is a wireless communication device that operates within the 2.4 GHz frequency band and is used for extending the effective range of communication between a mobile device (Smartphone) and the PHANTOM 2 VISION+. In an open unobstructed area, the transmission distance can reach up to 500 meters, but is usually affected by the surrounding environment, such as trees, buildings and other sources of the same frequency.
If the power indicator is a solid red light, the ranger extender may stop working at any moment.Recharge it as soon as possible. Reset Button Every time press the reset button once will reset the range extender, and the range extender will restart. Users have to bind the range extender with a PHANTOM 2 VISON+ again to rebuild a Wi-Fi network; otherwise the DJI VISION App will be failed to connect. 6.
Low battery capacity warning During flight, when the range extender is low battery capacity, a warning will appear in the camera page of DJI VISION App. 6.3Rename SSID of Range Extender For easier acknowledge the SSID of your range extender, users can rename SSID of range extender. 1. Tap “Rename SSID of Range Extender” in the Settings page. Enter a new name SSID name (e.g. Phantom_2 VISION+) in the textbox. 2.
R eset B utton 1. Power on the camera and range extender. 2. Approximately 30 seconds later, press the resetbutton on the range extender with a thin object until the SYSTEM Indicator turn off.The range extenderwill then restart automatically. 3. Approximately 30 seconds later, the SYSTEM Indicator should start to blink green, which indicates the range extender is now ready to be bound. 4. (Fig.1)Run the DJI VISION App->Settings->General->Binding. (Fig.
code, please contact DJI customer service to receive the QR code related to your camera’sserial number which is printed on the label of camera. (2) It’s suggested to capture the QR code and reserved the picture in your mobile device or PC, in case of lost the QR code on the package. ©2014 DJI Innovations. All Rights Reserved.
7Downloading and Installingthe DJI VISION App 7.1 Download and Install Download and install approaches Scan the QR code to get the download link. Download and install the DJI VISION App Approach1 Approach 2 on your mobile device. You can find the QR code on the‘Quick Start Guide’ as well iOS user ason the packaging of the PHANTOM 2 VISION+. Search “DJI VISION” from App Store, download and install on your mobile device.
to create a new account. A DJI account is available for all DJI assistant software and app. [2] Login Select ‘Login’ to enter the login page. Fill in your registered Email and Passwordand then tap You should login to your account the first time you use the DJI VISIONApp. to login. If you do have an account, but forgot the password, selectthe “Forgot password”to retrieve it. [3] Usage tips Useful tips will display when you enter the welcome page.Tap the screen to display the next useful tip.
©2014 DJI Innovations. All Rights Reserved.
8Connecting the Camera It’s important to using the mobile device connect the Wi-Fi network built by range extender and Wi-Fi module, the users can use DJI VISION App connect the camera and establish a live camera preview. 8.1 Connecting Procedures Please carry out the following procedures to connect a mobile device to thecamera of PHANTOM 2 VISION+. 1. Power on the remote controller and the range extender. 3. (Fig.1)Enable the Wi-Fi on your mobile device; wait for about 30 seconds, and then select 2.
Wi-Fi Connection Indicator Description Icon Solid green Solid blue Off Description Wi-Fi is now connected to the PHANTOM 2 VISION+. Wi-Fi is connected to another Wi-Fi network and NOT to the PHANTOM 2 VISION+. No Wi-Fi connection. (1) The SSID is unique for each PHANTOM 2 VISION+which should appear in your Wi-Fi list as Phantom_XXXXXX. (2) Android users can tap the SSID button on the main page to enter Wi-Fi settings of the mobile device directly. ©2014 DJI Innovations. All Rights Reserved.
Flight After the installation is completed,it’s recommended to take flight trainings refer to PHANTOM PILOT TRAINING GUIDE to enhance your flight skills or take adequate flight trainingsessions (such as running simulation or coaching by the experienced user) before you use the aircraft for the first time. Ensure that you have selected a proper location and environment for your flight.
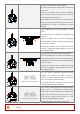
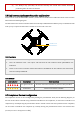
360 o R otate the aircraft horizontally Q uickly flip the sw itch S1 360 oR otate the aircraft vertically (N ose dow nw ard) Position-1 Position-3 Start cali Position-1->Position-3 ->Position-1 Flip 5 tim es or above LED Flight Indicator LED Flight Indicator LED Flight Indicator N orm alLED Start verticalcalibration Start horizontalcalibration Succeed Fail Position-1 R e-calibrate Position-3 Position-1->Position-3 ->Position-1 Flip once 1.
2 Starting the Motors A Combination Stick Command (CSC) is used to start the motors instead of simply pushing the throttle stick up. Push both sticks to their bottom corners as indicated in the diagram below to start the motors. Once the motors have spun up, release both sticks simultaneously. There are two methods to stop motors. Method 1: Conduct CSC again and motors will stop immediately.
(1) When the LED flight indicator blinks yellow rapidly during flight, the aircraft has entered into (2) A low battery capacity warning is indicated by the LED flight indicator blinking red slowly or (3) Failsafe mode, refer to for details. rapidly during flight. Refer to the for details. Watch the quick start video about flight for more flight information:www.dji.com/phantom2visionplus/training.
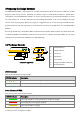
The flight control system will automatically control the aircraft to fly back to the home point and land. The figure below demonstrates the complete Failsafe landing process when the aircraft entered the Failsafe from the “Ready to Fly” status. 1 R ecord H om e Point. 2 Flying. 3 R em ote controller signallost. OFF CAM ON WIFI ON OFF CAM ON WIFI ON MICRO SD MICRO SD OFF CAM ON WIFI ON MICRO SD à LED Flight Indicator 4 Signallost lasts 3s,begin to go hom e.
Position-1 How to regain control When the S1 switch is switched to Position-1, toggle the S1 switch to any other position once to regain control. If remote controller’s signal is recovered, control is returned back to the pilot. ©2014 DJI Innovations. All Rights Reserved.51 | Position-2 Position-3 Regain control as soon as signal is recovered.
5Low Battery Capacity Warning Function The low battery capacity warning alerts users when the battery is close to depletion during flight. When it appears, users should promptly fly back and land to avoid accidental damage. The PHANTOM 2 VISION+ has two levels of low battery capacity warning. The default warning low battery threshold are 30% (first level warning) and 15% (second level warning) respectively.
DJI VISION App Usage The DJI VISION App controls the PHANTOM 2 VISION+ camera including capture and recording, settings, pitch angle adjustments,and displays essential status including flight parameters andbattery level. 1 DJI VISION App Main Menu After login you can see the GUI as shown below. The GUI shows the current Wi-Fi connection status and four main features of the App.
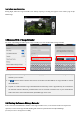
2Camera Page [5] [6] [7] [1] [8] [2] [9] [10] [11] [12] [3] [13] [4] [1] Return - Return to the preview page [2]Camera Pitch Control - Pitch Control switch is white whenin normal mode, tap once the switch will be highlight into the Accelerometer Sensor Mode.Tap once again to return to normal mode. Normal Mode Tap up arrow to pitch camera upwards and down arrow current camera pitch. and enter to pitch downwards.
(2) Compared with the control of mobile device movement in Accelerometer Sensor Mode, the control of remote controller is prior. 1) Camera Pitch Angle Control Pitch the mobile device forward to pitch down the camera. Pitch the mobile device inward to pitch up the camera.
[3]Flight Attitude and Radar Function Flight attitude is indicated by the flight attitude icon. (1) The red arrow shows which direction the PHANTOM 2 VISION+ is facing. (2) Blue and brown areas indicate its pitch. (3) Pitching of the brown and blue area shows roll angle. Tap the flight attitude icon to turn on the radar function. Home is located in the center of the radar and the red icon indicates thePHANTOM 2 VISION+’s current heading, direction, and approximate distance from home.
Altitude: Vertical distance from home point. Speed: Horizontal flying speed. Distance value will show as N/A if the PHANTOM 2 VISION+is not in“Ready to Fly” status. [5]Wi-Fi Signal Intensity Indicates camera is connected to your mobile device and Wi-Fi is working normally. The connection between the camera and mobile device may fail if Wi-Fi signal strength is low. Refer to the for more information.
(3) Micro-SD card is damaged. (4) Connection between the DJI VISION App and camera is broken. [10]Shutter Button Tap to take photos. Single capture: press once for a single capture. Continuous capture: press once for 3 or 5 captures. Timed capture: press once to begin a timed capture, press again to stop. (1) (2) Shutter button is disabled during video recording. Capture modes can be reconfigured in camera settings; refer to the.
3 Camera Settings [1] [2] [8] [3] [9] [4] [10] [5] [11] [6] [12] [7] [1]Capture Mode Single capture. 3 captures. 5 captures. Timed capture. Also selectable: a) b) Intervals between two shots (3~60 s) Number of shots (2~254, or number of picture is subject to the capacity of the memory card.) Capture Button will change according to the selected capture mode [2]Photo Size [3]Video Resolution Large: 4384 x 3288, 4:3, 14.