V 1.0 BETRIEBSANLEITUNG USER MANUAL CC 820 M Bestell-Nr. / Order No.
Seite / Page Deutsch .............................................................................................................. 4 English ............................................................................................................... 26 Anhang / Appendix: Technische Daten / Technical specifications ...........
Willkommen. Wir freuen uns, dass Sie sich für ein -Produkt entschieden haben. Mit dem CC 820 M haben Sie ein Gerät der Spitzenklasse erworben, bei dessen Konzeption und Entwicklung den Wünschen des audiophilen Musikliebhabers oberste Priorität eingeräumt wurde.
Inhaltsverzeichnis Bedienung Bedienelemente der Frontseite .............................................................................................. 6 Bedienung des CC 820 M Einlegen einer Cassette ......................................................................................................... Wiedergabe starten ............................................................................................................... Beenden der Wiedergabe .................................................
Bedienelemente der Frontseite Cassetten-Schublade Die Schublade wird durch Drücken des / -Tasters geöffnet und geschlossen. Schaltet das Gerät in die Aufnahmebereitschaft, wenn es sich in der Betriebsart STOP befindet. Die Leuchtdiode über dem Taster leuchtet bei Aufnahmebereitschaft. Die Cassette wird mit der Bandöffnung zur Innenseite des Gerätes in die CC-Schublade eingelegt (siehe auch 'Einlegen einer Cassette'). Langes Drücken dieses Tasters (ca.
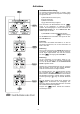
Multifunktions-Display (im PT 820 M) Das Display des PT 820 M informiert über den Betriebszustand und alle Geräteeinstellungen. Der CC 820 M zeigt in folgenden Bereich Informationen an: a Hauptanzeige In der Hauptanzeige werden kontextabhängig Informationen der Programmquelle oder zu einzelnen Bedienvorgängen dargestellt. Im normalen Abspielbetrieb wird hier die laufende Spielzeit angezeigt. b Aussteuerungsanzeige Nur während der Aufnahme aktiv.
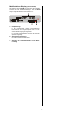
Bedienung des CC 820 M Einlegen einer Cassette Wiedergabe starten 1. Zum Öffnen der Schublade den Taster / an der Gerätefront drücken. Das Gerät besitzt ein Auto-Reverse-Laufwerk, das es gestattet, die Wiedergabe direkt von jeder der beiden Cassetten Seiten zu starten. Im Display erscheint: 'OPEN'. • Zur Wiedergabe von Seite A den Taster drücken. • Zur Wiedergabe von Seite B den Taster drücken. Das Display meldet entsprechend 'PB A' bzw.
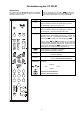
Fernbedienung des CC 820 M Allgemeines Auf der Abbildung sind die Taster ' ' markiert, die für die Fernbedienung des Recorders benötigt werden. Alle anderen Taster wirken nicht auf den CC 820 M. Zum Lieferumfang des M-Systems gehört die Fernbedienung F6, mit der alle wichtigen Funktionen des Gerätes fernbedient werden können.
Aufnahme Aufnahmevorbereitung Um optimale Aufnahme-Ergebnisse zu erzielen, sollten vor einer jeden Aufnahme die folgenden Arbeitsgänge durchgeführt werden: a) Bandmaterial einmessen (ATC) b) Exakt Aussteuern c) Balance einstellen d) ggf. Bias-Einstellung korrigieren Zum Einmessen des Bandmaterials wird der Taster an der Gerätefront ca. 1 Sekunde gedrückt gehalten. Die Arbeitsgänge b - c können sowohl aus der Aufnahmebereitschaft, als auch während der Aufnahme aufgerufen werden.
Aussteuern einer Aufnahme Manuelle BIAS-Korrektur Durch einen großen Dynamikumfang klingen Musikaufnahmen besonders lebendig. Der Dynamikbereich ist der Unterschied zwischen den sehr leisen und den sehr lauten Passagen. Der Einmesscomputer stellt entsprechend der Bandsorte die Vormagnetisierung (Bias) auf einen optimalen Wert ein.
Grundeinstellungen Einige Einstellungen müssen nicht ständig verändert werden. Sie werden in der Regel nur einmal durchgeführt. Dazu gehört: • die Wahl der Play-Betriebsart (s. Recorder Sonderfunktionen). • die Wahl des DOLBY-Rauschunterdrückungssytems (B, C oder NR OFF) durch Antippen des entsprechenden -Tasters. • bei Aufnahmen vom Tuner: Einschalten des MPXFilters (s. Recorder Sonderfunktionen).
Aufnehmen mit Synchrostart Über folgende M-Anlage: Für Aufnahmen vom CD 820 M und DVD 820 M ist eine Synchro-Start-Funktion vorhanden. Dabei wird bei der Bedienung des CC 820 M automatisch das Abspielen einer CD im CD 820 M / DVD 820 M gesteuert. Dadurch, dass die Steuerung nur durch den CC 820 M möglich ist, wird es möglich, z. B. während Aufnahmepausen am CD 820 M / DVD 820 M die CD zu wechseln oder ein anderes Stück zu wählen.
Recorder Sonderfunktionen Menüsteuerung PLAY-Betriebsart (Menüpunkt 1): Hinter dem Sonderfunktions-Menü verbergen sich die Recorder-Funktionen, die nicht durch einen eigenen Taster an der Gerätefront aufgerufen werden, sondern durch eine fernbedienbare Menüsteuerung: • Festlegen der PLAY-Betriebsart • Einmesscomputer (ATC) auf Standardwerte zurücksetzen (CLEAR ATC) (PLAY) • Ein- und Ausschalten des MPX-Filters Erläuterung: Die PLAY-Betriebsart legt fest, wie die beiden Cassettenseiten (Seite A und
CLEAR ATC (Menüpunkt 2): FILTER / NO FILTER (Menüpunkt 3): Erläuterung: Erläuterung: Durch Anwählen dieses Menüpunktes werden die durch den Einmesscomputer (s. -Taster) ermittelten Geräteeinstellungen auf Standardwerte zurückgesetzt. Bei einer Aufnahme von einem externen Tuner können Verzerrungen durch unhörbare Frequenzanteile (Trägerfrequenzen) entstehen, wenn dieser Tuner nicht mit einem MPX-Filter ausgestattet ist.
Begriffserläuterungen und Wissenswertes Aufnahmepegel Der Aufnahmepegel muss so eingestellt sein, dass die lautesten Passagen nicht den Dynamikumfang des Bandmaterials überschreiten und damit zu Verzerrungen führen. Andererseits darf der Aufnahmepegel auch nicht zu gering eingestellt sein, da sonst bei sehr leisen Passagen das Eigenrauschen des Bandes stören würde. Beim CC 820 M kann der Spitzenwert (Peak) des Aufnahmepegels auf dem Displayfeld dargestellt, und verändert werden.
Technische Beschreibung Compact-Cassetten Bandsorten-Erkennung Aufnahme- und Löschsperre Der CC 820 M ist mit einer automatischen BandsortenErkennung ausgestattet. Bei einer Aufnahme werden alle zuvor auf dem Band aufgezeichneten Stücke automatisch gelöscht (überspielt). Um ein versehentliches Überspielen wertvoller Aufnahmen zu verhindern, kann mit einem kleinen Schraubendreher o. ä. auf der Cassettenrückseite eine Zunge herausgebrochen werden.
Technische Beschreibung DOLBY-Rauschunterdrückungssystem Mit dem DOLBY-Rauschunterdrückungssystem wird das bei Magnetbandaufzeichnungen auftretende, störende Bandrauschen (Hintergrundrauschen) erheblich vermindert. Der CC 820 M ist mit dem DOLBY HX PRO HeadroomSystem ausgestattet. Dieses System wird bei der Aufnahme automatisch benutzt, so dass es nicht manuell eingeschaltet werden muss.
Installation Inbetriebnahme Sicherheitshinweise In diesem Kapitel werden alle Dinge von grundsätzlicher Bedeutung für die Aufstellung und Inbetriebnahme beschrieben, die nicht für den täglichen Umgang mit dem Gerät relevant sind, die aber trotzdem vor dem ersten Gebrauch gelesen und beachtet werden sollten.
Die Anschlusselemente des CC 820 M OUTPUT Der Ausgang des CC 820 M liefert ein Ausgangssignal von 0,745 Veff, 47 Ω. Die Cinchbuchsen sind für den Anschluss an die Eingangsbuchsen TAPE 1 - IN des Vorverstärkers PT 820 M vorgesehen. M LINK Anschlussbuchse für das M LINK-Kabel, den zentralen Steuer- und Versorgungsbus aller M-Geräte. INPUT Die Eingangsbuchsen sind entsprechend ihrer Kennzeichnung an die Ausgangsbuchsen des Vorverstärkers PT 820 M (TAPE 1 - OUT) anzuschließen.
Verkabelung • Stecken Sie alle Stecker fest in die Buchsen ein. Lockere Steckverbindungen können Brummen oder andere Störgeräusche verursachen. • Schließen Sie die Ausgangsbuchsen (OUTPUT) des CC 820 M an die Eingangsbuchsen (TAPE 1 IN) des Vorverstärkers an, wobei 'R' mit 'R' und 'L' mit 'L' verbunden werden müssen. Bei umgekehrtem Anschluss sind die Stereokanäle vertauscht.
Sicherheitshinweise Alle in diesem Gerät verwendeten Bauteile entsprechen den geltenden deutschen und europäischen Sicherheitsnormen und –standards. Eine genaue Qualitätsprüfung aller Materialien, die sorgfältige Produktion sowie die vollautomatische, rechnergesteuerte Endkontrolle eines jeden Gerätes gewährleisten die hohe Produktqualität und die Einhaltung aller Spezifikationen.
Betriebsstörungen Viele Betriebsstörungen haben eine einfache Ursache, die sich leicht beheben lässt. Störung: Der Ton ist bei der Wiedergabe unregelmäßig oder verzerrt. Im folgenden Abschnitt sind einige mögliche Störungen sowie Maßnahmen zu deren Behebung aufgeführt. Ursache 1: Aufnahmepegel zu hoch oder Vormagnetisierungspegel (Bias) zu gering eingestellt. Abhilfe: Korrekt einpegeln wiederholen. Ursache 2: Köpfe verschmutzt. Abhilfe: Nach jeweils ca.
English 25
Welcome. We are delighted that you have decided to purchase a product. With your new CC 820 M you have acquired a topquality piece of equipment which has been designed and developed with the wishes of the audiophile music lover as absolute top priority. This system represents our very best efforts at designing practical electronic equipment incorporating solid quality, userfriendly operation and a specification and performance which leaves nothing to be desired.
Contents Operating Front panel controls .............................................................................................................. 28 Operating the CC 820 M Inserting a cassette ............................................................................................................... Starting playback .................................................................................................................. Ending playback .....................................................
Front panel controls Cassette tray When the unit is in STOP mode you can switch it to "record ready" mode by pressing the REC button. The LED above the button glows when the deck is ready to record. Press the / button to open and close the tray. Place the cassette in the CC drawer, with the tape opening facing the inside of the machine (see also 'Inserting a cassette'). / A long press on this button (about 1 second) switches Memory Stop on and off.
Multi-function screen (on PT 820 M) The PT 820 M’s integral screen provides information about the machine’s operating state and all its settings. The CC 820 M displays information in the following areas: a Main display The main screen shows context-related information on the program source or individual operating processes. During normal playback the screen displays the current track and playing time. b Overload display Only active during recording.
Operating the CC 820 M Inserting a cassette Starting playback 1. Press the / button on the front panel to open the cassette drawer. The machine features an auto-reverse tape mechanism which enables you to start playback directly from either of the two cassette sides. The screen displays 'OPEN'. • To play Side A press the button. • To play Side B press the button. The screen displays the appropriate message 'PB A' or 'PB B'; the digital tape counter starts running.
Remote control of the CC 820 M General information In the drawing alongside the buttons marked "" are those required to control the cassette recorder. None of the other buttons affect the cassette deck. The M-System is supplied complete with the F6 remote control handset, which provides remote control of all the player’s most important functions.
Recording Preparing to make a recording If you wish to obtain optimum results when making a recording, it is important that you carry out the following procedure every time: a) Calibrate the tape material (ATC) b) Set the recording level accurately c) Adjust the balance d) Correct the bias setting if necessary After a long press on the button the ATC circuit checks the tape in the cassette, and adjusts the machine for a perfectly linear frequency response.
Setting the recording level Manual BIAS correction Music recordings sound especially lively if the dynamic range is wide. The dynamic range is the difference in level between the very quiet and the very loud passages. The automatic calibrator adjusts the tape deck to the optimum value for tape bias, matching the type of tape in the machine.
Basic settings Certain adjustments do not need to be made every time you make a recording; you just need to make them once. Amongst them are: • Choice of play mode (see 'Special Recorder Functions'). • Choice of DOLBY noise reduction system (B, C or NR OFF) by pressing the appropriate button. • When recording from the tuner, MPX filter on / off (see Special Recorder Functions).
Recording using Synchro-Start A Synchro-Start function is provided for recording from the CD 820 M and DVD 820 M. When you use this function the CC 820 M automatically controls the playback of the CD in the CD 820 M / DVD 820 M. Since the CC 820 M has sole control over the procedure, it is possible, for example, to change the CD in the CD 820 M / DVD 820 M during recording breaks, or choose a different piece.
Special recorder functions Menu control system PLAY mode (Menu point 1): The Special Functions Menu contains those recorder functions which do not have their own direct control buttons on the front panel.
CLEAR ATC (Menu point 2): FILTER / NO FILTER (Menu point 3): Introduction: Introduction: Selecting this menu point resets the automatic tape calibrator ( button) values to the recorder's default settings. When recording from an external tuner distortion may result due to inaudible frequency signals (carrier frequencies), if this tuner does not have an MPX filter. You can eliminate these unwanted signals by switching on the MPX filter.
Explanation of terms, useful information Automatic calibrator (ATC) The CC 820 M is equipped with a computer-based tape calibrator (Automatic Tape Calibration). The computer checks the sensitivity of the tape material in the machine at three frequency ranges (500 Hz, 5 kHz and 12 kHz), then adjusts the machine's settings to provide an optimum linear frequency response when making a recording.
Technical description Compact-Cassettes Tape type detection Record / erase protect tabs The CC 820 M is equipped with automatic tape type detection. When you make a recording all the music previously on the tape is automatically erased (overwritten). To prevent the danger of accidentally erasing precious recordings, cassettes are fitted with tabs on the rear face which can be broken out to prevent overwriting, using a small screwdriver or similar tool.
Technical description DOLBY noise reduction system The DOLBY noise reduction system substantially reduces the tape noise (background hiss) which occurs when a signal is recorded onto magnetic tape. The CC 820 M features the DOLBY HX PRO headroom extension. This system is applied automatically during the recording process, and does not have to be switched on manually.
Installation Using the unit for the first time Safety notes This section describes all those matters which are of fundamental importance when setting up and first using the equipment. This information is not relevant in daily use, but you should nevertheless read and note it before using the equipment for the first time.
Connections to the CC 820 M OUTPUT The CC 820 M's output supplies an output signal of 0.745 Veff, 47 Ω. The cinch sockets are designed for connection to the PT 820 M pre-amplifier's TAPE 1 - IN input sockets. M LINK Socket for the M LINK cable - the central control and power supply bus for all M-system components. INPUT The input sockets should be connected to the PT 820 M pre-amplifier's TAPE 1 - OUT output sockets, taking care to connect L to L, R to R.
Wiring • Push all plugs firmly into their sockets. Loose connections may cause hum or other unwanted noises. • Connect the output sockets (OUTPUT) on the CC 820 M to the input sockets (TAPE 1 IN) on the pre-amplifier, taking care to connect 'R' to 'R' and 'L' to 'L'. If you mix up the connections, the stereo channels will be reversed. • Connect the input sockets (INPUT) on the CC 820 M to the output sockets (TAPE 1 OUT) on the pre-amplifier, taking care to connect 'R' to 'R' and 'L' to 'L'.
Safety notes All components used in this device meet the current German and European safety norms and standards. For your own safety please be sure to read right through these operating instructions. It is especially important to observe the safety notes and the instructions regarding setting up and operating the equipment.
FCC Information to the user (for use in the United States of America only) Class B digital device – instructions: Note: This equipment has been tested and found to comply with the limits for a Class B digital device, pursuant to Part 15 of the FCC Rules. These limits are designed to provide reasonable protection against harmful interference in a residential installation.
Trouble shooting Many problems have a simple cause which is simple to put right. Problem: On playback the sound fluctuates or is distorted. In this section we list a number of possible problems together with the method of eliminating them. Cause 1: Record level set too high / bias level set too low. If you meet a problem which cannot be sorted out using these notes, then please disconnect the mains supply at the wall socket and contact an authorised service workshop without delay.
Anhang / Appendix Technische Daten / Specification Laufwerk / Tape drive unit hochwertige Autoreversemechanik mit drei Metallschwungmassen, verschleißarmer Revolverkopf high-quality auto-reverse mechanism with three metal flywheels, low-wear revolver head mechanism Signalverarbeitung / Signal processing Dolby Rauschunterdrückung B + C HX-PRO Headroom Extension abschaltbare MPX-Filterung 19 / 38 kHz DOLBY B + C noise reduction HX-PRO headroom extension MPX filtering 19/38 kHz, switchable System 4-Spur,
elektroakustik GmbH & Co. KG Postfach 2938 * D - 32019 Herford www.TAelektroakustik.