OPERATING INSTRUCTIONS CD - RECEIVER K1 V 5.
Dear fellow Hi-Fi enthusiast, The new K1 CD-RECEIVER you have just purchased is a Hi-Fi system of the highest quality, designed and developed with a single aim as top priority: to meet the wishes of the audiophile music lover. The robust all-metal cases which we use offer a real and practical advantage, since they exclude any possibility of external sources of interference affecting the quality of reproduction.
IMPORTANT! CAUTION! This product contains a laser diode of higher class than 1. To ensure continued safety, do not remove any covers or attempt to gain access to the inside of the product. Refer all servicing to qualified personnel. The following caution label appear on your device: Rear panel CLASS 1 LASER PRODUCT On the inner protective housing of the CD mechanism CAUTION: VORSICHT: ATTENTION: DANGER: VISIBLE AND INVISIBLE LASER RADIATION WHEN OPEN.
CONTENTS Page 6 8 Remote cotroll handset F12 Front panel controls 10 10 10 10 21 OPERATING THE AMPLIFIER Controlling from the front panel Volume control Selecting the source unit Remote control Switching on / Stand-by Volume control Speaker outputs Loudness / Low bass equalisation Selecting the source unit Amplifier special functions • Balance adjustment • Tone control, treble / bass • Set-up functions Funct.1 Dimmer (Display brightness) Funct.2 Setting the clock Funct.
Page 33 33 33 33 34 34 35 35 35 36 38 39 40 41 OPERATING THE CD PLAYER Controlling from the front panel Playing a CD Selecting a track during playback Remote control CD player as auditioning source Controlling the CD mechanism Stop - Pause – Play Numeric track selection MEMO program CD player special functions • Play A-B • Play mode (Normal /Repeat / Mix) • Track / Time display 42 Safety notes 44 Connection terminals on the K1 46 Connecting the system, the system in use 47 K1 wiring arrangement 48
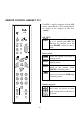
REMOTE CONTROL HANDSET F12 Your K1 is supplied complete with an F12 remote control handset. The relevant buttons are shaded in the diagram in like this: ’’. F12 A ON / OFF: Switches the unit ON from standby, or to stand-by from ON. The K1 must be switched on at the main ON/OFF switch for this to work. B CD/DVD TUNER + AUX V O L TAPE PAUSE Source select: Selects the integral CD player as listening source. Selects the integral tuner as listening source.
Pre-amplifier functions: Raises / lowers the volume in 1.25 dB increments. Switches the loudspeaker output A On / Off. Switches the loudspeaker output B On / Off. Short keypress: Switches LOUDNESS On / Off. Long keypress (approx. 1 sec.): Switcess low bass enhancement On / Off. Special functions In tuner mode this button switches radio text display for the current station ON/OFF. In CD mode this button switches the display from DIS TIME to DIS TRACK.
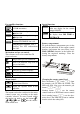
THE FRONT PANEL CONTROLS 1 2 3 4 5 6 7 8 9 10 The screen also shows supplementary information when required, i.e. seldom needed, machine-specific data. This information is shown in an alpha-numeric area, in plain language with the help of symbols. For further information please read the appropriate chapters. We have developed an overall methodology for controlling the system based on a small number of buttons, each of which has several functions depending on the situation.
SOURCE SELECT PLAY The term source device means the components of a Hi-Fi system which supply a sound signal, such as tuner, CD player, cassette deck etc. Pressing the button shows the system's currently active source device on the screen.
OPERATING THE AMPLIFIER Press the button briefly to change the auditioning device. VOLUME CONTROL The machine features a digital volume control system. Every time you press a button, the volume is … • The current auditioning source (e.g. Tuner) is now shown on the screen: 'TUNER'. … increased (right-hand button) • Pressing the button repeatedly cycles through all the auditioning sources on the screen. or … reduced (left-hand button) by 1.25 dB.
OPERATING THE AMPLIFIER BY REMOTE CONTROL GENERAL INFORMATION In the drawing of the remote control handset shown alongside the buttons marked " " are those which are used to control the amplifier. None of the other buttons have any effect on the amplifier ON If the system is already switched on, the button on the remote control handset switches the system to stand-by mode. In stand-by mode the screen just shows the time of day.
VOLUME CONTROL LOUDNESS / LOW BASS EQUALISATION Every time you press the VOLUME rocker the volume level is reduced ( ) or increased ( ) by 1.25 dB. Short keypress: Switches LOUDNESS On / Off. Long keypress (approx. 1 sec.): Switcess low bass enhancement On / Off. If you hold the rocker pressed in for more than one second, the volume alters continuously until you release the rocker again.
AMPLIFIER SPECIAL FUNCTIONS MENU CONTROL SYSTEM The special functions menu contains those amplifier functions which cannot be accessed directly by their own buttons on the front panel. Instead they are accessed and controlled by a menu control system operated from the remote-control handset. • Balance setting • Bass tone control • Treble tone control • Set-up functions The menu system is controlled using the remote control , , , and . Opens the amplifiers special functions menu.
Menu point 1: BALANCE CENTER 0 AMP OK Any change you make takes effect immediately. The function is terminated by pressing the button. Introduction: The 'BALANCE' function is used to adjust the balance between the left and right channels, e.g. to compensate for non-symmetrical speaker positioning. The balance setting is infinitely variable.
Menu point 2 + 3: BASS + TREBLE press BASS 00 AMP OK 2x press TREBLE 00 AMP OK 3x These settings can be altered over the range Introduction: The system features active tone control facilities. The tone controls are designed to compensate for the negative effects of adverse loudspeaker positions or unusual conditions in the listening room. - 14 dB (less bass / treble) to +14 dB (more bass / treble) ( or –button) Any change you make takes effect immediately.
Menu point 4: SETUP The diagram below shows the inegration of the set-up functions into the amplifier special functions.
Menu point 4: SETUP - press SETUP function 1: DIMMER SETUP AMP DIMMER 8 OK OK 4x Introduction: The brightness of the screen on the front panel can be set to any of eight levels (1..8): Operation: To alter screen brightness press the remote control buttons in the sequence shown above. 'DIMMER 1' = darkest level The screen then shows the current brightness level (e.g. 3): : 'DIMMER 3' 'DIMMER 8' = brightest level You can change the current setting by pressing the remote control buttons or .
Menu point 4: SETUP - press AMP 4x SETUP function 2: SETTING THE CLOCK SETUP OK press 10-25 CLK AMP OK 1x Introduction: The presence of the integral clock allows you to set the machine to switch itself on automatically at a pre-programmed time. To use this facility you must first set the clock to the correct time. Operation: You can change the set time by pressing the the remote control buttons in the sequence shown above. The screen shows the time of day which is currently set, e.g. '10-25 CLK'.
Menu point 4: SETUP - SETUP function 3: SEPARATE VOLUME ADJUSTMENT press AMP 4x SETUP OK press VOL A/B AMP OK 2x Introduction: In normal the volume of the speaker output A and B are controlled in common. Operation: To alter the option press the remote control buttons in the sequence shown above. The screen shows the current setting, e.g.
Menu point 4: SETUP - SETUP function 4: INPUT SENSITIVITY AUX/TV SETUP AMP OK 4x press AMP OK 3x Introduction: The sensitivity of the AUX/TV input can be changed to any of four settings so that you can continue to use source devices which are quieter than normal without suffering a disturbing change in volume when you switch from one source to another: 'AUX 'AUX 'AUX 'AUX AUX MIN Operation: To alter input senstivity of the AUX/TV input press the remote control buttons in the sequence shown above.
OPERATING THE TUNER PRESET SELECTION TUNER DISPLAY ELEMENTS When you want to listen to the tuner you must first select it as the current auditioning source. This is done by pressing the button repeatedly until the word 'TUNER' appears on the screen. STEREO INDICATOR This symbol lights up if the station you have selected is broadcasting a stereo signal.
Pressing the button again cancels the timer. The screen confirms this by showing the message 'ALARM OFF' briefly. If you now switch the machine to STANDBY mode when the timer has been set to active (by pressing the button at the front of the unit or on the RC handset), then it will switch itself on again at the programmed time. TIMER The system incorporates an integral clock module which can be set to switch the machine on automatically at a fixed time of day.
OPERATING THE TUNER BY REMOTE CONTROL GENERAL INFORMATION The tuning button on the machine's front panel provides only limited control of the tuner. The remote control handset provides full control in the most convenient manner. To be able to remote-control the tuner the F12 remote control handset must be set to HiFi operation and the tuner must be selected as the auditioning source. The handset only controls currently auditioning source.
SELECTING A PRESET AND STATION Note: NUMERIC PRESET SELECTION Calls up the preset with the next lower preset number; empty memory spots are automatically skipped. Calls up the preset with the next higher preset number; empty memory spots are automatically skipped. Pressing this button briefly drops the reception frequency of the tuner by a 25 kHz step Pressing this button briefly raises the reception frequency of the tuner by a 25 kHz step.
SWITCHING RADIOTEXT ON / OFF DISPLAYING PRESET NUMBERS AND RECEPTION FREQUENCY Pressing this button briefly switches the radiotext display on and off for the station currently selected. When first switched on the machine’s screen displays Pressing this button briefly replaces the RDS station name on the screen with the current preset number, together with the associated station frequency. This information stays on the screen for about two seconds. 'RADIOTEXT' until a new message is displayed.
TUNER SPECIAL FUNCTIONS MENU CONTROL SYSTEM The special functions menu contains the tuner functions which cannot be accessed by their own buttons on the front panel. Instead they are controlled via a remote-control menu system: Changing the reception mode (ReCeiVeMode) (RCVM) Storing and erasing presets (PRESET) The menu system is operated using the remote control buttons , , and . This button opens a menu offering two tuner special functions.
Menu point 1: RCVM RCVm NORM SRC OK Introduction: The tuner can be set to any of three different reception modes (ReCeiVeMode = RCVM). Reception mode normal STEREO normal STEREO with aerial attenuator MONO Selecting the reception mode 'RCVM MONO' automatically reduces the search threshold. The automatic station search function now also stops at distant, weak and slightly "hissy" stations.
Menu point 2: PRESET - PRESET function 1: STORING PRESETS MANUALLY press SRC P28 104,90 .. OK 9 OK or 2x To store the setting under the current pre-set number you must press the button. The screen then shows the message 'STORE' for a brief period instead of the frequency. The pre-set is now stored, and the MANUAL STORE process is ended. Introduction: The tuner can store a total of 60 station settings (presets).
Menu point 2: PRESET - PRESET function 2: AUTOMATIC PRESET STORING (AUTOSTORE) press SRC P01 AUTO .. OK 9 OK or 2x Introduction: If you select automatic preset storing, the tuner automatically searches the whole VHF band twice (using different search thresholds) for stations which can be received well in STEREO mode, and automatically stores the stations it finds. Operation: To use the AUTOSTORE function press the remote control buttons in the sequence shown above.
You can interrupt the PRESET function AUTOSTORE by pressing the or button. Note: The tuner is not capable of assessing the quality of each individual station, so it provides the user with a means of editing the presets manually. The same facility is useful if you find that stations have been stored whose RDS station name was not recognised in full by the AUTOSTORE function, or that a station failed to broadcast its RDS name in accordance with the RDS norms.
Menu point 2: PRESET - PRESET function 3: ERASING A PRESET press SRC P28 CLEAR OK OK 2x Introduction: Presets which contain stations of such low quality that they are not worth listening to, or which contain a duplicate station on a different frequency, should simply be erased. Operating: First call up the preset to be erased, either by entering the number directly or using the / buttons, then press the remote control buttons in the sequence shown above.
OPERATING THE CD PLAYER You can interrupt playback temporarily at any time by pressing the button. During the interruption the screen shows 'PAUSE'. Press the button a second time to resume playback. To play a CD: • Open the CD drawer ( / button) • Place a CD in the drawer, printed face up. If you press the button during playback, the player jumps to the start of the next track.
OPERATING THE CD-PLAYER BY REMOTE CONTROL GENERAL INFORMATION You can operate all the CD mechanism's facilities and all the system's special functions from the remote control handset, with the exception of opening and closing the CD drawer. F12 To be able to remote-control the CD player CD must be selected as the auditioning source. The handset only controls currently auditioning source. CD/DVD In the drawing shown here the buttons marked ' ' are those which are needed to control the CD player.
CONTROLLING THE CD MECHANISM NUMERIC TRACK SELECTION Direct numeric input for selecting a track number. : When you press a numeric button (e.g. 1) the screen shows: 'SELECT 1_. Selects the previous track during playback. Starts CD playback, selects the next track during playback. Fast search backwards to locate a particular passage. Fast search forward to locate a particular passage. Note: After about two seconds the search speed rises.
MEMO-PROGRAM Hold presses in OK for about 3 sec. PROG 1 .. 9 OK .. PROG 8 .. 9 or or SELECT TRACK SELECT TRACK Introduction: Each MEMO program can store up to twenty CD tracks in any sequence; it is useful, for example, when you are preparing to make a cassette recording. You can only produce a MEMO program for the CD actually in the drawer. The program is stored in the machine until you erase it again, or until you open the CD drawer. Hold pressed in OK OK for about 3 sec.
Playing back a MEMO program: Erasing a MEMO program: The MEMO program can now be played back: Pressing the / button when the machine is in STOP mode opens the CD drawer and erases the MEMO program. ( / button) • Start the playback process ( button) You can also erase a MEMO program without opening the CD drawer: Playback begins with the first track of the MEMO program. While a MEMO program is being played back, the screen shows a letter 'P' before the current track number.
CD PLAYER SPECIAL FUNCTIONS MENU CONTROL SYSTEM The special functions menu contains the CD player functions which cannot be accessed by their own buttons on the front panel. Instead they are operated by a remote-controlled menu system: • PLAY A-B The menu control system is operated using the remote control buttons , , und . Opens the menu with the three CD player special functions. Repeat pressing the button would display the menu points in next order. Menu point 1. 'PLAY AB' Menu point 2.
Menu point 1: PLAY A-B SRC PLAY AB 8 PLAY AB 8 OK OK START MARKER END MARKER OK Introduction: The PLAY A-B mode places two time markers on the current CD, and the machine then repeats the passage between the two markers constantly. After a short delay a flashing letter 'B' appears on the screen, requesting you to enter the end marker; press the button again at the end of the passage you want to hear repeated. Operation: First locate the starting point of the passage. ( / or / buttons).
Menu point 2: REPEAT / MIX-MODE / NORM-PLAY REP OFF press SRC OK 3x Introduction: The system's integral CD player can play CDs in any of three different operating modes. 'REP OFF': 'REP ALL': 'REP TRACK': 'REP MIX': Operation: This menu point allows you to change the playback mode. Place the CD in the machine and then press the remote control buttons in the sequence shown above.
Menu point 3: DISPLAY press DIS TRACK SRC OK 2x Introduction: Most CDs contain several tracks. However, the tracks on some CDs can be very long, especially when they contain classical music. Operation: To switch the track play time display on or off press the remote control buttons in the sequence shown above.
SAFETY NOTES Please read through these operating instructions carefully before you attempt to use your new equipment. It includes important safety notes which must be observed! 8. Take particular care with plugs, distribution panels and connections at the amplifier. Never exert undue force on mains connectors. 1. This unit must be operated in dry conditions. It should be set up well out of reach of small children. 9.
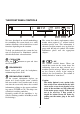
THE CONNECTION TERMINALS OF THE K1 CD-RECEIVER SHOCK HAZARD. DO NOT OPEN! RC IN VOR ÖFFNEN DES GERÄTES NETZSTECKER ZIEHEN! R L AUX / TV ANT 1 2 R IN L TAPE R OUT 3 L SUBW 4 R A DIGITAL CD-OUT L 5 MADE IN GERMANY FABRIQUE EN ALLEMAGNE 6 ANT R B 7 250VA 230V~ 50-60Hz L 8 9 A AERIAL INPUT The system is fitted with a 75 Ω aerial input socket marked ANT which is designed to accept a standard domestic aerial. It also accepts a cable radio connection.
RC-IN • The K1 must not be connected to any other type of power supply. Input socket for an E 2000 remote control receiver, available as an optional accessory to suit multi-room operation. • Mains leads must be deployed in such a way that there is no danger of damage to them (e.g. through persons treading on them or from furniture). • If the machine is not to be used for a long period, disconnect it from the mains supply at the wall socket. MAINS INPUT The mains cable is plugged into this socket.
CONNECTING THE SYSTEM, THE SYSTEM IN USE There must be at least 5 cm free space on both sides of the system, and at least 15 cm free space above and behind it, so that the heat produced by the machine can disperse freely in the ambient air. If the unit is set up on a shelf or in a cupboard compartment, it must not be enclosed by doors. Any heat build-up may shorten the unit's effective life, and could be a source of danger. Unpack your K1 carefully and keep the original packing in a safe place.
The remote control receiver is located within the screen on the front panel. The sketch below shows the operating radius of the remote control system F12. For this reason it is important to set up the system in a position where there is direct line-of-sight contact between the remote control transmitter and the screen. Maximum range between transmitter and receiver is approximately 6 metres. Check that the receiver is not subjected to direct sunlight and strong artificial lighting.
Multi-room sound system (MULTIROOM) If you decide to use the K1 as the basis of a sound system serving more than one room, we recommend the following configuration (see appropriate wiring diagram): Note: The cable from the separate remote control receiver can be extended up to a total length of 50 metres. • The system is located in the main listening room (Room A). The speakers connected to the loudspeaker output A are in the same room.
R.H. SPEAKER L.H. SPEAKER ROOM A SHOCK HAZARD. DO NOT OPEN! RC IN VOR ÖFFNEN DES GERÄTES NETZSTECKER ZIEHEN! ANT R L AUX / TV R IN L TAPE R OUT L SUBW R A DIGITAL CD-OUT L MADE IN GERMANY FABRIQUE EN ALLEMAGNE R B 250VA 230V~ 50-60Hz L AERIAL E 2000 R.H. SPEAKER L.H.
SPECIFICATION AMPLIFIER SECTION Input sensitivity AUX/TV TAPE IN 250 mV ...
CD PLAYER Precision mechanism, LDGU-Optics, semi conductor laser 780 nm / 2 mW Mechanism Quartz-controlled, fluctuations not measurable Wow and flutter 8-times FIR Oversampling Sigma/Delta, 24-Bit-resolution D/A converter system Frequency response +0 -0,2 dB Total harmonic distortion / intermodulation Effective system dynamics Signal noise ratio (A-weighted) Signal noise ratio (unweighted) Digital output 2 Hz ..
TROUBLE-SHOOTING Many problems have a simple cause and a correspondingly simple solution. The following section describes a few difficulties you may encounter, and the measures you need to take to cure them. Cause2: No visual contact between system and remote control transmitter. Remedy: Ensure direct line-of-sight contact to the remote control transmitter.
F12 - Changing the RC address: Press the buttons and from the numeric pad for about 10 seconds. The LED will flash. Number button sets the remote control handset to the normal remote control level; number button sets the alternative level. The LED will go out to confirm that the switch has taken place.
Tuner section Problem: The auditioning source responds to control commands, but the system produces no output signal. Loudspeaker outputs switched Cause: off; 'A' or 'B' not glowing on the screen. Remedy: Press the appropriate button or on the RC handset to switch on the speakers. Problem: Cause1: Remedy: Problem: Loud hum from the speakers when playing back through TAPE or AUX/TV. Poor contact of a Cinch plug or a Cause: faulty Cinch lead. Remedy: Please check all connections and cables.
Problem: The tuner works normally, but only picks up a very small number of stations or none at all. The aerial system or the aerial Cause: cable itself is defective. Remedy1: Check the aerial lead for good contact at the aerial wall socket and at the tuner. Remedy2: Check the aerial cable for damage and sharp bends (kinks). If necessary, replace it with a new cable. Problem: After a house-move the screen continues to show a few of the old station names - but those stations cannot be picked up.
CD - player Problem: Cause1: Remedy: The CD is not correctly recognised, or the screen displays the message "No Disc". The CD is not correctly inserted. Place the CD centrally in the drawer, printed face up. Cause2: Remedy: The CD is dirty. Clean the CD and try again. Cause3: The CD is damaged in the area of the Table of Contents (TOC). No remedy; the CD is unusable.
FCC Information to the user (for use in the United States of America only) Class B digital device – instructions: Note: This equipment has been tested and found to comply with the limits for a Class B digital device, pursuant to Part 15 of the FCC Rules. These limits are designed to provide reasonable protection against harmful interference in a residential installation.
elektroakustik GmbH & Co KG Herford * Germany