V1.0 USER MANUAL DVD 1235 R Order No.
Welcome. We are delighted that you have decided to purchase a product. With your new DVD 1235 R you have acquired a top-quality piece of equipment which has been designed and developed with the wishes of the audiophile music lover as absolute top priority. Our innovative approach to solving problems, solid and carefully thought-out construction, and the highest quality materials ensure that this unit will satisfy your greatest demands and requirements over a period of many years.
IMPORTANT! CAUTION! This product contains a laser diode of higher class than 1. To ensure continued safety, do not remove any covers or attempt to gain access to the inside of the product. Refer all servicing to qualified personnel. The following caution label appear on your device: Rear panel CLASS 1 LASER PRODUCT On the inner protective housing of the DVD mechanism CAUTION: VORSICHT: ATTENTION: DANGER: VISIBLE AND INVISIBLE LASER RADIATION WHEN OPEN.
Contents Operating the unit Front panel controls ........................................................................................................................ 6 Remote control of the DVD 1235 R ................................................................................................ 10 Operating the DVD 1235 R ............................................................................................................ 12 Play back of MP3 / JPEG / Kodak Picture CD ...........................
Front panel controls On / Off switch. The green LED glows when the unit is switched on and ready to use. This button switches the phase of the signal from normal to inverse phase and back. Note: The human ear is certainly capable of detecting absolute phase when listening to particular instruments and voices.
(only P-Scan option) Cursor block (multi function buttons) A long key press (approx. 3 sec.) switches the progressive scan mode for the YUV component video output on and off. Progressive scan increases the picture quality dramatically but it requires a progressive scan capable projector or TV set. These multi-function buttons are used for navigation within On-Screen-Menus and for play back control (track jump, cueing etc.
Screen window A short press on this button switches the unit to Pause / static picture. Press the -button to resume playback. All the screen elements of the DVD 1235 R are displayed in a clearly laid-out window on the integral screen: During DVD playback repeated short presses of the button move on to the next single frame of the film. Repeated long presses (around 2 seconds) during DVD playback switch to different slow motion speeds. Press the -button to stop slow motion.
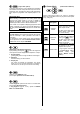
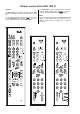
Remote control of the DVD 1235 R The DVD 1235 R receives remote control commands from the RLINK –Master device (amplifier or surroundreceiver). It is switched ON with the button. General The DVD 1235 R can be remote operated with the remote controls F6 and F12 or with the system control F1. Note: On the following diagrams all buttons used for the control of the DVD 1235 R are marked ' '. All other buttons are without function for the DVD 1235 R.
F1 F12 F6 Switches DVD player on, selects DVD as program source - Switches DVD 1235 R ON, if RLINK 2 back panel) Switches DVD player to stand-by Switch to HiFi control In STOP mode: Starts playback (PLAY) During playback: Selects next title MP3-CD: Select the next track within an album directory MP3-CD: Selects previous title Select the previous track within an album directory MP3-CD: Fast rewind / forward Select the album brief press:
Operating the DVD 1235 R Switching on Starting playback Press the button on the front panel of the unit. The green indicator LED above the button lights up, as does the display screen. The unit is now ready for use. Some discs feature an “autostart” function. These discs will start automatically. Other DVDs show an On-ScreenMenu after start-up. Please follow the instructions of the menu.
Selecting a Chapter or Title REPEAT 1.) Selecting using a skip button The device offers several REPEAT-modes for repeating chapters, titles or entire discs: You can initially select CD tracks, DVD titles or chapters by pressing the skip forward button or the skip back button repeatedly until you reach the desired point. • • • • • Note regarding DVD: If the last chapter of a title is reached, the machine skips automatically to the previous or following track. 2.
Play back of MP3 / JPEG / Kodak Picture CD The DVD 1235 R can play back MP3, JPEG, VCD and SVCD files from recorded available CD-R/RW discs or from comercially available CDs. A MP3-CD may contain up to 32 album files (directories) with music titles. To select an album file use / buttons on the front panel or the / buttons of the remote control. To select one title/track within a directory / buttons on the front panel or the / buttons of the remote control.
Listening to SACD Play back of the CD layer of hybid SACD discs It exist three types of SACD discs: single layer, double layer and hybrid discs. The hybrid discs contain a standard CD and a SACD layer. The DVD 1235 R can play back both of the SACD and the CD layer of these discs. Switching between CD and SACD layer is accomplished by pressing the button while the disc is stopped. After switching to the CD layer, the “CD” indicator in the display will be lit.
Hints for using the DVD 1235 R in combination with SR 1535 R and DD 1535 R Wire the system according to the diagrams and execute all steps described in the chapters 'Setting up the DVD 1235 R, Wiring and Safety Notes'. Operation of DD 1535 R (software version > 1.10) • For DVD (S/VCD) playback choose the DVD input. • For playback of CDs and SACDs in Stereo mode choose “CD” as source and switch to PREAMP-mode.
Menu Functions of the DVD 1235 R General Menu control During operation of the DVD 1235 R two different menus are available: the disc menu and the player menu. In selection menus the following buttons are used for navigation and selection: • • The Disc-Menu is stored on the DVD itself. This menu is intended for selecting and operating special features of the disc like sound-track, subtitles, additional information on the film, film trailers, games etc.
DVD / VCD Disc Menu (menu operation and navigation) A DVD may contain a Disc Menu with selection facilities for individual titles and / or chapters. Depending on the DVD, the disc may also contain games, bonus material or alternatives for camera angle, synchronous languages or sub-titles, which can be set or called up via the Disc Menu.
Menu TOOLBAR - overview 21
Menu Toolbar In this menu the playback options for the disc can be selected. Menu Play Option Disk-Navigation Audio / Subtitle Submenu for title / chapter selection. Submenus for the selection of audio language and subtitle language. Only languages present on the disc can be selected. The default language selection can be set in the menu 'Preference / Language'.
Menu Search Time Slow This submenu lets you enter a time position on the disc where playback shall be started. Use the numerical buttons of the remote control to enter hour, minutes and seconds. Then press to confirm your selection. Playback will now start at the selected position. Here the slow motion mode can be activated. Choose 1 to return to playback at normal speed. During slow motion mode the audio output will be muted.
Menu Preferences - overview 25
Menu Preferences Menu Picture Video Shift The menu Picture lets you adjust the picture parameters to your personal preferences. The video shift function can be used to change the horizontal position of the picture and to center the picture on the screen. Color Settings (will not influence the YUV Component video output) In this menu you have the choice between different predefined color settings or one adjustable setting (personal).
Menu Sound Analog Output In this menu the basic settings for the sound reproduction are adjusted. Sets the operation mode of the analogue Stereo output of the DVD 1235 R. Night mode Off The sound is reproduced with full dymanics. The difference between loud and soft passages may be very high. On Sound reproduction with decreased dynamics. Loud passages will be played at a lower volume, during soft passages the volume is increased a little bit, especially in the dialog track.
Menu Features Wake up timer Status window The DVD 1235 R will be switched on at the selected period of time. If the wake up timer is active the timerLED in the display window will light up. If the status window is switched on, the current operation mode and time information is displayed on the screen of the video monitor.
Menu SETUP – overview 29
Menu Setup If the SETUP menu is opened during playback, the disc is stopped. The playback will continue after closing the SETUP on screen menu. Menu Language In this menu you can select the default values for the languages for sound track, subtitles and On-ScreenMenus. Default Subttl. In this menu you can select your preferred language for subtitles. If available on the disc the DVD 1235 R will show subtitles in this language.
Menu TV TV-System TV shape The DVD 1235 R is compatible with both NTSC and with PAL video monitors. This submenu lets you adjust the picture output of the DVD 1235 R to the geometry of your TV set. PAL Note: Use this setting, if the picture shall be displayed on a PAL TV. DVDs in NTSC format are converted to PAL by the DVD 1235 R and output in standard PAL video mode. The format selected must be available on the disc. Otherwise this setting will not have any influence on the picture display.
Audio Menu PCM output In this menu the basic configuration for the audio output is done. In this submenu the 96 kHz digital output format can be enabled. Note: Digital output signals are not available when playing a SACD. If you have selected 96 kHz output, DVDs with a 96 kHz / 24 bit audio format are output directly in this format without conversion. The highest audio quality is acheived in this mode. Digital output Here the format for the digital audio output of the DVD 1235 R can be chosen.
Menu Features PBC Sleeptimer The play back control function can be set to 'On' or 'OFF'. If 'On' is selected, the disc menu (if available on the disc) can be accessed and will displayed on the TV. Note: This function is available for video CDs (VCD) version 2.0 only The Sleeptimer, if switched on, will switch the DVD 1235 R OFF, if the playback is stopped for more than 20 minutes.
Installation Using the unit for the first time Safety notes This chapter describes all the matters of fundamental importance for setting up and operating your DVD player. This information is not relevant to your daily handling of the system, but should still be read and noted carefully before using the machine for the first time.
Back panel connections MAIN ANALOG OUT DIGITAL OUT SURROUND The analogue output of the DVD video player supplies a fixed-level output signal. It is designed for connection to a pre-amplifier, integrated amplifier or receiver with its own volume control. Optical digital output for connecting a digital surround decoder. Co-axial digital output for connecting a digital surround decoder. Please be sure to use high-quality 75 Ω cable with Cinch connectors.
RLINK 2nd ADDR. Toggle switch for the selection of the remote control address of this device within a -RLINK system. Note: If no CD player is operated within the 'R' system, the 'RLINK 2nd ADDR.' switch of the DVD 1235 R should be configured to the additonal CD address (position switch position = 'CD') In this case the stereo output should be connected to the CD input of the pre- or integrated amplifier.
Setting Up the DVD 1235 R Carefully unpack the DVD 1235 R and store the original packing materials carefully. The carton and packing are specially designed for this unit and will be needed again if you wish to move the equipment at any time. Please be sure to read the safety notes in these instructions. When installing the unit on a shelf or in a cupboard it is essential to provide an adequate flow of cooling air, to ensure that the heat produced by the unit is dissipated effectively.
Wiring Notes on wiring • You will find wiring diagrams on the following pages. • Make all connections as shown in the wiring diagrams. • Push all connectors firmly into their sockets. Loose connections can cause humming and other unwanted noises. • Please also make all necessary adjustments like input assignments etc. on your surround amplifier or surround receiver. • Deploy the mains and loudspeaker cables and the RLINK lead as far as possible from signal interconnects and aerial leads.
Wiring diagram 1: DVD 1235 R and SR 1535 R with S-Video and Component YUV Video *1 used for Dolby/dts playback through SR 1535 R *2 for high-quality Stereo CD/SACD playback *3 S-Video+2channel audio is needed for VCR recordings and Zone 2 *4 additional YUV-ComponentVideo-cable for Video monitors/projectors with component video input Note: Please make the following assignments in the configuration menus of the SR 1535 R : Audio Inputs: DIG-3 (coax) DVD YUV-Inputs: YUV1 DVD Video-Inputs: DVDin S-Video
Wiring diagram 2: DVD 1235 R in combination with DD 1535 R und PA 1530 R (S-Video-mode) *1 for Dolby/dts playback through DD 1535 R *2 for high quality Stereo CD/SACD playback Note: Please make the following assignments in the configuration menus of the DD 1535 R: Audio Inputs: DIG-3 (coax) DVD Video-Inputs: DVDin S-Video The DD 1535 R should be equipped with a software version > V1.10 nd The switch RLINK 2 ADDR. on the back panel of the DVD 1235 R must be set to position 'CD'.
In this configuration the DVD 1235 R is switched ON with nd the source button . The switch RLINK 2 ADDR. must be set to position 'CD'. If the DVD 1235 R is to be operated in a non- system, the E 2000 remote control receiver must be connected to the RC-IN socket if you wish to remote-control the player. Wiring diagram 3: DVD 1235 R connected to a stereo amplifier * optional accessories When playing back multichannel SACDs switch to STEREO operation ( -button on the front panel).
Safety notes All components used in this device meet the current German and European safety norms and standards. For your own safety please be sure to read right through these operating instructions. It is especially important to observe the safety notes and the instructions regarding setting up and operating the equipment. This device should never be used without proper supervision. The machine should be set up well out of the reach of small children. This applies to all electrical equipment.
Approved usage Device approval and conformity with EC directives This device is designed exclusively for reproducing sound and/or pictures in the domestic environment. It must be operated in a dry indoor room which meets all the recommendations stated in these instructions.
Explanation of terms, useful information DVDs can be recognised by the logo shown here. Video CDs (VCD) can be recognised by the logo shown here. They also provide digital picture and sound information, but their lower storage capacity means that they do not quite attain the quality of DVDs. DVDs have a very high storage capacity, and offer top-quality picture and sound reproduction.
CD Camera angle A Compact Disc (CD) is a digital data medium that requires a little care in handling: Many DVDs and VCDs contain scenes which were recorded using different camera view angles. When such a disc is played back, the screen displays a symbol which indicates the number of available angles (e. g. 7) and the currently selected angle (e. g. 3). The DVD 1235 R can easily be switched to any of the different camera viewing angles. • The surface of a CD may only be cleaned using a soft, dry cloth.
Technical description OVERSAMPLING OVS 1 (short FIR filter) The audio data on CDs and DVDs is stored at a sampling rate of 44.1 or 48 kHz - i. e. for each second of music 44.100 or 48.000 sampled values are available for each channel. In the DVD 1235 R the audio data read from the DVD or CD is „multiplied“ to a higher sampling rate (384 kHz) before it is converted back into analogue music signals.
SACD Operation Standard OVS CD/DVD and SACD discs have a totally different data structure. This filter introduces a slight limitation of the high frequency bandwidth. It is suited for most amplifier / speaker systems. For a CD or DVD recording the analogue signal is sampled at a high rate (44.100 or 48.000 samples / second). The audio signals have to be bandwidth limited before the sampling process to get rid of signal components above 20 kHz because these could not be correctly digitized.
Trouble-shooting Many problems have a simple cause and a correspondingly simple solution. The following section describes a few difficulties you may encounter, and the measures you need to take to cure them. If you find it impossible to solve a problem with the help of these notes, please disconnect the unit from the mains and ask your authorised specialist dealer for advice. Problem: Machine does not switch on (green LED stays dark).
Problem: Surround decoder / receiver fails to recognise digital surround programs (Dolby Digital or dts). Cause: The digital output of the DVD 1235 R is wrongly configured (PCM instead of ALL). Remedy: Set the digital output to the correct ALL setting (see 'Basic device settings'). Problem: After removing the disc the machine fails to return to the Start screen. Cause: The program may be waiting for a further disc. Remedy: Insert the next disc.
Problem: Cause: If the DVD 1235 R is connected to a TV set directly using a SCART lead, this can result in a scrolling DVD picture appearing on all programme memories. This problem may occur with many types of TV. The TV set is analysing the A/V switching signal from the DVD player incorrectly, or not at all. Remedy 1: If possible, call up the Setup menu for your TV set and switch off RGB priority. Select the RGB signal type for the DVD SCART input of your TV set.
Specification high precision linear tracking drive Mechanism: GaAlAs semiconductor laser:785 nm / 10 mW 650 nm / 7 mW (VCD / CD) (DVD / SACD) Formats Video DVD, DVD+R / +RW, DVD-R / -RW, VCD, SVCD Audio CD, CD-R / RW, MP3-CD, SACD Stereo, SACD Multi channel as 2-channel down-mix Picture Picture CD (JPEG) Audio section Analogue audio outputs 2 x Stereo, 2 x Stereo TV Digital audio outputs 1 x coaxial, 1 optical, D / A converter for CD, DVD, (S)VCD, MP3 24 Bit / 384 kHz Sigma / Delta IEC 60958
elektroakustik GmbH & Co.