
Installation Sheet


4
Instructions
Maximum Running Time: 30 seconds
Response Time: 0.3 seconds
Sensing Range: 3/4” (2cm) to 6-11/16” (17cm)
Power Source: AC and/or DC
Low Battery Indicator: Flashing red LED
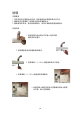
5. Hold your hand still in front of the sensor at the desired sensor distance. The red
LED will flash roughly 5 times then remain on for 2 seconds indicating the new
range has been set.
6. If step 5 is not done within 15 seconds, the red LED will blink quickly then stop
indicating the sensor range has NOT been changed. Start over at step 3 to
change the sensor range.
SENSOR RANGE SETUP
The sensor range is preset at the factory during assembly but can be further
adjusted by using the steps below.
1. The sensing distance is adjustable from 3/4” (2cm) to 6-11/16” (17cm). If there
is a disruption in power, the sensor range is saved and will revert to the last setting
when power is restored.
2. The faucet sensor range is set by simply using the on/off button on the front of the
control module. Do not attempt to open the control module box.
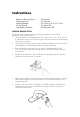
3. Push and hold the on/off button; water will flow. After holding the button
5 to 7 seconds, the water flow will stop and the red LED in the sensor lens will
turn on solid.
4. Release the on/off button. The red LED will turn off signaling that the sensor is
ready for set-up for the next 15 seconds.