TM1393
Welcome Guide
T-Mobile provides an outstanding value in wireless by offering more minutes, more features, and more service at an incredible price.
For more information, call 1-800-937-8997 Or write: T-Mobile Customer Care PO Box 37380 Albuquerque, New Mexico 87176-7380 Our fax number is 1-505-998-3775 www.t-mobile.com ©2006 T-Mobile is a registered trademark of Deutsche Telekom AG. All rights reserved.
Section 1, page 2
Contents Getting Help ...................................................................................................4 Welcome to T-Mobile ......................................................................................5 Introducing Your T-Mobile Dash........................................................................................... 5 Introducing T-Mobile Services ........................................................................................... 10 Voice / Phone..................
Using Communication Manager ....................................................................22 Accessing the Internet ..................................................................................23 Accessing the Internet ....................................................................................................... 24 T-Mobile Internet (GPRS / EDGE) ........................................................................... 24 T-Mobile HotSpot (Wi-Fi) .......................................
Sending Text Message ....................................................................................................... 40 Reading Text Message ....................................................................................................... 40 Replying to Text Message .................................................................................................. 40 Deleting Text Message .......................................................................................................
Getting Help This Welcome Guide provides you with introductory information to get you started, but much more information is available. ■ T-Mobile Dash™ Get Started Poster ■ User Manual on the CD (click the Learn More link). ■ Microsoft Windows Mobile Web site (http://www.microsoft.com/windowsmobile) ■ T-Mobile Customer Care The T-Mobile Customer Care team offers responsive and knowledgeable customer support 24 hours a day, seven days a week.
Welcome to T-Mobile With your new T-Mobile DashTM and T-Mobile’s service package, you get the freedom of excellent voice and broadband connectivity in many locations nationwide. We know you are eager to activate your service, but please take a few minutes first to read this guide. Important: By using T-Mobile service, you acknowledge that you have read, understand and agree to be bound by each of the terms and conditions of the Service Agreement.
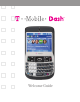
Network signal strength Navigation button/ Center Select key Volume Up/Down keys Wi-Fi status Left Soft key Right Soft key End key Send key Previous screen/ back key Home screen key Voicemail Delete key Enter key Alt key Messaging key t-zones key Cap key Tab key Symbol/camera key Power/Headset jack Section 1, page 8
Introducing Your T-Mobile Dash Your T-Mobile Dash is a Microsoft® Windows® powered device that integrates GPRS / EDGE, Wi-Fi, and Bluetooth wireless technology to give you high-speed wireless voice and data connectivity at home, at work, and on the go. Specifications: Connectivity Operating System Memory Power Display Weight and Dimensions Camera Applications GPRS / EDGE (850, 900, 1800, 1900 MHz), Wi-Fi, Bluetooth® technology, Infrared, and USB Microsoft Windows Mobile 5.
Introducing T-Mobile Services When you activate service with T-Mobile, the following features and services are available to you: Voice / Phone ■ Local calling and nationwide long distance calling ■ * International calling ■ Caller ID ■ ** Call waiting and call hold ■ ** Conference calling ■ ** Call forwarding *NOTE: Log on to my.t-mobile.com to set up international calling. See t-mobile.com/international/ for rate and other information on international services.
E-mail T-Mobile My E-mail This service provides you unlimited access to your work and personal email. Instantly access your e-mail from AOL®, Yahoo!® Mail Plus, EarthLink™, Comcast®, Microsoft® Exchange, Lotus Notes®/Domino®, and many more, including any POP3 or IMAP4 e-mail server. See the Using T-Mobile My E-mail section in this guide for more information. Pocket MSN Pocket MSN delivers the features of MSN® Messenger and Hotmail e-mail to your device.
Messaging Text Messaging (SMS) Text messaging allows you to send, receive, and reply to short text messages using your device. Messages may be sent to and from mobile devices that support text messaging. You may be charged for using text messaging depending on your rate plan. Visit www.t-mobile.com or a T-Mobile store for domestic and international text messaging rates. See the Text Messaging section in this guide for more information on how to send text messages.
When you subscribe to the service, you can take advantage of the following: Unlimited nationwide calling to any five U.S.
Introducing Your T-Mobile Subscriber Identity Module (SIM) Card The SIM card contains a computer chip that identifies you to the wireless network and contains information such as your phone number, service and registration information, and contact information, as well as the memory to store speed dial numbers and text messages that you receive. Introducing Your Personal Identification Number (PIN) Your SIM card comes configured with a PIN to lock it against unauthorized use. The default PIN code is 1234.
1. Have your service agreement and the following information ready for your Activations representative: ■ Name, home address, home phone, preferred billing address. NOTE: For business and government accounts, your Activations representative will also require your physical address, company name or government agency name, and the tax ID.
Setting Up Your Device Inserting SIM Card and Battery If you have purchased your device from an authorized T-Mobile retailer, the SIM card may already be in your device. To insert SIM and battery: 1. Remove the back cover and battery by pressing down on the back cover and sliding it open. Remove the battery by lifting it up. 2. Insert the SIM card into the top left corner with gold contacts facing down. Push the SIM card in. 3.
Inserting the Micro SD Card You can purchase a micro-secure digital (SD) card separately and use it with your device. This card provides an alternative storage location for images, videos, music, and other phone data. 1. Remove the back cover and battery by pressing down on the back cover and sliding it open. Remove the battery by lifting it up. 2. Insert the micro SD card into the slot with gold contacts facing down. To remove, press the card to pop it out of the slot.
Charging Battery Use USB Cable 1. Insert the USB plug into a USB port on your computer. 2. Insert the other end of the USB cable into the sync connector port on the bottom of the device NOTE: only the AC adapter and USB cable provided with your device should be used to charge the device. Use AC Adapter 1. Insert the AC adapter plug into an electrical outlet. 2. Insert the other end of the AC adapter into the sync connector port on the bottom of the device.Fully charge the battery (2-3 hours) prior to use.
Using Phone Features After you have activated service with T-Mobile, you can start using the phone features on your device. Making a Call On the Home screen, type the contact’s phone number and press the green Send key to initiate the call. To end the call, press the red End key Adding New Contact to Phone Book 1. On the Home screen, select Contacts. 2. Select New. 3. Type the contact’s information. 4. Select Done. Calling Contact from Phone Book 1. On the Home screen, select Contacts. 2.
Calling Voicemail If you are not available to answer incoming calls, T-Mobile’s voicemail system offers your caller the option to record a voice message that you can play back at your convenience or to send a numeric page to your device. Your device has been programmed to forward calls to your voicemail when your line is busy or when you are not available. When you receive a new voicemail, you will be notified by a text message. To call voicemail, press and hold the 1 key.
If the conference connection is successful, the screen displays Conference. To add additional people, select Menu > Hold, dial the number, and select Resume. Using Call Waiting If another person calls you when you are talking on the phone, the device notifies you of the second call. If you want to accept the second call: ■ ■ ■ Select Answer to accept the second call (first call is put on hold). Select Swap to swap between calls. Press the red End key to end the second call and go back to the first call.
Using Comm Manager The Communication Manager allows you to quickly enable or disable phone features and manage data connections. To access the Communication Manager, on the Home screen, select Start > Comm Manager 1. Phone: Select to turn the phone radio on or off. Turning off the phone radio places the device in Flight Mode. 2. Bluetooth feature: Tap to turn Bluetooth feature on or off. 3. Wi-Fi: Select to turn Wi-Fi on or off. To configure Wi-Fi on your device. 4.
Accessing the Internet Your device supports GPRS / EDGE and Wi-Fi to give you high-speed wireless voice and data connectivity at home, at work, and on the go To access the Internet on your device, you must add a data plan to your account. Inform your T-Mobile Activations representative that you want to add data plan when activating service with T-Mobile. Visit www.t-mobile.com or a T-Mobile store for plan rates.
T-Mobile HotSpot (Wi-Fi) After you have added an eligible data plan to your account, you can access the Internet over the T-Mobile Wi-Fi network.To turn on Wi-Fi and access the Internet: 1. On the Home screen, select Start. 2. Select More. 3. Scroll to and select Comm Manager. The Communication Manager screen opens. 4. Scroll to and select Wi-Fi.
If there are multiple Wi-Fi networks available, your device displays the message, “New wireless networks are available. Would you like to see the list of available network?” Select Yes. At Select network field, move the Navigation key left or right until you see tmobile [Unsecured]. Select Connect. The HotSpot Found screen opens You can log in to another Wi-Fi network that has roaming agreements with TMobile. Select the network that you want to use and launch your Web browser (Start > Internet Explorer).
If you select Disable HotSpot Login Utility, you are disabling the screen where you type your username and password to log in to T-Mobile HotSpot. Your device will no longer prompt you to log in when you enter a T-Mobile HotSpot location. To access the HotSpot Utility screen again, select Start > TMO HotSpot. If you select Skip ‘login/cancel/sign up/ request, you will skip the previous screen and will be prompted to type your username and password.
Setting Up E-mail You can access e-mail through various methods: ■ Using T-Mobile My E-mail ■ Using Pocket MSN Hotmail ■ Using USB cable and Microsoft® ActiveSync to synchronize with a computer ■ Synchronizing wirelessly with a Microsoft Exchange Server 2003 (if server is set up for wireless synchronization) Using T-Mobile My E-mail T-Mobile My E-mail service provides you unlimited access to your work and personal e-mail from any T-Mobile device.
4. Select time zone, if necessary. 5. Select Next. 6. After you have added a My E-Mail account to your device, you will see the account at Start > Messaging, and you are ready to send and receive e-mail messages NOTE: If you turn off the Alerts feature at my.t-mobile.com, then you will not receive automatic e-mail updates and My E-mail alerts on your device. If you would like to access My E-mail on your computer, then you will need to register for an account on my.t-mobile.com.
Synchronizing with Computer Using USB Cable You can synchronize e-mail, calendar, and contacts directly with your computer by connecting the device to the computer using the USB cable. Before you can synchronize using the USB cable, you must first install Microsoft ActiveSync 4.2 or higher and Microsoft® Outlook (if you do not have it already) on your computer.
Connect device to computer 1. Plug the USB cable into the sync connector port on the bottom of your device. 2. Plug the other end into a USB port on your computer. 3. Follow the ActiveSync instructions on your computer to establish a connection between your device and your computer. Connect device to computer using USB to PC utility In some cases, you may have difficulty establishing a successful ActiveSync connection with your computer.
Synchronizing Wirelessly with Microsoft® Exchange Server 2003 To synchronize data wirelessly (without connecting your device to your computer), you must have Microsoft® Exchange Server 2003. The server must be set up for wireless synchronization. You will need the server address, username, password, and domain name from your system administrator. To synchronize: 1. On the Home screen, select Start. 2. Scroll to and select ActiveSync. 3. Select Menu. 4. Scroll to and select Add Server Source. 5.
Using E-mail Once you have set up e-mail on your device, you can start using e-mail. Writing and Sending E-mail 1. On the Home screen, select Start. 2. Select Messaging. 3. Select the e-mail account you want to use. 4. Select New. 5. At To, type the recipient’s e-mail address. 6. At Subject, type the subject of your message. 7. Scroll down and type your message. 8. Select Send. Reading E-mail Press the Messaging key (key with envelope icon) and select the e-mail account. To go via the menu: 1.
Introducing myFaves (sm) T-Mobile myFaves (sm) helps you stay connected to the people who matter most in your life. Simply choose any U.S. five numbers you call most often, on any network, and have them displayed on your phone’s main screen. When you subscribe to the service, you can take advantage of the following: ■ ■ ■ Unlimited nationwide calling to any five U.S.
Adding myFaves Contact Adding a new contact Important: Contact names, icons, and ringtones* may be changed at any time. Each contact number may only be changed once per calendar month. * Additional charges may apply. 1. On the Home screen, scroll to one of the myFaves circles and press the Center Select key. 2. Select Create New. 3. Type the contact’s name and number (must be a 10-digit number). 4. To change icon, scroll to Change icon and press the Center Select key. 5.
Adding contact from phone book Important: Contact names, icons, and ringtones* may be changed at any time. Each contact number may only be changed once per calendar month. * Additional charges may apply. 1. On the Home screen, scroll to one of the myFaves circles and press the Center Select key. 2. Scroll to and select Get from Contacts. 3. Scroll to and select the desired contact. 4.
■ ■ ■ Take picture to take a picture with the camera and send. The camera application opens. To capture, frame the subject and press the Center Select key. Press the Left Soft key. At Subject, type the subject of your message. Scroll to Insert Text and press the Center Select key. Type your message and select Done. Select Send. My Pictures to send a picture you have already taken. Scroll to the picture and select Menu > View. Press the Left Soft key.
Changing icons 1. On the Home screen, scroll to the contact and press the Center Select key. 2. Select Options > Change Icon. 3. Select one of the following: ■ Take picture to take a picture with the camera and assign it to your contact. The camera application opens. To capture, frame the subject and press the Center Select key. Press the Left Soft key. To crop the picture to fit in the circle, move the circle to the desired location using the Navigation keys and select Crop.
1. On the Home screen, select Start. 2. Scroll to myFaves and press the Center Select key. 3. Select Menu > myFaves Settings. 4. Scroll to and select Hide myFaves Contacts on Home Screen. 5. Select OK. Unhiding myFaves main display (circles) When myFaves is hidden from the Home screen, you can still access your myFaves through Start > myFaves. Note: You can change your Home screen through Start > Settings. myFaves will only display on pre-loaded Home screens. 1. On the Home screen, select Start. 2.
Text Messaging Text messaging allows you to send, receive, and reply to short text messages using your device. Messages may be sent to and from T-Mobile phones and any e-mail address Accessing Text Message Screen You can open the text entry screen via two ways: ■ On the Home screen, press the Messaging key (key with envelope icon) and select Text messages. ■ On the Home screen, select Start > Messaging > Text messages > New.
Note: To change text entry method press alt+space and select from the menu Reading Text Message When you receive a new text message, you will hear an alert. To open the message: 1. On the Home screen, select Start. 2. Select Messaging. 3. Select Text Messages to view. 4. Scroll to the desired message and press the Center Select key. Replying to Text Message 1. On the Home screen, select Start. 2. Select Messaging. 3. Select Text Messages. 4. Scroll to the message and press the Center Select key. 5.
Instant Messaging Your device comes with AOL®, ICQ®, Yahoo!®, and MSN®. Your normal screen name and password work just as they would on any computer connected to the Internet. You may be charged for using instant messaging depending on your rate plan. Using Pocket MSN® Messenger Sign in to MSN 1. On the Home screen, select Start. 2. Scroll to and select Pocket MSN. 3. Select MSN Messenger. 4. Select Sign In. 5. Type your @hotmail, @msn, or @passport.com e-mail address. 6. Type your password. 7.
Adding a contact 1. At contact list, select Menu. 2. Scroll to and select Add Contact. 3. Type the contact’s sign-in name. 4. Select Next. 5. Select Done Deleteing a contact 1. At contact list, scroll to the contact. 2. Select Menu. 3. Scroll to and select Delete Contact. 4. Select Yes. Sending message to a listed contact 1. At contact list, scroll to the contact. 2. Select Menu. 3. Scroll to and select Send Message. 4. Type your message. 5. Select Send. Blocking messages 1.
Using AOL® Instant Messenger™ Sign on to AIM® 1. On the Home screen, select Start. 2. Scroll to and select Instant Messaging. 3. Select AOL Instant Messenger. 4. Type your screen name and press the Center Select key. 5. Type your password and press the Center Select key. Passwords are casesensitive. 6. Select Sign On. To sign out, select Menu > Sign out. Add a Buddy 1. At Buddy List®, select Menu. 2. Scroll to and select Add Buddy. 3. Type the buddy’s screen name. 4. Tap Add Delete a Contact 1.
Send message to an unlisted buddy 1. At Buddy List®, select Menu. 2. Scroll to and select Send IM to. 3. Type the buddy’s screen name and press the Center Select key. 4. Select Ok. 5. Type your message. 6. Select Menu. 7. Select Send IM. Blocking messages 1. At Buddy List®, scroll to the buddy. 2. Select Menu. 3. Scroll to and select Block. 4. Select Yes Using ICQ® Sign on to ICQ® 1. On the Home screen, select Start. 2. Scroll to and select Instant Messaging. 3. Scroll to and select ICQ 4.
Deleteing a contact 1. At contact list, scroll to the contact. 2. Select Menu. 3. Scroll to and select Delete User. 4. Select Yes. Sending message to a listed contact 1. At contact list, scroll to the contact. 2. Select Menu. 3. Scroll to and select Send message. 4. Type your message. 5. Select Menu. 6. Select Send message. Sending message to an unlisted contact 1. At contact list, select Menu. 2. Scroll to and select Send message to. 3. Type the contact’s ICQ number and select OK. 4. Type your message.
Using Yahoo!® Messenger Sign in to Yahoo!® 1. On the Home screen, select Start. 2. Scroll to and select Instant Messaging. 3. Scroll to and select Yahoo! . 4. Type your Yahoo!® ID and press the Center Select key. 5. Type your password and press the Center Select key. Passwords are casesensitive. 6. Select Sign In. To Sign off tap Menu > Sign Out > Yes.
Adding a contact 1. At contact list, scroll to a contact category. 2. Select Menu. 3. Scroll to and select Add Contact. 4. Type the contact’s Yahoo! ID. 5. Select Add Deleteing a contact 1. At contact list, scroll to the contact. 2. Select Menu. 3. Scroll to and select Delete Contact. 4. Select Yes. Sending message to a listed contact 1. At contact list, scroll to the contact. 2. Select Menu. 3. Scroll to and select Send a Message. 4. Type your message. 5. Select Menu. 6. Select Send Message.
Using the Camera and Video Recorder Using the Camera Take a picture Pictures are automatically saved to Start > Pictures and Videos. 1. Press and hold the Camera key (next to the Space key) to open the camera application. 2. Frame the subject and press the Center Select key to capture. ■ To adjust brightness, press the Left and Right Navigation key. ■ To review the picture you have taken, press the Right Navigation key and scroll to the picture and select View.
6. At Subj, type the subject of your message. 7. Scroll to Insert Text and press the Center Select key. 8. Type your message. Tip: Press the Center Select key to select the desired word from the list displayed. 9. Select Send. Sending an existing picture or video To send a picture or video that you have previously saved to the device: 1. On the Home screen, select Start > Pictures & Videos. Note: If you have a micro-SD card, then go to Menu > Folders > Storage Card to access pictures saved on the SD card.
Recording and sending You can send videos right after recording them. To send: 1. On the Home screen, select Start > Application > Video Recorder. 2. Press the Center Select key to record. Press again to stop recording. 3. Press the Right Navigation key to scoll to and select the envelope icon. 4. Scroll to and select Multimedia Messages. 5. At To, type the phone number or e-mail address. 6. At Subj, type the subject of your message. 7. Scroll to Insert Text and press the Center Select key. 8.
Using Bluetooth® Your device comes with Bluetooth® technology that allows for short-range connections and provides fast, reliable, wireless communication.
Pairing Bluetooth® Devices Before pairing, make sure that Bluetooth devices are turned on, discoverable, and within close range. To pair: 1. On the Home screen select Start > Settings. 2. Scroll to and select Connections. 3. Scroll to and select Bluetooth. 4. Select Menu > Devices. 5. Select Menu > Add new device. Your device searches for other devices with Bluetooth capabilities and displays them. 6. Scroll to the device that you want to pair with and select Next. 7.
Tips Ending Programs For quick access to your favorite programs, your device keeps the programs you use running in the background. To free up memory, end programs running in the background; otherwise, you may experience freezing and memory failures when multiple programs run in the background for an extended period. You must end running programs in the Task manager. To end: 1. On the Home screen, select Start > More > More > Task Manager. 2. Scroll to the application you want to close. 3.
Customizing Your Device Customize Home screen The Home screen is the main screen for accessing device features. You can personalize the background image and color scheme, or change the layout settings to display only the date and time. To customize: 1. On the Home screen, select Start > Settings. 2. Scroll to and select Home Screen. 3.
Backing Up Data You can back up data if you have Microsoft® ActiveSync installed on your computer. The CD that is included with your device has the ActiveSync software. Before backing up, you must first install ActiveSync on your computer. Install Microsoft® ActiveSync 1. Insert the CD into the CD-ROM drive in your computer. 2. Follow the instructions on the CD to install ActiveSync. Backing up data 1. Connect your device to your computer using the USB cable.
Managing Power and Battery Life You can adjust several settings on your device to reduce power drain and extend battery life. 1. On the Home screen, select Start > Settings. 2. Scroll to and select More. 3. Scroll to and select Power Management. 4. Scroll to the following and press the Left or Right Navigation key to adjust: Backlight time out on battery Backlight time out on AC Display time out 5.
Additional Information Coverage only available on our domestic GSM/GPRS network and the networks of our GSM/GPRS affiliates and roaming partners, but not in all locations; see our coverage maps, available at www.t-mobile.com and at T-Mobile stores, for details. Depicted phone model is sold solely for use with T-Mobile service; all T-Mobile rate plans require credit approval, $35/line activation fee and minimum one-year service agreement, with $200/line early termination fee.
Section 1, page 58