
Owners manual


TOOLS REQUIRED:
Socket & Ratchet Set
Screwdriver set
Jigsaw/Grinder/Cutting Wheel
Masking Tape
Vise Grips
Continued on page 2
20546
2011 FORD
SUPER DUTY
2011 FORD SUPER DUTY
Billet Grille Insert - 1 Pc. - w/ optional logo plate
20546
2011 FORD
SUPER DUTY
Corona, California www.trexbillet.com
PARTS LIST
(7) #8 x 3/4” Screws
(7) #8 Flat Nuts
(1) Bilet Grille
(1) Logo Plate
Step 1 Factory Grille Removal
Remove the factory grille from the vehicle. There are 4 bolts along the top of the grille under the hood that need to be
removed. The top of the grille will be loose, pull the bottom out untill the latches pop loose and remove the grille.
(2) 1” Fender Washers
(2) 6/32” Nylon Lock Nuts
(4) Double Sided Tape 2”x3/4”
PLEASE READ AND UNDERSTAND ALL INSTRUCTIONS BEFORE INSTALLATION. Auto makers
offer varied models to each vehicle and occasionally manufacture more than one body style of
the same model. To assure your part is correct; our tech department can be contacted at tech@
trexbillet.com to verify tment or assist with tech questions. All other inquires can be directed
to info@trexbillet.com. In the event you do not have internet access please call 1-800-287-5900.
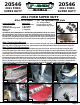
Fig 1 Fig 2 Fig 3
Page 1
Step 2 Factory Grille Disassembly
With the grille removed from the vehicle remove the 5 plastic pop clips and one 10/32” bolt from the top plate of the factory grille,
remove the top plate (Fig 1). Now remove 7 plastic pop rivets from along the top edge of the factory grille assembly. Use a pointy object
or a small punch to press in the center of the top (Fig 2). The pop rivet will break and will not be reused. Remove the pop rivet with a pair
of pliers (Fig 3). Now you will remove the 2 chrome trim bars from the front of the factory grille. From the backside of the grille, unlatch
the 7 plastic latches holding the chrome trim bars secure with a at screwdriver (Fig 4). Pull the chrome trim bars off the grille. Now you
will separate the front and back sections of the factory grille. On the backside of the factory grille there are 6 plastic latches along the
top, 6 along the bottom and 2 on each side, unlatch these with a at screwdriver and separate the front and back sections of the factory
grille (Fig 5). Remove the ford logo, there are 4 plastic latches and 1 nut holding it to the grille (Fig 6). If you want to remount the ford
logo on the new grille, cut the black plastic tabs off from the backside of the logo and sand it smooth. Continued on page 2.
Fig 4 Fig 5 Fig 6