
Installation Guide

Before starting the installation, be sure to flush supply lines and shut off water supply.
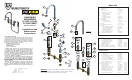
Step 1:
Take center shank out of body.
Step 3:
Insert body into deck holes until hanger snaps to top of deck.
Place c-washers under bonnet nuts on side bodies.
Step 5:
Squeeze hanger loops and allow hanger to drop through center
hole.
Step 4:
Option B: Screw metering escutcheons over c-washers. Tighten
cartridges.
Step 6:
Remove nuts as shown. Option B: Remove retaining rings from cartridges.
Place center body through center hole into main body. Tighten 3 flange
nuts. Tighten compression nut to seal center body.
1. Tighten diverter to center body using
flat head screwdriver.
2. Remove locknuts from hose guide,
place it through existing hole in sink.
Reinstall locknut on the hose guide.
Tighten by hand.
3. Apply Teflon tape to threaded end of
sidespray, insert through hose guide and
attach threaded end of side spray to base
of center body. Tighten with wrench.
4. Turn on water and check for leaks.
Step 2:
Place hanger on body. Add center flange nut to top of
compression nut. Option B: Remove cartridges.
Step 7:
Add escutcheons, packing nuts, handles, spout and tighten. Option B: Add
handles, retaining rings, spout and tighten. Turn on water supply and check for
leaks.
For models with sidespray:
Option B
Option B
Option B
Option B
Option B
Option B
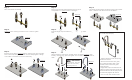
Swivel to Rigid Gooseneck Swivel to Rigid Gooseneck
OptionOption: Uninstall and lift
out gooseneck. Place star
washer into swivel body.
Reinstall gooseneck.