
Install Instructions

Instruction Sheet
5120 Mixing Valve
102-413
SUPERSEDES: New EFFECTIVE: June 1, 2010
Plant I.D. 001-3948
GENERAL:
• All installations should be carried out by a Licensed
Professional.
• Ensure compatibility of valve installation, e.g. tempera-
ture of hot water, inlet pressure, and flow rates - refer to
specification section.
• Install in accordance with markings on valve body, i.e.
hot water inlet - marked “H”, cold water inlet - marked
“C” and mixed outlet - marked with directional arrow.
• Valve may be installed in any position.
• Any inconsistency between these instructions and any
specific instructions, bylaws or codes issued by local
authorities must be referred back to Taco, Inc. prior to
any installation taking place.
• The Taco Series 5120 Mixing Valve must not be fitted on
steam supplied systems.
• During startup ensure that the valve is set to the desired
temperature (valve preset to 120°F (49°C) with 150°F
(66°C) hot water inlet temperature). If the valve tempera-
ture needs to be adjusted please refer to the instructions
below (SETTING VALVE OUTLET TEMPERATURE).
FITTING VALVE TO PIPEWORK:
• Flush all piping thoroughly before installing the valve
(using water only).
• Valve comes complete with union type connections for
ease of installation and service.
• Valve must be removed from the piping prior to soldering
the end connections. It is recommended to use a spacer
piece while soldering.
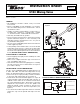
SETTING VALVE OUTLET TEMPERATURE:
The Taco Series 5120 Mixing Valve is supplied factory set
to 120°F with 150°F hot water inlet temperature. It may
need to be altered depending on operating requirements.
1. Remove the green cap by inserting a small screwdriver
in the notch and gently prying up. (See Figure 1.)
2. Turn both the hot and cold water supplies on. Open an
outlet, preferably a sink or basin rather than a shower. To
calibrate, let the water run for 2 minutes and measure
the outlet temperature with a thermometer. Using the
adjustment tool provided to fit over the spindle end,
adjust the spindle counter clockwise to increase tem-
perature and clockwise to decrease temperature. (See
Figure 2.)
3. Once the desired outlet temperature has been achieved
replace the cap over the spindle and snap it onto the
body.
Figure 1
Figure 2
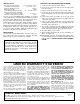
HOT
COLD
COLD
MIX
COLD WATER LOOP
FLOW REGULATOR
12" RECOMMENDED
HOT
TYPICAL DOMESTIC WATER INSTALLATION: