
Install Instructions
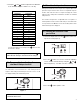


For the most complete protection, the FloodBreaker should
be installed on the home’s incoming water supply and as
close to where the supply enters as possible. (Check with
local authorities for any restrictions.) The FloodBreaker
uses a universal body assembly and can be installed into
e
ither a vertical or horizontal pipe line as shown (Figure 32).
Install the union nuts and tailpieces onto the piping system
before attaching them to the FloodBreaker body. Be sure to
mount the body in the correct flow orientation. The triangle on
one end of the body indicates the direction of flow (Figure 33).
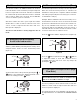
The FloodBreaker universal body may now be attached to
t
he tailpieces already installed in the piping as shown
(Figure 32).
Note: Remove the clear protective plastic covering
from the face of the universal body.
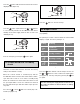
Flush the piping before attaching the FloodBreaker to the
body. (Figure 34).
Attach the FloodBreaker to the universal flange body using
the 2 O-rings and the 4 body bolts provided (Figure 35).
16
13. Installing the FloodBreaker
Figure 32
Figure 34
Figure 35
FLOW IN FLOW OUT
Figure 33
systems made easy
®
TACO, INC., 1160 Cranston Street, Cranston, RI 02920 Telephone: (401) 942-8000 FAX: (401) 942-2360.
TACO (Canada), Ltd., 8450 Lawson Road, Unit #3, Milton, Ontario L9T 0J8. Telephone: 905/564-9422. FAX: 905/564-9436.
Visit our web site at: http://www.taco-hvac.com
Printed in USA
Copyright 2013
TACO, Inc.