Manual Tacx Grand Excel English 1 GB
Packing Contents Packing Contents Check to make sure the package contains the following items. - Grand Excel USB Interface - Excel Analyser Software - CycleForce Excel - Brake Unit - Manual - T1466 Assembly kit, unit adjustment set - T1910 Assembly kit, trainer - T1606 cable set - T 1636 PC cable - T 1625 Adapter T1642 Base and end caps T1643 T1424.01 T1424.02 2x 2x CD ROM Contents T1615 Assembly kit T1402 T1408.11 T1410.02 T1410.04 T1410.06 T1423.
Index INDEX How to use this manual 1 2 3A 3B 3C 4 Assembling Grand Excel Assembling the Trainer Connecting the Grand Excel Computer Operation of Grand Excel Three Ways to Train Six Ways to Adjust Program Settings Structure of the Three Displays Eight Function Keys Available Saving the Data Excel Analyser Software Tacx BikeNet Setting General Data Activating Pulse Rate Registration Setting the 24-hour Clock and the Date Printer Set-up Switching the Data logger On or Off and Deleting the logger’s memor
How to Use this Manual How to Use this Manual The manual explains the features of Grand Excel. It discusses assembly, adjustment and use in that order. One can locate the most important features with the aid of the key word list. Excel Analyser software is included with Grand Excel. With this software, you can make full use of the Ergotrainer through simple processing and analysis of recorded training data. You should be familiar with software installation procedures in Windows.
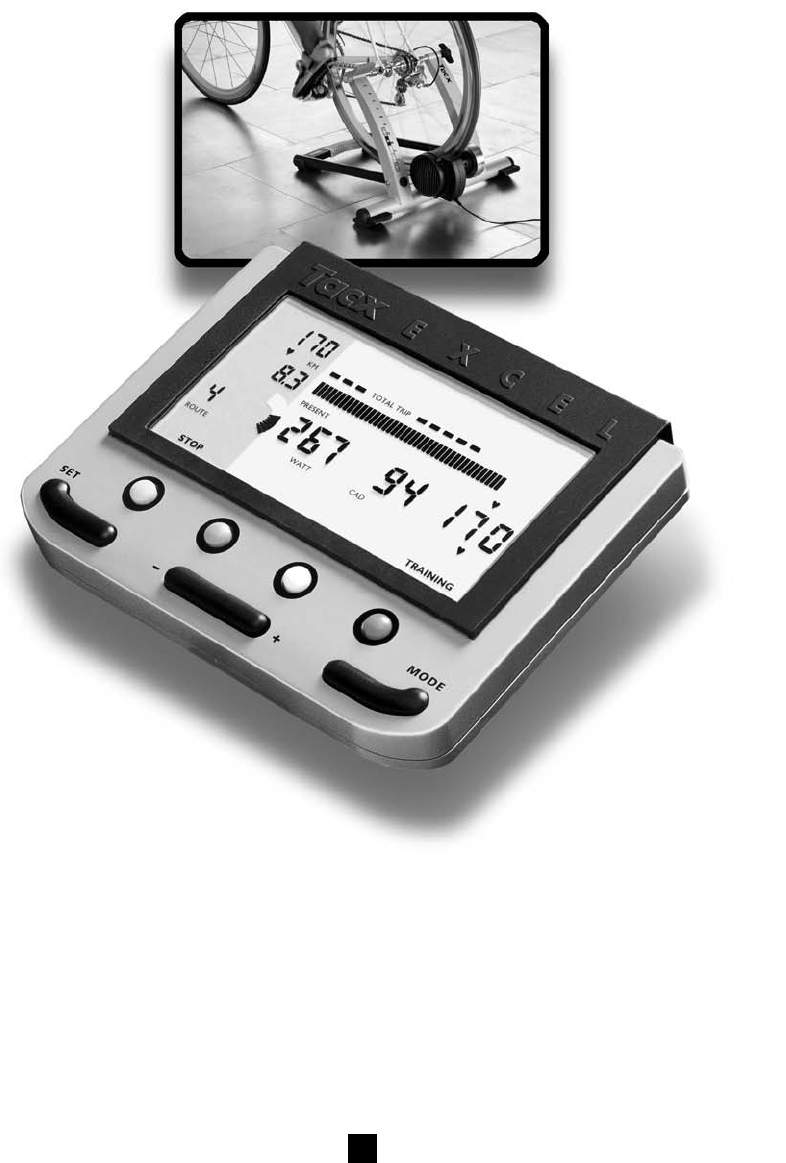
Assembling Grand Excel 1 ASSEMBLING GRAND EXCEL The Grand Excel ergotrainer consists of the collapsible CycleForce frame on which you mount your bike and the Grand Excel computer. The CycleForce is suitable for racing and hybrid bikes and mountain bikes with a wheel diameter of 610 - 720 mm. Assembling the Trainer 10 mm 13 mm (2x) 1 2 3 4 5 6 7 The following steps show how to assemble and adjust the trainer. Press nut A into cap B and slide the cap into the frame tube (fig.1).
Assembling Grand Excel 8 With handle H the roll of the mag unit can be moved to and from the tire of the bike (fig. 5 and 6). When handle H has been folded, knob R can be used to regulate the pressure of the roll against the tire. Make sure the roll is firmly placed against the tire so that slipping of the tire is not possible. H H R 5 6 Alteration in mounting of bicycle with different wheel diameter Before assembling the complete handle to the frame, see nr.
Assembling Grand Excel Connecting the Grand Excel Computer 1 2 3 4 5 After placing the bike in the trainer, you can connect the computer as follows: Assemble the computer using the two rubber clamps P on the handlebars (fig.9). Connect the computer to the unit with the cable Q. Make sure that the cable is out of the way so you won’t touch it with your shoes or pedals while cycling. Place the small magnet in front of the cadence R on the inside of the left crankshaft (fig.10).
Operation of Grand Excel 2 OPERATION OF GRAND EXCEL The CycleForce Grand Excel will enable you to simulate the resistance encountered when cycling outdoors. Below is a description of the options offered by the Grand Excel computer, with an explanation of the corresponding displays.
Operation of Grand Excel Program Display With this display, you can select the training program you want to use during cycling: PO, the free program or P1 to P10, the programs with settings. In the display, you can set, modify, view or delete the program selected and you can see how often the program has been cycled.
Operation of Grand Excel Saving the Data The Grand Excel computer’s memory stores all personal data and records the settings of training programs. For each program, you can save a maximum of five trip or logging data. The training information is always stored in SCORE. The data of a distance/slope resistance program is stored in OPPONENT. Note, you must have an OPPONENT to ride a match. During the match, you will see the distance in metres on the display of how much you are leading or trailing.
Setting General Data 3A SETTING GENERAL DATA Begin by setting general data in the training display. Press the purple key until the word TRAINING appears at the bottom right of the display (fig.12). 1 2 Activating Pulse Rate Registration, Setting the 24-hour Clock, Date, Printer and Switching the Logger On or Off. While in the training display, press MENU (yellow key). SET-UP and PULSE RATE will start to flash on the display, along with ON or OFF.
Setting General Data 9 Using the +/- key, set the YEAR. If the settings for the 24-hour clock and date are not (correctly) set, the recorded training information will not show the (correct) time. 1 > 2 You should now either continue or stop setting general data. If you would like to continue with the printer set-up, press the MODE key. PRT will start flash in the centre of the display. Continue with the Printer Set-up.
Setting General Data 12.1 Activating Pulse Rate Registration PROGRAM OPPONENT Yellow TRAINING Orange White Purple MENU Yellow Orange White Purple SET UP OFF ON 12.2 Setting the 24-hour clock and the date MODE MINUTES MODE HOURS MODE DAY MODE MONTH MODE YEAR 12 12.3 Printer Set-up MODE Prt no Prt hp dj Prt hp lj Prt EP 24 12.
Setting Personal Data 3B SETTING PERSONAL DATA Start setting personal data in the opponent display. Press the purple key until the word OPPONENT appears at the bottom right of the display (fig.13). 1 > 2 > You now have the following options to continue To go to ID number, set name, pulse rate limits and body weight, press MENU (yellow key). The ID number will start to flash at the upper left. Continue with Select ID Number, Set Name, Pulse Rate Limits and Body Weight.
Setting Personal Data 13.1 Select ID Number 13.3 Deleting Personal Data PROGRAM MENU OPPONENT Yellow Yellow Orange White Purple DELETE Orange White Purple TRAINING CANCEL Yellow ENTER Orange White Purple Choos an ID-number 13.
Setting Personal Data 6 Using the +/- key, set the MINIMUM PULSE RATE LIMIT. The value of the minimum pulse rate limit can never be higher than the value of the maximum pulse rate limit. The range limit is between 30 and 250 beats per minute. 7 Press the MODE key. The words MAXIMUM PULSE RATE LIMIT will start to flash in the centre. 8 Using the +/- key, set the MAXIMUM PULSE RATE LIMIT. 9 Press the MODE key. The words BODY WEIGHT will start to flash at the bottom right.
Setting Training Programs 3C SETTING TRAINING PROGRAMS Start setting the training program in the program display. Press the purple key until the word PROGRAM appears in the display at the bottom right (fig.15). 1 > 2 > 3 > 4 > You now have the following options to continue To set the route distances of the P0 program: Using the +/- key, select P0 and then continue with Setting Route Distances of P0 Program.
Setting Training Programs Select program P0 to P10 Program Opponent Yellow Orange White Purple Training 15.1 Setting Route Distances of Program P0 15.
Setting Training Programs Select program P1 to P10 Program Opponent Yellow Orange White Purple Training 15.4 Deleting a Program 15.
Setting Training Programs 2 Press MENU (yellow key) to modify the program. ROUTE 1 will start to flash at the bottom left. 3 Using the +/- key, select the route whose value you wish to change. 4 Press the MODE key. SLOPE, or WATT will start to flash. 5 Using the +/- key, change the value setting for SLOPE, or WATT. 6 Press the MODE key. Km/Mi or will start to flash. 7 Using the +/- key, change the value set for Km/Mi or 8 Press the MODE key. ROUTE NO. will start to flash at the bottom left.
Setting Training Programs 7 Press the MODE key. SLOPE, or WATT will start to flash. 8 Using the +/- key, set the value of SLOPE, 9 Press the MODE key. Km/Mi or will start to flash. 10 Using the +/- key, set the value of Km/Mi or or WATT. . If you selected pulse/time or pulse/distance, we recommend that you set the time at five minutes and the minimum distance at 2 Km/Mi per route. 11 Press the MODE key. ROUTE 1 or 2 will start to flash at the bottom left.
Training with Grand Excel 4 TRAINING WITH GRAND EXCEL > Before you start training, if you wish, you can activate the pulse rate registration, set the 24-hour clock and date and switch the data logger on or off. See 3A Setting General Data. Further, you can set the personal data (ID number, name, pulse rate limits and body weights) of 99 persons. See 3B Setting Personal Data. > Starting the Training 1 Press the purple key until the word PROGRAM appears at the bottom right.
Training with Grand Excel Switching the Pulse Rate Alarm OFF or ON during Training If your pulse rate should exceed the pulse rate limit setting during training, the alarm will start to beep. You can turn off the alarm by pressing the purple key once. You can reset the alarm by pressing the purple key a second time.
Training with Grand Excel Training without a Program in P0 In the program display you selected training without a program, P0. The following information will be available in seven different displays during cycling. You can use the MODE and +/- keys to browse ahead through the displays. With the -key, you can browse in reverse. Combination Display (fig.
Training with Grand Excel Cadence Display (fig.21) CADENCE CAD AVS MAX 24-hour clock (if set) total number of revolutions during trip actual pedalling frequency average pedalling frequency maximum pedalling frequency ROUTE PRESENT ROUTE CAD AVS SLOPE MAX TRAINING STOP 21 If the pulse rate registration is activated (see section 3a), you will successively enter three displays involving the pulse rate. If the pulse rate registration is not activated, the combination display will return.
Training with Grand Excel Manual Setting of Slope Resistance or Watts in P0 During cycling or at rest, you can set the slope resistance (SLOPE) or power (WATT) manually. 1 Press the SET key. SLOPE will start to flash at the bottom left. 2 Using the +/- key, set the value of SLOPE between -4 and +9 in increments of 1. 3 To save the slope value settings, press ENTER (white key) and the SET key to go to the WATT settings. The word WATT will start to flash at the upper left.
Training with Grand Excel Training with Programs, in P1 to P10 In the program display you have selected a program (P1 to P10). As with P0, you will now see above the heading PRESENT a bar, which represents your progress in the program, moving from left to right across the display. Above the bar are the words TOTAL TRIP (fig.26). That means that the bar represents progress in the entire program.
Training with Grand Excel Training with Programs and Opponents, in P1 to P10 In the program display you have selected a program (P1 to P10). Select an Opponent You can only cycle against an opponent with a program that has a combination slope/distance setting. The training information of such programs is stored as OPPONENT. Start by selecting an opponent in the program display. Press the purple key until the word PROGRAM appears on the display at the bottom right.
Viewing the Training Information 5 VIEWING THE TRAINING INFORMATION Viewing the Training Information on the Display To view the training information, go to the program display. Press the purple key until the word PROGRAM appears at the bottom right of the display. 1 Using the +/- key, select the program information you wish to view (at the top of the display you can see how many SCORES or OPPONENTS are stored in the program).
Excel Analyser Software 6 EXCEL ANALYSER SOFTWARE > The Excel Analyser software must be installed before you can download the training information to a PC. Place the Excel Analyser CD-Rom disc in de CD-Rom player. The CD-Rom will start automatically. Follow the instructions of the installation program. Connecting up Grand Excel and Running Excel Analyser Software 1 You can use the Excel Analyser Software to retrieve graphs and tables of the recorded training data on the display.
Excel Analyser Software Calendar Opens the month selected. The figures in green indicate that there is training information in the PC for the day in question. On days for which no training information has been recorded, the figures will be in black. In the two scroll windows at the top left, you can select MONTH and YEAR. Click on the TODAY button to return to the current day. <> Browse quickly forward and backward through the days for which scores have been recorded.
Excel Analyser Software Viewing the Graph With the arrow keys on the keyboard you can relocate the vertical MARKING LINE. The values at the bottom left of the graph correspond to the position of the marking line. The slope value, power, or heart rate is also given. You can also view sections of the graph in detail using ZOOM. Use the mouse to select the section you wish to enlarge. After zooming in, a scroll bar will appear at the bottom of the graph. The data in statistics will change accordingly.
Excel Analyser Software 3 After the memory has been transferred, the new logging data window will appear (fig.38). Select the trip(s) that you wish to store and click on STORE. 38 During downloading, only the new trips will be visible in the window. The Analyser software recognises previously downloaded logging data and will not show it again. If there are no new logging data, the communication window with Excel will show the text no new logging data. PC > Excel Uploading data from the PC to Grand Excel.
Excel Analyser Software The Status Bar You can use the status bar to speed up performance of the functions listed below. Print Prints active graphs and tables. Graph Graphs of training information. Table List with recorded data per second. Overlap Compare two different graphs of the same course. Overview Performance overview. Arrange Windows The windows will overlap on the screen. Excel > PC Download data from Grand Excel to a PC. PC > Excel Upload data from a PC to Grand Excel.
Excel Analyser Software Excel During downloading, all stored data will be sent. Printer reports can be directly printed out via a printer connected to the parallel port of Grand Excel. However, it is also possible to use the Excel Menu option to review on screen and print out the Identity Overview, the Opponent Overview and the Performance Overview via your PC. ID Print report Identity Overview. Opponent Print report Opponent Overview. Performance Print report Performance Overview.
Optimising Grand Excel 7 1 2 3 4 > OPTIMISING GRAND EXCEL Setting the Excel scale factor and line functions during pulse rate program and speed. Remove the plug underneath the Excel computer. While replacing the plug, depress the SET key until you hear a second beep (fig.41). The scale factor will start to flash at the bottom right. Follow the step-by-step instructions for setting the Excel scale factor and line code during pulse rate program and speed. For recalling the factory settings of the computer.
Optimising Grand Excel Completely Resetting the Computer (fig.41.2) The scale factor will flash at the bottom right. 1 Press DELETE (orange key). DELETE will start to flash, with CANCEL beneath and ENTER beside it. 2 By pressing the orange CANCEL key, you can stop the delete procedure. By pressing ENTER (white key), you will confirm the delete procedure. All your settings will now be deleted and the computer will return to the factory settings. The ODO (total distance) cannot be reset.
Error Messages 8 ERROR MESSAGES Failure Potential problem Solution1 Trainer 1 The CycleForce frame is not level 1 Place the trainer on a level floor 2 The frame has not been assembled properly 2 Check whether all bolts and nuts are properly tightened 3 The bike does not fit properly in the frame 3 Check whether the Tacx Quick-release skewer has been mounted 4 The frame is not fully extended 4 Unfold frame completely 2 Rubber from the bike tyre sticks to the roller 1 The tyre pressure is too lo
Error Messages Failure 6 Cycling power seems less than shown on the display 7 Cycling power seems higher than shown on the display Potential problem 1 The mag unit does not brake properly or at all. 1 Check the cable and plug contacts in the computer and the mag unit. They could be dirty, oxidised or bent. 2 The mains voltage is too low. 2 Grand Excel works properly between 220 and 230 V/50Hz. 3 Several magnets of the mag unit are loose due to having been dropped.
Error Messages Failure Potential problem Solution1 10 The present bar is 1 There could be several causes for this. For example, this not - or not procould be because of a static perly - displayed electrical discharge or because the mains power was down during the trip. 11 Loss of Data Logger Memory, Date and Time 1 The battery is (nearly) empty. 1 Grand Excel must be completely reset, > See 7 Optimising Grand Excel. 1 Replace the battery, (model CR 2032, fig.42).
Error Messages Failure Potential problem Solution1 Printer 14 The printer does not print 15 The printer does not print properly 1 The printer is not compatible or the print set up is incorrect. 1 > See 3A Printer Set Up. 2 The printer cable is not connected properly. 2 Reconnect the printer cable. 3 The cable is connected properly. 3 Check the printer with the same cable connected to a PC. Replace the cable if necessary. 1 The printer set up is incorrect. 1 Try a different printer set up.
EU Declaration of Conformity 9 TECHNICAL SPECIFICATIONS Speed (Km/h or Mi/h) SPD current speed Kilometer or Miles per hour 0,1 to 99,9 Km/h or Mi/h Stopwatch, cycling time capacity 8 hours, 59 min. 59 seconds KM/MI trip distance capacity 9999,9 Km or Mi ODO total distance capacity 99.
Warranty provisions 11 WARRANTY PROVISIONS Tacx products are manufactured in accordance with the highest quality standards. A warranty period of one (1) year from the date of purchase applies to manufacturing or material defects of all Tacx products.