
Instructions
Settings
Debounce – The Tadao Etek Ego board features an interrupt based debounce algorithm
that effectively “scans” the trigger over 2 million times per second. It runs this
completely independent of code execution on the microcontroller so your trigger pulls
are always registered. The debounce setting is in increments of 1/2 milliseconds. Users
should be aware that low debounce settings may cause the marker to read switch bounce
as additional pulls, falsely generating shots or near full-automatic fire. The setting
ranges from 1 to 50 and is defaulted at 10 (5 ms).
Dwell – The amount of time the solenoid is energized each time the marker is fired. The
default is 12 ms. The range is 2 to 20 ms. Too low of a dwell may lead to inconsistency
or drop-off. Too high of a dwell can cause bad air efficiency.
Loader delay – Adds a slight delay after the eye has seen a ball and the bolt is cycled,
causing the gun to fire. If not using force fed loaders, it may be necessary to increase
this setting to prevent chopping. A setting of 1 means no loader delay, which is the
astest. The default is 2 and may be set from 1 to 25.
f
AMB (Anti-mechanical bounce) – Allows the user to adjust the anti-mechanical
bounce feature. Mechanical bounce occurs due to the kick generated during each shot
and can cause the marker to “run away” on the first few shots. AMB helps stop markers
from going full-auto when the trigger is pulled very slowly. The default is 2 and may be
set from 1 to 5 (1 being off). AMB is only used in fire modes 1 and 2 (semi-automatic
unlimited and adjustable).
ABS dwell – Amount of dwell time added for an ABS (anti-bolt stick) shot. The range
is from 1 to 10 additional milliseconds of dwell. The default is 1, which is disabled.
ABS programming helps to eliminate first shot drop-off. First shot drop-off occurs when
the lube and o-rings settle or “stick” inside the marker after it has been sitting. The next
shot fired will be lower in velocity because the bolt has to break free. ABS will slightly
increase the dwell to compensate if the marker is left sitting for 15 seconds.
Fire mode – Included are 12 different fire modes (default is 1):
1. Semi-automatic, unlimited rate of fire
2. Semi-automatic, adjustable rate of fire
3. PSP auto-response
4. PSP 50% ramping, adjustable ramp start
5. PSP 100% ramping, adjustable ramp start
6. PSP burst
7. NXL full-automatic
8. Auto-response
9. 50% ramping
10. 100% ramping
11. 3 round burst
12. Full-automatic
Setting 1 is normal semi-automatic with an unlimited rate of fire while the eyes are
enabled. When the eyes are turned off, the max rate of fire is set to 20 balls per second.
Setting 2 is semi-automatic with an adjustable rate of fire. It limits the maximum balls
per second that can be fired. The cap is set by the max rate of fire setting.
Setting 3 is the PSP auto-response fire mode that works as follows:
•
The first 3 shots of a string are semi-automatic
• After the 4th
shot the marker will fire on the pull and release in auto-
response mode
• If the user stops firing for more than 1 second, the 3-shot semi-automatic
count starts over
Setting 4 is the PSP 50% ramping fire mode that works as follows:
• The first 3 shots of a string are semi-automatic
• After the 4th shot the marker will ramp, adding 1 additional shot for every 2
pulled by the user, as long as the user pulls the trigger faster than the ramp
start setting
• If the user stops firing for more than 1 second, the 3-shot semi-automatic
count starts over
Setting 5 is the PSP 100% ramping fire mode that works as follows:
• The first 3 shots of a string are semi-automatic
• After the 4th shot the marker will ramp up to the loader’s maximum speed or
the maximum rate of fire, as long as the user pulls the trigger faster than the
ramp start setting
• If the user stops firing for more than 1 second, the 3-shot semi-automatic
count starts over
Setting 6 is the PSP burst fire mode that works as follows:
• The first 3 shots of a string are semi-automatic
• After the 4th shot the marker will burst fire 3 shots per pull
• If the user stops firing for more than 1 second, the 3-shot semi-automatic
count starts over
Setting 7 is the NXL full-automatic fire mode. It functions similarly to the PSP fire
modes except, after the 3rd semi-automatic shot, the user may pull and hold the trigger
for the marker to fire in full-automatic.
Setting 8 is the normal auto-response fire mode. The marker will fire on each pull and
release of the trigger, generating 2 shots per full pull cycle.
Setting 9 is the normal 50% ramping fire mode. The marker will fire in semi-automatic
unless the user pulls the trigger faster than the ramp start setting. Once the ramp start
setting has been achieved, the marker will 50% ramp, adding 1 additional shot for every
2 trigger pulls.
Setting 10 is the normal 100% ramping fire mode. The marker will fire in semi-
automatic unless the user pulls the trigger faster than the ramp start setting. Once the
ramp start setting has been achieved, the marker will ramp up to the maximum feed rate
of the loader or the maximum rate of fire setting, whichever is lower.
Setting 11 is the normal 3 round burst fire mode. The marker will burst fire 3 times for
every pull and release of the trigger.
Setting 12 is the normal full-automatic fire mode. As long as the trigger is depressed the
marker will fire in full-automatic.
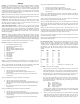
Fire mode max rate of fire – The max rate of fire setting applies to the 2nd – 12th fire
modes. The max rate of fire is adjustable from 10 to 25 balls per second, and has an
unlimited setting for maxing out the loader system. The default is 7, which is roughly
13 balls per second. Oscillator inconsistencies from chip to chip make it impossible to
time perfectly, so the only true way to check rate of fire is to use a Pact Timer or
ballistic chronograph. The red radar chronographs commonly found at fields are NOT
reliable.
Setting BPS Setting BPS
1 10.0 12 15.5
2 10.5 13 16.0
3 11.0 14 17.0
4 11.5 15 18.0
5 12.0 16 19.0
6 12.5 17 20.0
7 (default) 13.0 18 21.0
8 13.5 19 22.0
9 14.0 20 23.0
10 14.5 21 24.0
11 15.0 22 Unlimited eyes on, 25.0 bps eyes off
Eye Mode – Four eye modes are available:
1. Delayed – If the eye system does not detect a ball in the breech for 1/2 second, the
marker automatically fires. This is useful for sound activated loaders because it
ensures that a shot is fired, even without paint, so the loader will continue to feed.
2. Forced with force shot – The marker only fires if paint is seen in the breech or the
user pulls and holds the trigger for 1/2 second, thereby initiating a force shot.
3. Test – This mode is specifically for seeing how fast the user can fire the marker, or
how fast the pneumatics can actually cycle. The eyes work to prevent firing if
they are blocked. This mode is only for dry firing. The LED is used to show the
fastest achieved rate of fire:
Red less than 10 bps
Yellow between 10 and 15 bps
Green between 15 and 20 bps
Blue between 20 and 25 bps
White 25 bps or greater
As long as the user continues to fire, the fastest achieved rate of fire will continue
to be displayed on the LED. If the user stops firing for 1 second, the LED will
cycle back through the rate of fire colors.
4. Training – This mode works just like the test eye mode, but features an adjustable
dwell setting independent of the normal dwell, which makes it easy for users to
adjust their trigger settings and try them out with much less noise and air
consumption. The training mode dwell setting corresponds with this eye mode.