
Instructions / Assembly

STEP 1. Check that the rough wall opening is square (diagonals measure must
match). The rough opening width and height should be at least 1/2” larger than
the actual window size. Next, cut a piece of flashing tape (not included) 12”
longer than the opening width. Apply tape at the bottom of the opening so that
it overhangs 1” to the exterior and 6” up each side of the opening, as shown.
Aluminum Window
Installation Instructions
Replacement/New Construction application
Note: window openings should always be non load-bearing
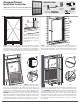
STEP 4 Secure window through the sidewall jambs using panhead screws
(fig. D) (not included) fastened every 4”- 6” starting up/down from each
corner. CAUTION Be careful NOT to drill through the window balances that
run inside the sidewall jambs. Next, install a series of exterior stops (not
included) tightly against the sash and window. Finally, apply sealant (not
included) to the perimeter of the exterior of the window between the rough
opening and sash (fig. E) and then seal the interior of the window in the
same way. Finish with exterior and interior trim, if necessary, to complete
the installation.
REQUIRED TOOLS
JAMB
HEADER
SHIM
SHIM
SHIM
SHIM SHIM
SILL
SHIM
JAMB
JAMB
HEADER
JAMB
SILL
SEALANT
BATT-TYPE
INSULATION
TAPE
MEASURE
#8 X 2”
PAN HEAD
SCREWS
DRILL
DRIVER
JAMB
HEADER
SHIM
SHIM
SHIM
SHIM SHIM
SILL
SHIM
JAMB
JAMB
HEADER
JAMB
SILL
STEP 2. If you are installing from the outside, prepare and install four
1” x 1/2” interior window stops (not included) towards the inside of the
window rough opening (fig A). These will hold the window in place during
the installation and will serve as part of your finish interior trim material.
A
B D
EC
Note: Cut tape 12” longer than the
width of the opening so it extends
up each side by approx 6”. The
flashing tape does not have to
extend all the way to the interior
of the framing.
6”
1”
STEP 3 Remove the included
aluminum head expansion jamb from the top of the window and install across
the top of your rough opening so that it butts up against the interior stop
that was previously installed in STEP #2. Secure the expansion jamb with
panhead screws (not included). Next, insulate around the perimeter of the
window with a 1-1/2”-2” strip of batt type insulation (not included) (fig. B).
CAUTION Using expanding foam sealants may make the window too
tight in the opening and can negatively impact the operation of the window.
Finally, angle the widow sash into the expansion jamb and lower into the
rough opening opening (fig. C). Shim around the window if necessary to
ensure the window operates smoothly and is plumb, square and level.