Model #TPGAZ1558 USE AND CARE GUIDE 10’x10’ Steel Fan Gazebo
Table of Contents Table of Contents .......................................................... 2 Safety Information ......................................................... 2 Warranty ......................................................................... 2 What is Covered .......................................................................2 What is Not Covered ................................................................2 Warning.....................................................................
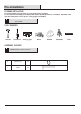
Pre-installation PLANNING INSTALLATION To prevent damage, place all parts on a soft surface during assembly. Tools required for assembly (not included): Allen wrench (included), hammer, screwdriver, stepladder, level and other safety items such as gloves, safety goggles and hardhat. NOTE: Tools and protective articles below are not provided. TOOLS REQUIRED Hammer Screwdriver Safety goggles Gloves HARDWARE INCLUDED NOTE: Hardware not shown to actual size.
Pre-installation (continued) PACKAGE CONTENTS A Central Connector 1 B Long Top Bar 4 C Short Top Bar 4 D Lintel 4 E Corner Panel 4 F Connector 8 F1 Bolt (M10*15) 8 G Shelf 4 H Small Canopy 1 I Large Canopy 1 J Mosquito Netting 4 4
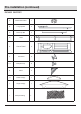
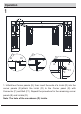
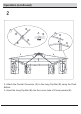
Operation 1 D D E E E E 2 1 E D D D 3 D E E D F F F1 1. Unfold two Corner panels (E), then insert the ends of a Lintel (D) into the corner panels (E),attach the Lintel (D) to the Corner panel (E) with Connector (F) and Bolt (F1). Repeat the procedure for the remaining corner panels (E) and Lintels (D). Note: The hole of the crossbeam (D) inside.
Operation (continued) 2 B 1 A B B 2 A B B E B B A B B B D D E D D E E E 2. Attach the Central Connector (A) to the Long Top Bar (B) using the Push Button. 3. Insert the Long Top Bar (B) into the corner tube of Corner panels (E).
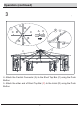
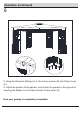
Operation (continued) 3 C 1 B A C C B 2 C C A B B C D C A D D E C D D E E E 4. Attach the Central Connector (A) to the Short Top Bar (C) using the Push Button. 5. Attach the other end of Short Top Bar (C) to the Lintel (D) using the Push Button.
Operation (continued) 4 C H/I B I H I D D E E 6. Slide the Large Canopy (I) onto the top of the gazebo (do not tighten at this stage); place the small Canopy(H) onto the Small Top Bar, then tighten the Canopy.
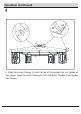
Operation (continued) 5 E G 7. Place Shelves (G) onto Corner panels (E) as desired.
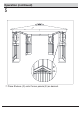
Operation (continued) 6 K E E J L 8. Hang the Mosquito Netting (J) on the Corner panels (E) with Plastic Loop (K). 9. Adjust the position of the gazebo, and anchor the gazebo to the ground by inserting the Stakes (L) into holes of each Corner panel (E). Now your gazebo is completely assembled.