
User's Manual


68 Installation TB8100 Installation and Operation Manual
© Tait Electronics Ltd March 2004
1. Remove the front panel, as described in
“Preliminary Disassembly”
on page 71
.
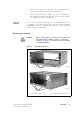
2. Fit the subrack into the cabinet or rack and secure it firmly with an
M6 screw, flat and spring washer in each of the four main mounting
holes
b, as shown in
Figure 5.4 on page 67.
Note If you need extra mounting security, there are additional mount-
ing holes c provided at the rear of the subrack for auxiliary sup-
port brackets.
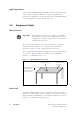
Auxiliary Support Bracket
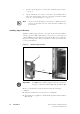
TBA2140 auxiliary support brackets can be fitted to the rear of the TB8100
subrack to provide additional mounting security.
Figure 5.5 below shows a
standard TBA2140 bracket b fitted in a typical Tait Electronics cabinet c.
If you are not using a Tait cabinet, you may have to make your own brackets
to suit your installation.
Important Yo u must fit the auxiliary support brackets if you intend to
transport a cabinet fitted with a fully built-up TB8100 BSS.
We also recommend that you fit the brackets under the following
conditions:
■ when the installation is in an area prone to earthquakes
■ when third party equipment is installed hard up underneath the TB8100
BSS subrack.
Figure 5.5 Auxiliary Support Bracket
c
b