
User's Manual


plug the DC adapter to a wall outlet.
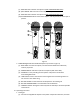
(2) Press the Receiver’s power switch to turn the power on, and the status LED will
light up green.
(3) Press the microphone’s power switch to turn the power on, and the status LED
will light up green. When the microphone connecting LED on the Receiver lights
up red, it indicates the microphone signal is been received by the Receiver.
(4) If the feedback noise appears when the volume is too high or the microphone is
too close to the speaker, turn the volume down.
(5) For best result, keep the microphone to the sound source in between 2 to 5 cm.
2. Turning off
(1) Keep pressing the microphone power switch for 2 to 3 seconds till the status LED
goes off. When the microphone is been turned off, the microphone connecting
LED on the Receiver will also go off.
(2) Press the power switch on the Receiver till the status LED goes off.
3. Replacing batteries
(1) When the status LED keeps blinking after the microphone is on, it indicates the
battery energy is running low, so please replace the batteries.
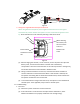
(2) As shown in figure 3, press on where circle 1 indicates and push the battery cover
forward to the end, then remove the cover (CAUTION: To avoid injury, DO NOT
place your fingers at where circle 2 indicates when pushing the cover).
figure 3
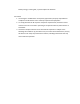
(3) Insert two AA batteries in the battery compartment according to the polarity
marks.
figure 4
(4) Replace the battery cover. Place the cover on top front of the battery
compartment, then press on where circle 3 indicates and push the battery cover
downward to the end (CAUTION: To avoid injury, DO NOT place your fingers at
where circle 4 indicates when pushing the cover).
1
2