TA L K S W I TC H D O C U M E N TAT I O N VOIP NETWORK CONFIGURATION GUIDE RELEASE 6.10 C T.T S 0 0 5 .
INTRODUCTION About this guide This guide will help you plan and configure a TalkSwitch system to use VoIP (Voice over IP) in order to: • Use IP phones as external IP extensions. • Set up a multi-location TalkSwitch VoIP network. • Subscribe to a VoIP service provider. Where to go for further information You can find additional documentation: • Within the TalkSwitch management software by clicking the Help icons. • By choosing Start > Programs > TalkSwitch 6.10 > Documentation.
ABOUT VOIP VoIP-enabled TalkSwitch units route VoIP calls over the Internet or private IP network, and other calls over the traditional telephone network. VoIP-enabled TalkSwitch units use the industry-standard Session Initiation Protocol (SIP) for VoIP calls. In this guide the term SIP is often used in place of VoIP. About SIP servers A VoIP network requires a SIP server to manage calls across the network. The SIP server contains registration information for all SIP devices in the network.
CONNECTING TO A NETWORK Each location requires a high-speed connection to the Internet or private IP network that is sufficient for VoIP calls. This is required for a location using an external IP extension, TalkSwitch VoIP network, or service provider VoIP network. Connecting to local and IP networks Set up a LAN (local area network) with an Ethernet switch, router, and modem or gateway. The Ethernet switch can be integrated into the router.
CONFIGURING IP ADDRESSES Starting the TalkSwitch management software 1. Double-click the TalkSwitch Configuration 6.10 icon on your desktop. You can also select Start > Programs > TalkSwitch 6.10 > TalkSwitch Configuration 6.10. The TalkSwitch Management Software window appears, and the software attempts to detect your TalkSwitch unit. 2. Select your language. You can select English, Français or Español. 3. Once the software detects your TalkSwitch unit, click Configure AutoDetected TalkSwitch System.
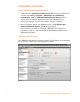
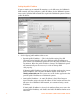
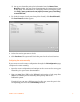
1. Select the IP Configuration page. By default, Obtain IP and DNS information automatically is selected and the area shows IP addresses from the router. 2. Change Obtain IP and DNS information automatically to Use configured IP and DNS information in order to lock in the IP addresses. 3. In some cases, the System IP Settings area may be blank because your router has not delivered the IP addresses.
Setting the public IP address If you are setting up an external IP extension, or the SIP server of a TalkSwitch VoIP network, you must configure a public IP address for the TalkSwitch system. Some service provider VoIP networks also require the TalkSwitch system to have a public IP address. X Z Y 1. Set the Type of public address. Choices are: • Dynamic public IP address — This is the default setting. Your ISP (Internet Service Provider) will assign different public IP addresses to your location.
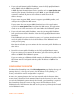
2. If you selected Dynamic public IP address, enter the Fully qualified domain name (FQDN). Get the FQDN from your ISP. A DDNS (Dynamic Domain Name Service) provider such as www.dyndns.com matches your dynamic IP addresses to your FQDN, so your TalkSwitch VoIP network or external IP phones will continue to work when the IP address changes. If your router supports DDNS, ensure it supports your DDNS provider, and configure it to update the DNS servers.
If you are setting up external IP extensions, a TalkSwitch VoIP network, or a VoIP service that doesn’t handle port forwarding, port forwarding is required. If port forwarding is required, and your router supports uPNP (Universal Plug and Play), ensure uPNP is enabled. The TalkSwitch system will use uPNP to automatically set up port forwarding, and the Automatic (uPNP Enabled) link will appear. No router configuration is required.
d) Set up port forwarding using the information from the Manual Port Mapping window. See your router documentation for instructions on how to map ports. For information on configuring routers and mapping ports, visit http://www.portforward.com/english/routers/port_forwarding/ routerindex.htm. 4. To check the status of each port through the firewall, click Check Firewall. The Test Firewall window appears. 5. Select the services you want to check. 6. Click Test Ports.
3. Map the following ports (Type: UDP) to the TalkSwitch units. These RTP ports forward voice traffic to the TalkSwitch system by default. VoIP Lines/ Unit Unit 1 Unit 2 Unit 3 Unit 4 4 6000–6006 6010–6016 6020–6026 6030–6036 8 6100–6114 6200–6214 6300–6314 6400–6414 If required, you can map different ports. In this case enter the first port in the Starting RTP port box of the VoIP Settings window. 4.
EXTERNAL IP EXTENSIONS Warning: Calls to an emergency service number (e.g. 911) using an external IP extension will not send the correct address to the emergency operator. We strongly recommend that you apply a warning label to any external IP extension stating: 1. Calls to emergency services should not be placed from this phone. 2. If an emergency call is made from this phone, you must provide your address to the emergency operator. An external IP extension is an IP phone located outside the office.
To set up an external IP extension, use the following steps: 1. Add the external IP extension, as described in Adding IP Phones to TalkSwitch. Procedures are available for adding TalkSwitch, Polycom, Grandstream, Counterpath and selected other phones (depending on the market). 2. Verify operation of the external IP extension: a) Select the Local Extension/Fax page. b) Select the external IP extension. c) Confirm Registered is Yes, and the Phone URL appears in the IP Extension Details area. 3.
TALKSWITCH VOIP NETWORK A TalkSwitch VoIP network has at least one SIP device at each location. A SIP device is a VoIP-enabled TalkSwitch unit, IP telephone or SIP gateway. One TalkSwitch unit in the network acts as the SIP server. The other SIP devices are SIP clients. A user, auto attendant or call cascade can dial a three-digit VoIP number (ranging from 250 to 299) to reach an extension, auto attendant or voice mailbox at any location.
SETTING UP A TALKSWITCH PROFILE FOR THE SIP SERVER The TalkSwitch profile for the SIP server shows registration details and contains authentication information. 1. Start the TalkSwitch management software, and connect to the TalkSwitch system that will act as the SIP server. 2. Select the VoIP Configuration page. 3. Select Profile TS, which is for configuring the TalkSwitch profile. _ Y Z [ \ ] ^ 4. Select the This TalkSwitch location is the proxy/registrar check box. 5.
SETTING UP A TALKSWITCH PROFILE FOR A SIP CLIENT The TalkSwitch profile for a SIP client contains registration details and authentication information. 1. Start the TalkSwitch management software, and connect to the TalkSwitch system that will act as the SIP client. 2. Select the VoIP Configuration page. 3. Select Profile TS, which is for configuring the TalkSwitch profile. Y Z [ \ ] ^ 4. Leave the This TalkSwitch location is the proxy/registrar check box cleared. 5.
CONFIGURING VOIP NUMBERS FOR A TALKSWITCH VOIP NETWORK A VoIP number is like a telephone number, and is used to dial a TalkSwitch system at a particular location. Each VoIP number must be unique (i.e. only used at one location). VoIP numbers 250 to 299 permit direct dialing from any extension, auto attendant or call cascade to any extension, auto attendant or voice mailbox in the TalkSwitch VoIP network. No line hunt group number is required.
SETTING UP LINE HUNT GROUPS IMPORTANT: Ensure at least one line hunt group uses telephone lines that can reach emergency services. If a VoIP-enabled TalkSwitch unit is present, line hunt group 88 uses the TalkSwitch VoIP network by default, and the other line hunt groups use telephone lines. You can modify these default settings as described on page 24. Note that the user does not have to dial the line hunt group number before VoIP numbers 250–299: these automatically use the TalkSwitch VoIP network.
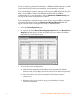
VERIFYING THE TALKSWITCH VOIP NETWORK If you are configuring the TalkSwitch profile for the SIP server, the window enables the View Registrar Entries button. Clicking the button shows the Registrar Entries window with a list of VoIP numbers, their IP addresses and port numbers, and the number of seconds until their registrations with the SIP server will expire. 1. Select the VoIP Configuration page. 2. Select Profile TS, and then click View Registrar Entries. The Registrar Entries window appears.
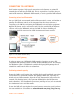
SERVICE PROVIDER VOIP NETWORK Using a service provider VoIP network requires at least one VoIP-enabled TalkSwitch unit. The service provider acts as the SIP server. The service provider assigns the VoIP numbers and VoIP configuration parameters. For example, the following illustration shows a service provider VoIP network.
SETTING UP A SERVICE PROVIDER PROFILE If you are using a TalkSwitch-certified VoIP service provider, visit www.talkswitch.com/support/ServiceConfigurationGuides.asp to access the service configuration guide for your VoIP service provider. Otherwise use the procedures in this section. A service provider profile contains the registration details for connecting to the service provider’s SIP server. 1. Start the TalkSwitch management software. 2. Select the VoIP Configuration page. 3.
7. If your service provider requires you to set up keep alive messages, and if your router does not support uPNP, set up keep alive messages. Keep alive messages maintain the connection from the TalkSwitch unit, through your router, to the service provider’s SIP server. a) Select the Enable NAT keep alives check box. b) Click Settings. The Keep Alive Settings window appears. c) Select the type of ping, as directed by your service provider.
The Codec Options window allows you to select the codecs that your system can use, specify the preferred codec, and clear the unsupported codecs. You can specify the codecs for the TalkSwitch profile, and for each service provider profile. External IP extensions will use the preferred codec specified in the TalkSwitch profile. 1. Select the VoIP Configuration page. 2. Click Codec Options. The Codec Options window appears. 3. Select the codecs that your system can use, and clear the unsupported codecs.
CONFIGURING VOIP NUMBERS FOR A SERVICE PROVIDER VOIP NETWORK If you are using a TalkSwitch-certified VoIP service provider, visit www.talkswitch.com/support/ServiceConfigurationGuides.asp to access the service configuration guide for your VoIP service provider. Otherwise use the procedures in this section. A VoIP number is like a telephone number, and is used to dial a TalkSwitch system at a particular location. Your service provider will assign VoIP numbers for each location. 1.
SETTING UP LINE HUNT GROUPS IMPORTANT: Ensure at least one line hunt group uses telephone lines that can reach emergency services. A line hunt group is a set of lines that are available for making an outbound call. It can use selected telephone lines, all VoIP lines associated with the TalkSwitch VoIP network, or all VoIP lines associated with a service provider VoIP network. The configuration has nine different line hunt groups.
ADVANCED VOIP CONFIGURATION Optionally, perform advanced VoIP configuration. Setting up caller ID The VoIP Caller ID area allows you to set up the source for caller ID for outbound VoIP calls. The same setting is used for the TalkSwitch profile and all service provider profiles. Extension names are used by default. 1. Select the VoIP Configuration page. 2. Set the caller ID for outbound VoIP calls.
Reserving VoIP lines By default, all TalkSwitch VoIP lines are available for external IP extensions, TalkSwitch VoIP network calls, and/or service provider calls on a first-come firstserved basis. You can also reserve VoIP lines for a specific use. For example, you can set aside two lines for external IP extensions. Reserving VoIP lines guarantees resources for a specific network. Sharing VoIP lines uses them most efficiently. 1. Select the VoIP Configuration page. 2. Click Reserve VoIP Lines.
VERIFYING REGISTRATION Clicking the View All Registrations button shows a window with a list of VoIP numbers, their registration status, and the number of seconds until their registrations with the SIP server will expire. This confirms that the TalkSwitch system is registered with a SIP server. 1. Select the VoIP Configuration page. 2. Click View All Registrations. The Registration status window appears. 3. Choose All Registered Numbers or an active profile.
APPENDIX A — TALKSWITCH VOIP NETWORK ADMINISTRATION FORM Use this form to keep track of VoIP numbers assigned to locations within a TalkSwitch VoIP network.