TS-200 cover_4c.qxd 11/2/2007 3:33 PM Page 1 TALKSWITCH USER GUIDE TALKSWITCH TS-200 TELEPHONE C T.T P 0 0 5 . 0 0 1 4 0 1 1545 CARLING AVENUE, SUITE 510 OTTAWA, ONTARIO, CANADA K1Z 8P9 www.talkswitch.
TalkSwitch is a division of Centrepoint Technologies Inc. November 2007 CT.TP.005.001401 Information in this user guide is subject to change without notice and does not represent any commitment on the part of TalkSwitch.
Dear TS-200 owner, Your TS-200 may be a new model that uses icons for special function keys that are not reflected in this guide. Please take note of the changes below: Key Label New Key Icon RELEASE MUT E H O LD SPEAKER French language TalkSwitch documentation For the TS-200 User Guide and Quick Reference Card in French, please visit our website at www.talkswitch.
TABLE OF CONTENTS Installing your phone . . . . . . . . . . . . . . . . . . . . . . . . . . . . . . . . . . . . . . . . 1 Introduction . . . . . . . . . . . . . . . . . . . . . . . . . . . . . . . . . . . . . . . . . . . 1 Important safety instructions . . . . . . . . . . . . . . . . . . . . . . . . . . . . . . . 1 Part checklist . . . . . . . . . . . . . . . . . . . . . . . . . . . . . . . . . . . . . . . . . . 3 Installation . . . . . . . . . . . . . . . . . . . . . . . . . . . . . . . . . . . . . . . . .
Useful tips . . . . . . . . . . . . . . . . . . . . . . . . . . . . . . . . . . . . . . . . . . . . . . . 17 Reprogramming the voicemail button for quick access . . . . . . . . . . . . . 17 Ring once feature . . . . . . . . . . . . . . . . . . . . . . . . . . . . . . . . . . . . . . 17 Advanced configuration . . . . . . . . . . . . . . . . . . . . . . . . . . . . . . . . . . . . . 18 Changing your phone back to factory default . . . . . . . . . . . . . . . . . . .
TS-200 USER GUIDE INSTALLING YOUR PHONE INTRODUCTION Congratulations on purchasing a TalkSwitch® TS-200 phone. This phone is specifically designed to take full advantage of the features provided by the TalkSwitch line of phone systems.
TS-200 USER GUIDE 7. Do not allow anything to rest on the telephone line cord or power cord. Do not locate this product where its cords will be stepped on or interfered with. 8. Do not overload outlets and extension cords, as this can result in the risk of fire or electric shock. 9. Never push objects of any kind into this product through the cabinet slots, as you may touch dangerous voltage points or short out parts that could result in fire or electrical shock. 10.
TS-200 USER GUIDE PART CHECKLIST The following parts are included with your TS-200 phone: • • • • TS-200 telephone Plastic base AC power adapter 6’ RJ11 phone cable • Handset • Coiled handset cord • TS-200 User Guide If any of these parts are missing, please contact your reseller. INSTALLATION 1. Connect the power adapter to a wall socket and to the phone base. The power jack is located on the underside of the phone. Use only the power adapter provided with your phone. 2.
TS-200 USER GUIDE SETTING UP YOUR TS-200 PHONE Before you can start using your TS-200 telephone, you will need to do the following: 1. Configure your line access mode. 2. Set the language display. 3. Enable headset operation if you’re using a headset. 4. Set the date and time. CONFIGURE THE LINE ACCESS MODE When you first power up the phone, the display will show DIRECT LINE? with options YES and NO. • If this extension is configured so that you don’t need to dial external calls, then select YES.
TS-200 USER GUIDE SET THE LANGUAGE DISPLAY The telephone’s display has three lines of text. The first two lines display information, while the third shows the functions of the 4 softkey buttons located below the display. 09/16 05 11:03 AM 03 CALLS MESSAGES When the phone is idle, it displays the time and date as well as the number of calls received and number of new messages in your voicemail inbox. Your phone comes with the English display menus installed.
TS-200 USER GUIDE HEADSET OPERATION (OPTIONAL) If you are using a headset, you will need to configure your telephone to operate in headset mode. Configuring the TS-200 for headset mode allows you to place calls using the headset without the need to lift the handset. The TS-200 supports 2 types of headsets: Headsets with RJ22 (handset) connectors Headsets with 2.
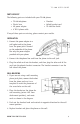
TS-200 USER GUIDE Installing headsets with 2.5mm connectors 1. Plug your headset into the 2.5mm jack located on the right side of the phone. 2. The phone will automatically detect the headset and enable headset mode. 2.5 mm Headset Jack Using headsets with the TS-200 Once headset mode is enabled, you can make and receive calls using the headset without having to lift the handset.
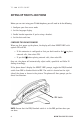
TS-200 USER GUIDE USING YOUR PHONE OVERVIEW OF THE TS-200 PHONE KEY LABEL USAGE 1 • Drop active call. • Exit configuration menus or cancel data entry. 2 • Mute microphone during a call. • Enable/disable ring once feature when idle. 3 • Hold/unhold an active call. 4 • Enables handsfree operation. • Toggle between headset/handsfree/on-hook when in headset mode. 8 W W W.T A L K S W I T C H .
TS-200 USER GUIDE KEY LABEL USAGE 5 OPTIONS 6 PHONEBOOK • Access the phone book. • Access the configuration menu. • Show Call Detail while in call log. • Store the displayed phone number in the phone book. 7 VOICEMAIL • Calls Voicemail. 8 FLASH 9 DND 10 PICKUP 11 CONF 12 REDIAL 13 VOLUME S • Increase ringer volume — when idle. • Send a FLASH signal to the Extension line. • Toggles do-not-disturb on and off. • Answer a call at any ringing extension.
TS-200 USER GUIDE MAKING A CALL Calls can be initiated in a number of different ways: Traditional — Lift the handset and dial the number. Handsfree or headset — Press the button and dial the number. Pre-dial — Dial the number first then lift the handset or press . If required, the phone will automatically add the line access code (for example “9”) if you dialed an external number. Call log — Dial from the call log. See the call log section for details on how to do this.
TS-200 USER GUIDE PUTTING A CALL ON HOLD You can put a call on hold by pressing the button. Once a call is on hold, you can hang up your phone without losing the call. In order to get re-connected to a call that you previously put on hold, you must first lift the handset or press the button, then press the button. You will be reconnected to your previous call. Note: A call that was put on hold at a specific extension can only be retrieved from the same extension.
TS-200 USER GUIDE PARKING A CALL Parking a call puts the call on hold in one of ten park orbits, and allows the call to be retrieved from any phone in the office. 1. Press the PARK softkey to park the current call. 2. The system will respond by confirming the call is parked and will announce the park orbit. The orbit is between 500 and 509. To retrieve a call that has been parked: 1. From any phone, lift the handset or press the button. 2.
TS-200 USER GUIDE DO NOT DISTURB You can enable Do Not Disturb on your extension and you will not receive any calls at that extension. All calls will follow the programmed Do Not Disturb call cascade option for your extension, such as going directly to voicemail. To enable or disable Do Not Disturb: 1. Lift the handset or press the 2. Press the DND button. button. 3. The Do Not Disturb setting of your extension will be changed.
TS-200 USER GUIDE For example, the display would show the following: 12 CALLS: Total number of calls in the call log. 12 CALLS 5 NEW: Indicates the number of calls in the call log that have not been reviewed. This includes answered and unanswered calls. RSET FIND UP DOWN Resets all new calls as old without having to review all calls. UP Displays the call log starting with the oldest call. DOWN Displays the call log starting with the newest call.
TS-200 USER GUIDE OPTIONS Show additional information about the call. (The Options button is the topmost feature key). Record Number: 1 of 45 AN: Call was answered 1/45 AN 4 09/20 CB: “Called-back” from the call record DEL CB LD 4:35 PM DIAL UP DOWN LD: Long Distance Call 4: is the Number of calls received from this caller. UP/DOWN Show the next call record for this caller. USING ONE-TOUCH SPEED DIALS The TS-200 has 10 programmable one-touch speed dial buttons.
TS-200 USER GUIDE • You can include “Flash” in the dialing sequence by pressing the FLASH softkey. DIR • Pressing at beginning of a number will disable the automatic dialing of the line access code 9. • If your phone is configured for Direct Line Access, the phone will never insert a line access code 9. • These tips also apply to programming phone book entries.
TS-200 USER GUIDE USEFUL TIPS REPROGRAMMING THE VOICEMAIL BUTTON FOR QUICK ACCESS Most people have a password assigned to their mailbox for security purposes. The TS-200 is shipped with the VOICEMAIL button programmed to dial * * # to access your mailbox. Once in voicemail you then have to enter a password, # , then press 1 to listen to messages. To automate this process, you can reprogram the voicemail number as follows: 1. Press the OPTIONS button located at the upper right side of the phone. 2.
TS-200 USER GUIDE ADVANCED CONFIGURATION Pressing the OPTIONS button while the phone is idle provides access to numerous programmable features and values for the telephone. WARNING: Changing some of the values in the Options menus may cause your phone to experience operational problems. CHANGING YOUR PHONE BACK TO FACTORY DEFAULT WARNING: Resetting your phone to factory default will cause all programming, including the phone book to be erased.
TS-200 USER GUIDE OPTIONS MENU DEFAULT SETTINGS Key Code 1 2 3 4 5 6 7 8 9 0 * # Feature/Value Phone book Speed dial Headset Voicemail number Ring tone LCD contrast LCD backlight Features Auto dial prefix Set time/date Advanced config About Setting OFF **# Fast warble Sub-menu 9 Sub-menu - FEATURES MENU DEFAULT SETTINGS 8-1 8-2 8-3 8-4 8-5 8-6 8-7 8-8 Time format Date format Auto time set Auto answer Store Caller ID Quiet auto dial Format numbers Auto idle/hold 12hr.
TS-200 USER GUIDE CONFIGURATION MENUS FUNCTION SUMMARY Key Code 1 2 3 4 5 6 7 8 9 0 * # 8-1 8-2 8-3 8-4 8-5 8-6 8-7 8-8 *-1 *-2 *-3 *-4 *-5 *-6 *-7 *-8 *-9 *-0 *-**-1-1 *-1-2 *-1-3 *-1-4 *-1-5 *-1-6 *-1-7 *-1-8 20 Feature/Value Name Phone book Speed dial Headset Voicemail # Ring tone LCD contrast LCD backlight Features Auto dial prefix Set time/date Advanced cfg.
TS-200 USER GUIDE MAINTENANCE OF YOUR PHONE Treat your telephone with care for trouble-free performance. Avoid dropping the handset or telephone. Dropping or damaging the phone will void the warranty. Retain the original packaging in case you need to ship your phone back for repair. Clean your telephone with a slightly damp cloth. Never use detergents, excess water, aerosols or cleaning agents.
TS-200 USER GUIDE NO CALLER ID • Check Caller ID subscription. In order to receive Caller ID for external calls, you must be subscribed to the Caller ID service from your telephone service provider. HANDSET DOESN’T WORK • Verify that the coiled handset cord jack is fully inserted into the handset. HEADSET DOESN’T WORK • Verify that your phone is configured for headset operation. PROBLEMS DIALING • Verify that the switch on the right side of the phone is in the PBX position.
TS-200 USER GUIDE REGULATORY INFORMATION This equipment complies with TIA-968-A of FCC Rules. On the base unit of this equipment is a label that contains, among other information, the FCC Registration Number and Ringer Equivalence Number (REN) for this equipment. If requested, this information must be given to the telephone company. This equipment also complies with regulations RSS210 and CS-03 of Industry Canada and Science Canada.
TS-200 USER GUIDE TALKSWITCH LIMITED WARRANTY TalkSwitch, a division of Centrepoint Technologies Inc. (“TalkSwitch”) warrants to the original end-user customer (“Customer”) that each new TalkSwitch TS-200 telephone shall be substantially free from defects in materials and workmanship under normal use for a period of one (1) year from the date of the original purchase (proof of purchase required).
TS-200 USER GUIDE (INCLUDING WITHOUT LIMITATION, NEGLIGENCE), or any other legal theory, whether or not advised of the possibility of such damages, or whether such damages are forseeable. In any event, the total aggregate liability of TalkSwitch FOR DIRECT DAMAGES shall not exceed the purchase price of the product. This warranty gives specific rights, and Customer may have other rights subject to jurisdiction.
TS-200 USER GUIDE FOR PRODUCTS PURCHASED OUTSIDE OF THE U.S. AND CANADA To be eligible to obtain warranty service during the warranty period the Customer must provide proof of the date of purchase, serial number, and obtain warranty return instructions from the appropriate Authorized Warranty Centre. Authorized Warranty Centres are listed in the User Guide and on www.talkswitch.com.