Philips 107B Electronic User's Manual file:///G|/manual/english/107B/index.
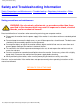
Safety & Troubleshooting Safety and Troubleshooting Information Safety Precautions and Maintenance • Troubleshooting • Regulatory Information • Other Related Information Safety precautions and maintenance WARNING: Use of controls, adjustments, or procedures other than those specified in this documentation may result in exposure to shock, electrical hazards, and/or mechanical hazards.
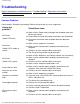
Troubleshooting Troubleshooting Safety Precautions and Maintenance • Troubleshooting • Regulatory Information • Other Related Information Common Problems Having trouble? Something not working? Before calling for help, try these suggestions. Having this problem? Check these items ● Make sure the Power cable is plugged into the power outlet and back of the monitor. ● Power button on top of the monitor should be in the ON position. Disconnect the monitor from the power outlet for about one minute.
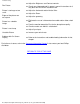
Troubleshooting ● Dim Picture ● Picture is too large or too small. ● Adjust the Brightness and Contrast controls. Check your video card and it's owner's manual instructions for it may be a non-VESA-DDC Standard card. ● Adjust the Horizontal and/or Vertical Size. Adjust the Zoom. ● Adjust the geometry. ● Eliminate the use of a video extension cable and/or video switch box. ● Face the monitor toward the East for the best picture quality. ● ● Check to make sure Moiré is switched off.
Regulatory Information Regulatory Information TCO'92 and TCO '99 Information • TCO Environmental Requirements • Energy Star Declaration • Federal Communications Commission (FCC) Notice (U.S.
Regulatory Information This product meets the requirements for the TCO'99 scheme which provides for international and environmental labeling of personal computers. The labeling scheme was developed as a joint effort by the TCO (The Swedish Confederation of Professional Employees), Svenska Naturskyddsforeningen (The Swedish Society for Nature Conservation) and Statens Energimyndighet (The Swedish National Energy Administration).
Regulatory Information Cadmium** Cadmium is present in rechargeable batteries and in the color-generating layers of certain computer displays. Cadmium damages the nervous system and is toxic in high doses. The relevant TCO'99 requirement states that batteries, the color-generating layers of display screens and the electrical or electronics components must not contain any cadmium. Mercury** Mercury is sometimes found in batteries, relays and switches.
Regulatory Information Normal operation ON Green < 90 W Suspend Yellow < 10 W OFF Amber < 2.3 W Power Saving Position A1 Power Saving Position A2 As an ENERGY STAR® Partner, PHILIPS has determined that this product meets the ENERGY STAR® guidelines for energy efficiency. We recommend you switch off the monitor when it is not in use for quite a long time. RETURN TO TOP OF THE PAGE Federal Communications Commission (FCC) Notice (U.S.
Regulatory Information RETURN TO TOP OF THE PAGE Commission Federale de la Communication (FCC Declaration) Cet équipement a été testé et déclaré conforme auxlimites des appareils numériques de class B,aux termes de l'article 15 Des règles de la FCC. Ces limites sont conçues de façon à fourir une protection raisonnable contre les interférences nuisibles dans le cadre d'une installation résidentielle.
Regulatory Information RETURN TO TOP OF THE PAGE VCCI Notice (Japan Only) This is a Class B product based on the standard of the Voluntary Control Council for Interference (VCCI) for Information technology equipment. If this equipment is used near a radio or television receiver in a domestic environment, it may cause radio Interference. Install and use the equipment according to the instruction manual.
Regulatory Information Polish Center for Testing and Certification Notice The equipment should draw power from a socket with an attached protection circuit (a three-prong socket). All equipment that works together (computer, monitor, printer, and so on) should have the same power supply source. The phasing conductor of the room's electrical installation should have a reserve short-circuit protection device in the form of a fuse with a nominal value no larger than 16 amperes (A).
Regulatory Information Placering/Ventilation VARNING: FÖRSÄKRA DIG OM ATT HUVUDBRYTARE OCH UTTAG ÄR LÄTÅTKOMLIGA, NÄR DU STÄLLER DIN UTRUSTNING PÅPLATS. Placering/Ventilation ADVARSEL: SØRG VED PLACERINGEN FOR, AT NETLEDNINGENS STIK OG STIKKONTAKT ER NEMT TILGÆNGELIGE. Paikka/Ilmankierto VAROITUS: SIJOITA LAITE SITEN, ETTÄ VERKKOJOHTO VOIDAAN TARVITTAESSA HELPOSTI IRROTTAA PISTORASIASTA.
Regulatory Information Ergonomie Hinweis (nur Deutschland) Der von uns gelieferte Farbmonitor entspricht den in der "Verordnung über den Schutz vor Schäden durch Röntgenstrahlen" festgelegten Vorschriften. Auf der Rückwand des Gerätes befindet sich ein Aufkleber, der auf die Unbedenklichkeit der Inbetriebnahme hinweist, da die Vorschriften über die Bauart von Störstrahlern nach Anlage III ¤ 5 Abs. 4 der Röntgenverordnung erfüllt sind.
Regulatory Information of plug proceed as follows: 1. Remove fuse cover and fuse. 2. Fit new fuse which should be a BS 1362 5A,A.S.T.A. or BSI approved type. 3. Refit the fuse cover. If the fitted plug is not suitable for your socket outlets, it should be cut off and an appropriate 3-pin plug fitted in its place. If the mains plug contains a fuse, this should have a value of 5A. If a plug without a fuse is used, the fuse at the distribution board should not be greater than 5A.
Regulatory Information the lead - not simply over the three wires. RETURN TO TOP OF THE PAGE file:///G|/manual/english/107B/safety/regs/regulat.
Other Related Information Other Related Information Safety Precautions and Maintenance • Troubleshooting • Regulatory Information • Information for Users in the U. S. • Information for Users Outside the U.S Information for Users in the U. S. For units set at 115 V : Use a UL Listed Cord Set consisting of a minimum 18 AWG, Type SVT or SJT three conductor cord a maximum of 15-feet long and a parallel blade, grounding type attachment plug rated 15 A, 125 V.
About This Electronic User's Manual About This Electronic User's Manual About This Guide • Other Documents You May Need • Notational Descriptions About This Guide This electronic user's guide is intended for anyone who uses the Philips 107B Color Monitor. It describes the monitor's features, setup, operation and all other information, which is the same exact information described in our printed version.
About This Electronic User's Manual Notes, Cautions, and Warnings Throughout this guide, blocks of text may be accompanied by an icon and printed in bold type or in italic type. These blocks are notes, cautions, and warnings, and they are used as follows: NOTE: This icon indicates important information and tips that help you make better use of your computer system. CAUTION: This icon indicates information that tells you how to avoid either potential damage to hardware or loss of data.
107B Product Information Product Information Product Features • Technical Specifications • Automatic Power Saving • Physical Specification • Pin Assignment • Product Views Product Features 107B10 ● 17" -inch (16.
107B Product Information • Phosphor P22 • Recommended display area 12.0" x 9.0" / 306 x 230 mm • Maximum display area 12.9" x 9.7" / 327 x 245 mm SCANNING • Horizontal scanning 30 - 92 KHz • Vertical scanning 50 - 160 KHz VIDEO • Video dot rate 234 MHz • Input impedance - Video 75 ohm - Sync 2.2 kOhm • Input signal levels 0.
107B Product Information Power LED color Saving (%) VESA's Mode Video H-sync V-sync Power Used ON Active Yes Yes < 90W 0% Green Stand-by Blanked No Yes < 10W 89% Yellow Suspend Blanked Yes No < 10W 89% Yellow OFF Blanked No No < 2.3W 97% Amber This monitor is ENERGY STAR® compliant. As an ENERGY STAR® Partner, PHILIPS has determined that this product meets the ENERGY STAR® guidelines for energy efficiency.
107B Product Information Pin Assignment No. Pin Assignment No. 1 2 Red video input Green video input 9 10 No pin Logic ground Identical output - connected to pin 10 3 Blue video input 11 4 Identical output - connected to pin 10 12 Serial data line (SDA) 5 6 7 Ground Red video ground Green video ground 13 14 15 H. Sync / H+V V.
Installing your Monitor Installing your Monitor Front View • Rear View • 6G3B10 Multimedia Base (option) • PCUH411 USB Hub (option) Front View Power button switches your monitor on. OK button which when pressed will take you to the OSD controls Contrast hotkey. When the UP arrow is pressed, the adjustment controls for the CONTRAST will show up. UP and DOWN buttons are used when adjusting the OSD of your monitor file:///G|/manual/english/107B/install/install.
Installing your Monitor Brightness hotkey. When both the LEFT and RIGHT arrows are pressed at the same time, then the adjustment controls for BRIGHTNESS will show up. LEFT and RIGHT buttons, like the UP and DOWN buttons, are also used in adjusting the OSD of your monitor. RETURN TO TOP OF THE PAGE Rear View file:///G|/manual/english/107B/install/install.
Installing your Monitor 1. Power in - attach power cable here. 2. USB Port - attach your USB Upstream cable here. (Not available on all models.) 3. Video In - this is a cable which is already attached to your monitor. Connect the other end of the cable to your PC. RETURN TO TOP OF THE PAGE file:///G|/manual/english/107B/install/install.
6G3B10 Multimedia Base (option) 6G3B10 Multimedia Base (option) Front View • Rear View • Technical Specifications • Description of the Controls • Installing your Multimedia Base Technical Specifications* • Output power 2 x 1.5W RMS / 36W PMPO • Bass Boost • Headphone connection 3.5 mm jack • Microphone in/out 3.5 mm jack • Includes Audio cable and AC adapter • Dimension 9.4" x 2.1" x 8.2" / 239 x 54 x 208 mm • Power consumption 5W RETURN TO TOP OF THE PAGE Description of the Controls A.
6G3B10 Multimedia Base (option) D. Microphone jack Attach your microphone here. E. Audio In Connect this to the audio output of your PC. F. MIC Out Connect this to the microphone output of your PC. G. DC Input Connect power input here. RETURN TO TOP OF THE PAGE Installing your Multimedia Pedestal 1. To INSTALL ● ● Slide the pedestal, aligning with the holes on the side. Then click the back hook into the corresponding hole on the bottom plate of your monitor.
6G3B10 Multimedia Base (option) 2. To UN-INSTALL ● ● Lift the back hook from the hole on the bottom plate of your monitor. Slide out the pedestal the opposite direction (from when you installed it). RETURN TO TOP OF THE PAGE file:///G|/manual/english/107B/install/mm_pede/mm_inst.
USB Hub (Optional Feature) PCUH411 USB Hub (Option) Front View • Rear View • Installing your USB Hub Installing your USB Hub Installing on a conventional base. 1. Take out the USB hub from the box. 2. Take off the USB hub cover. 3. Slightly tilt and lift the base of your monitor. 4. Attach the USB hub by clipping into the base. 5. You can reposition the USB hub along the base to suit your needs. Installing on the Multimedia base. Follow Steps 1 and 2 above.
USB Hub (Optional Feature) 6. Position the USB hub to the back of the Multimedia Pedestal. 7. Attach the USB hub by sliding-in to the Multimedia base. RETURN TO TOP OF THE PAGE file:///G|/manual/english/107B/install/usbhub/usb_inst.
On-Screen Display On-Screen Display Description of the On-Screen Display • The OSD Tree • The OSD Controls Description of the On Screen Display What is the On-Screen Display? This is a feature in all Philips monitors which allows an end-user to adjust screen performance of monitors directly though an on-screen instruction window. The user interface provides user-friendliness and ease-of-use when operating the monitor. Basic and simple instruction on the control keys.
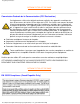
On-Screen Display RETURN TO TOP OF THE PAGE The OSD Tree Below is an overall view of the structure of the On-Screen Display. You can use this as reference when you want to later on work your way around the different adjustments. file:///G|/manual/english/107B/osd/osddesc.
On-Screen Display file:///G|/manual/english/107B/osd/osddesc.
On-Screen Display RETURN TO TOP OF THE PAGE file:///G|/manual/english/107B/osd/osddesc.
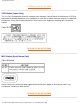
107B The OSD Controls The OSD Controls Description of the On-Screen Display • The OSD Tree The OSD Controls : Brightness (HotKey) • Contrast (HotKey) • Language • Input Signal Selection • Zoom • Adjust Horizontal • Adjust Vertical • Adjust Shape • Adjust Color • Reset to Factory Settings • Extra Controls • Close Main Controls BRIGHTNESS To adjust your screen's brightness, follow the steps below. Brightness is the overall intensity of the light coming from the screen. A 50% brightness is recommended.
107B The OSD Controls 1) Press the or button on the monitor. The CONTRAST window appears. 2) Press the or button to adjust the contrast. 3) When the contrast is adjusted to the level desired, stop pressing the or button and after three seconds the CONTRAST window will disappear with the new adjustment saved.
107B The OSD Controls 3) Press the or button until the desired language is highlighted. 4) Press the button to confirm your selection and return to MAIN CONTROLS window. CLOSE MAIN CONTROLS will be highlighted... After returning to MAIN CONTROLS . . . . . . to continue to INPUT SIGNAL SELECTION, press the Help button until INPUT Smart SIGNAL SELECTION is highlighted. Next, follow steps 3 - 5 under INPUT SIGNAL SELECTION. . . .
107B The OSD Controls RETURN TO TOP OF THE PAGE INPUT SIGNAL SELECTION (Not available in all models) INPUT SIGNAL SELECTION determines what you see on the screen. The default setting is INPUT A, but if the video input signal is different that the output signal, you may want to change it to INPUT B.? 1) Press the button on the monitor. The MAIN CONTROLS window appears. 2) Press the button until INPUT SIGNAL SELECTION is highlighted. 3) Press the button. The INPUT SIGNAL SELECTION window appears.
107B The OSD Controls MAIN CONTROLS will be highlighted. After returning to MAIN CONTROLS . . . Smart Help . . . to continue to ZOOM, press the button until ZOOM is highlighted. Next, follow steps 3 - 5 under ZOOM. . . . to exit completely, press the button RETURN TO TOP OF THE PAGE ZOOM ZOOM increases or decreases the size of the images on your screen. To adjust the ZOOM follow the steps below. 1) Press the button on the monitor. The MAIN CONTROLS window appears.
107B The OSD Controls 4) Press the or button to adjust ZOOM. 5) Press the button to confirm your selection and return to the MAIN CONTROLS window. CLOSE MAIN CONTROLS will be highlighted. After returning to MAIN CONTROLS . . . Smart Help . . . to continue to ADJUST HORIZONTAL, press the button until ADJUST HORIZONTAL is highlighted. Next, follow steps 3 - 7 under ADJUST HORIZONTAL. . . .
107B The OSD Controls 3) Press the button. The ADJUST HORIZONTAL window appears. ADJUST POSITION should be highlighted. 4) Press the or button to move the image to the left or right. 5) When the position is adjusted, press the button to return to MAIN CONTROLS window, or press the to highlight ADJUST SIZE. file:///G|/manual/english/107B/osd/osd_cont.
107B The OSD Controls 6) To adjust the horizontal size, press the 7) When the size is adjusted, press the or button. button to return to MAIN CONTROLS window. CLOSE MAIN CONTROLS will be highlighted. After returning to MAIN CONTROLS . . . . . . to continue to ADJUST VERTICAL, press the Help button until ADJUST Smart VERTICAL is highlighted. Next, start with step 3 under ADJUST VERTICAL and follow the directions. . . .
107B The OSD Controls 3) Press the button. The ADJUST VERTICAL window appears. ADJUST POSITION should be highlighted. 4) Press the or button to move the image up or down. 5) When the position is adjusted, press the button to return to MAIN CONTROLS window, or press the to highlight ADJUST SIZE. file:///G|/manual/english/107B/osd/osd_cont.
107B The OSD Controls 6) To adjust the vertical size, press the or button. 7) When the size is adjusted, press the button to return to MAIN CONTROLS window. CLOSE MAIN CONTROLS will be highlighted. After returning to MAIN CONTROLS . . . Smart Help . . . to continue to ADJUST SHAPE, press the button until ADJUST SHAPE is highlighted. Next, start with step 3 under ADJUST SHAPE and follow the directions. . . .
107B The OSD Controls 3) Press the button. The ADJUST SHAPE window appears. ADJUST SIDE CURVE should be highlighted. 4) Press the button. The SIDE CURVE window appears. PINCUSHION should be highlighted. file:///G|/manual/english/107B/osd/osd_cont.
107B The OSD Controls 5) To adjust the pincushion, press the or 6) When the pincushion is adjusted, press the button. button to highlight BALANCED or press the button to return to the ADJUST SHAPE window. 7) To adjust the balanced pincushion, press the or 8) When the balanced pincushion is adjusted, press the button. button to return to the ADJUST SHAPE window. BACK TO MAIN WINDOWS will be highlighted.
107B The OSD Controls After returning to MAIN CONTROLS . . . ...to continue to ADJUST SIDE ANGLES, start with step 5 under ADJUST SIDE ANGLES and follow the directions. Smart Help ...to exit completely, press the button twice. ...to adjust only the BALANCED pincushion, follow steps 1 - 4 above, then press the button, and follow steps 7 - 9. ADJUST SIDE ANGLES ADJUST SIDE ANGLES under ADJUST SHAPE allows you to adjust two of the five preset options. These two options are TRAPEZOID and PARALLELOGRAM.
107B The OSD Controls 4) Press the button to highlight ADJUST SIDE ANGLES. 5) Press the button. The SIDE ANGLES window appears. TRAPEZOID should be highlighted. 6) To adjust the trapezoid, press the or 7) When the trapezoid is adjusted, press the button. button to highlight PARALLELOGRAM or press the button to return to the ADJUST SHAPE window. file:///G|/manual/english/107B/osd/osd_cont.
107B The OSD Controls 8) To adjust the parallelogram, press the or 9) When the parallelogram is adjusted, press the button. button to return to the ADJUST SHAPE window. BACK TO MAIN WINDOWS will be highlighted. 10) Press the button to return to the MAIN CONTROLS window, or press the button until ROTATE IMAGE is highlighted. After returning to MAIN CONTROLS . . . ...to continue to ROTATE IMAGE, start with step 5 under ROTATE IMAGE and follow the directions. Smart Help ...
107B The OSD Controls 3) Press the button. The ADJUST SHAPE window appears. ADJUST SIDE CURVE should be highlighted. 4) Press the arrow until ROTATE IMAGE is highlighted. 5) Press the button. The ROTATE IMAGE window appears. ROTATE should be highlighted. file:///G|/manual/english/107B/osd/osd_cont.
107B The OSD Controls 6) To adjust the rotation, press the or 7) When the rotation is adjusted, press the button. button to return to the ADJUST SHAPE window. BACK TO MAIN CONTROLS should be highlighted. 8) Press the button to return to MAIN CONTROLS. After returning to MAIN CONTROLS . . . Smart Help . . . to continue to ADJUST COLOR, press the button until ADJUST COLOR is highlighted. Next, start with step 3 under ADJUST COLOR and follow the directions. ...
107B The OSD Controls 3) Press the button. The ADJUST COLOR window appears. 4) Press the or button to highlight 9300K for GENERAL USE, 6500K for IMAGE MANAGEMENT, 5500K for PHOTO RETOUCH, or USER PRESET. 5) Once you have highlighted GENERAL USE, IMAGE MANAGEMENT, or PHOTO RETOUCH, press the button to confirm you selection and return to the MAIN CONTROLS window. CLOSE MAIN CONTROLS will be highlighted. file:///G|/manual/english/107B/osd/osd_cont.
107B The OSD Controls 6a) ?If USER PRESET is highlighted, press the button to highlight RED. Next, press the or button to adjust the color red. 6b) ?When finished with RED, press the button to highlight GREEN. Next, press the or button to adjust the color green. 6c) ?When finished GREEN, press the button to highlight BLUE. Next, press the or button to adjust the color blue.
107B The OSD Controls RESET TO FACTORY SETTINGS returns everything in all the windows to factory presets. 1) Press the button on the monitor. The MAIN CONTROLS window appears. 2) Press the button until RESET TO FACTORY SETTINGS is highlighted. 3) Press the button. The RESET TO FACTORY SETTINGS window appears. 4) Press the or button to select YES or NO. NO is the default. YES returns all settings to their original factory adjustments.
107B The OSD Controls After returning to MAIN CONTROLS . . . Smart Help . . . to continue to EXTRA CONTROLS, press the button until EXTRA CONTROLS is highlighted. Next, start with step 3 under EXTRA CONTROLS. . . . to exit completely, press the button. RETURN TO TOP OF THE PAGE EXTRA CONTROLS DEGAUSS EXTRA CONTROLS is a set of three features, including DEGAUSS. Degaussing removes electromagnetic build up that may distort the color on your screen. 1) Press the button on the monitor.
107B The OSD Controls 4) To degauss your screen, press the button. Your screen will be degaussed, then the MAIN CONTROLS window will reappear. CLOSE MAIN CONTROLS will be highlighted. After returning to MAIN CONTROLS . . . Smart Help . . . to continue to ADJUST MOIRE, press the button until EXTRA CONTROLS is highlighted. Next, start with step 3 under EXTRA CONTROLS, ADJUST MOIRE. . . . to exit completely, press the button.
107B The OSD Controls 3) Press the button. The EXTRA CONTROLS window appears. DEGAUSS will be highlighted. 4) Press the button until ADJUST MOIRE is highlighted. 5) Press the button. The ADJUST MOIRE window appears. HORIZONTAL will be highlighted. file:///G|/manual/english/107B/osd/osd_cont.
107B The OSD Controls 6) To adjust the horizontal moire, press the or 7) When the horizontal moire is adjusted, press the 8) To adjust the vertical moire, press the or 9) When the vertical moire is adjusted, press the button. button to highlight VERTICAL. button. button to return to the EXTRA CONTROLS window. BACK TO MAIN CONTROLS will be highlighted. After returning to MAIN CONTROLS . . . Smart Help . . . to exit completely, press the button.
107B The OSD Controls CLOSE MAIN CONTROLS RETURN TO TOP OF THE PAGE file:///G|/manual/english/107B/osd/osd_cont.
Customer Care and Warranty Customer Care & Warranty PLEASE SELECT YOUR COUNTRY TO READ THE WARRANTY COVERED: WESTERN EUROPE: Austria • Belgium • Cyprus • Denmark • France • Germany • Greece • Finland • Ireland • Italy • Luxembourg • the Netherlands • Norway • Portugal • Sweden • Switzerland • Spain • United Kingdom EASTERN EUROPE: Czech Republic • Hungary • Poland • Russia • Turkey LATIN AMERICA: Antilles • Argentina • Brasil • Chile • Colombia • Mexico • Paraguay • Peru • Uruguay • Venezuela NORTH AMERICA
F1rst Choice Warranty Your International Philips F1rst Choice Warranty Thank you for purchasing this Philips monitor. All Philips monitors are designed and manufactured to high standards and deliver high-quality performance, ease of use and ease of installation. Should you encounter any difficulties while installing or using this product, please contact Philips directly to benefit from your Philips F1rst Choice Warranty.
F1rst Choice Contact Information F1rst Choice Contact Information Telephone numbers: Austria 0660 311 657* Luxembourg 0800 30 12 Belgium 0800 735 75 Netherlands 0800 023 2011 Cyprus 0809 22 56 Norway 800 113 31 Denmark 808 800 50 Portugal 0800 831 363 France 0800 901 703 Sweden 020 798 327* Germany 0800 181 7143 Switzerland 0800 837 062 Greece 00800 3112 1223 Spain 900 993 146 Finland 0800 113 125 United Kingdom 0800 896 324 Ireland 1 800 553 154 U.S.A.
International Guarantee Your International Guarantee Dear Customer, Thank you for purchasing this Philips product which has been designed and manufactured to the highest quality standards. If, unfortunately, something should go wrong with this product Philips guarantees free of charge labor and replacement parts irrespective of the country where it is repaired during a period of 12 months from date of purchase.
Consumer Information Centers Consumer Information Centers Antilles ¥ Argentina ¥ Australia ¥ Bangladesh ¥ Brasil ¥ Canada ¥ Chile ¥ China ¥ Colombia ¥ Czech Republic ¥ Dubai ¥ Egypt ¥ Hong Kong ¥ Hungary ¥ India ¥ Indonesia ¥ Japan ¥ Korea ¥ Malaysia ¥ Mexico ¥ Morocco ¥ New Zealand ¥ Pakistan ¥ Paraguay ¥ Peru ¥ Philippines ¥ Poland ¥ Russia ¥ Singapore ¥ South Africa ¥ Taiwan ¥ Thailand ¥ Turkey ¥ Uruguay ¥ Venezuela Eastern Europe CZECH REPUBLIC Philips Service V Mezihorí 2180 00 Prage Phone: (02)-68315
Consumer Information Centers TURKEY Türk Philips Ticaret A.S. Talatpasa Caddesi No 5. 80640-Gültepe/Istanbul Phone: (0800)-211 40 36 Fax : (0212)-281 1809 Latin America ANTILLES Philips Antillana N.V. Kaminda A.J.E. Kusters 4 Zeelandia, P.O. box 3523-3051 Willemstad, Curacao Phone: (09)-4612799 Fax : (09)-4612772 ARGENTINA Philips Antillana N.V. Kaminda A.J.E. Kusters 4 Zeelandia, P.O. box 3523-3051 Willemstad, Curacao Phone: (09)-4612799 Fax : (09)-4612772 BRASIL Philips Argentina S.A.
Consumer Information Centers COLOMBIA Industrias Philips de Colombia S.A.-Division de Servicio Calle 13,No 51-39 Apartado 4282, Bogota Phone: (01)-6235511/ 9800-18971 (toll free) Fax : (01)-6234399 MEXICO Consumer Information Centre Norte 45 No.669 Col. Industrial Vallejo C.P.02300, -Mexico, D.F. Phone: (05)-3687788 / 9180050462 Fax : (05)-7284272 PARAGUAY Philips del Paraguay S.A. Avenida Artigas 1519 Casilla de Correos 605 Asuncion Phone: (021)-211666 Fax : (021)-213007 PERU Philips Peruana S.A.
Consumer Information Centers VENEZUELA Industrias Venezolanas Philips S.A. Apartado Postal 1167 Caracas 1010-A Phone: (02) 2377575 Fax : (02) 2376420 Canada CANADA Consumer Service Division. 4977 Levy Street Ville St.Laurent, Quebec H4R2N9 Phone: (514)-9560120 Fax : (514)-9560828 Pacific AUSTRALIA Philips Consumer Service. Customer Information Centre. 3 Figtree Drive Homebush Bay NSW 2140 Phone: (02)-131391 Fax : (02)-97644681 NEW ZEALAND Philips New Zealand Ltd. Consumer Help Desk 2 Wagener Place, Mt.
Consumer Information Centers BANGLADESH Philips Service Centre 100 Kazi Nazrul Islam Avenue Kawran Bazar C/A Dhaka-1215 Phone: (02)-812909 Fax : (02)-813062 CHINA BEIJING Beijing Authorized Service Centre. Consumer Information Centre Building 6, West Street Chong Wen Men, Beijing, Jin Bang Co. Led.
Consumer Information Centers HONG KONG Philips Hong Kong Limited Consumer Information Centre 16/F Hopewell Centre 17 Kennedy Road, WANCHAI Phone: 2821-5345 Fax : 2861-3104 INDIA BOMBAY Philips India Customer Relation Centre Bandbox House 254-D Dr.
Consumer Information Centers JAPAN Philips Consumer Electronics 1-11-9,Ebisuminami Shibuya-Ku Tokyo 150 Phone: (03)-3719-2235 Fax : (03)-3715-9992 KOREA Philips Korea Ltd. Philips House C.P.O. box 3680 260-199, Itaewon-Dong. Yongsan-Ku, Seoul 140-202 Phone: (02)-5961195/1196 / (02)-5967632/76325 Fax : (02)-5959688 MALAYSIA Philips Malaysia Sdn. Berhad Service Dept. No.51,sect.13 Jalan University. 46200 Petaling Jaya, Selagor. P.O.box 12163 50768 Kuala Lumpur.
Consumer Information Centers PHILIPPINES Philips Electronics and Lighting Inc. 106 Valero St., Salcedo Village Makati, Metro Manilla. Phone: (02)-8100161 Fax : (02)-8173474 SINGAPORE Philips Singapore Private Ltd. Consumer Service Dept. Lorong 1,Toa Payoh., P.O. box 340 Singapore 1231 Phone: 3502000 Fax : 2508037 TAIWAN Philips Taiwan Ltd. Consumer Information Centre Nr 96 Section 1, Chien-Kuo N.Road TAIPEI Phone: (02)-382-4567 Fax : (02)-2134-2670 THAILAND Philips Electronics (Thailand) Ltd.
Consumer Information Centers SOUTH AFRICA South African Philips. S.V. Div. 195 Main R.D. Martindale., Johannesburg P.O.box 58088 Newville 2114 Phone: (011)-4715000 Fax : (011)-4715034 Middle East DUBAI Philips Middle East B.V. Consumer Information Centre P.O.Box 7785 DUBAI Phone: (04)-353666 Fax : (04)-353999 EGYPT Philips Egypt Consumer Information Centre 10, Abdel Rahman El Rafei Mohandessin - Cairo, P.O.Box 242 DOKKI Phone: (02)-3313993 Fax : (02)-3492142 file:///G|/manual/english/warranty/warcic.
United States Guarantee LIMITED WARRANTY (Computer Monitor) Three Years Free Labor / Three Years Free Service on Parts / One Year Exchange* *Product will be exchanged with a new or renewed to original specifications unit within two business days for the first year. This product must be shipped in at your expense for service during years two and three. WHO IS COVERED? You must have proof of purchase to receive warranty service.
United States Guarantee Philips service organization will attempt to provide service (although there may be a delay if the appropriate spare parts and technical manual(s) are not readily available). Where CAN I GET MORE INFORMATION? For more information, contact the Philips Customer Care Center by calling (877) 835-1838 (U.S.A. customers only) or (903) 242-4804. Before Requesting Service... Please check your owner's manual before requesting service.
United States Guarantee Philips Customer Care Center, P. O. Box 2976, Longview, TX 75601 Your International Philips F1rst Choice Warranty Thank you for purchasing this Philips monitor. All Philips monitors are designed and manufactured to high standards and deliver high-quality performance, ease of use and ease of installation. Should you encounter any difficulties while installing or using this product, please contact Philips directly to benefit from your Philips F1rst Choice Warranty.
Glossary Glossary ABCDEFGHIJKLMNOPQRSTUVWXYZ A Autoscan A microprocessor-based feature of Philips Brilliance monitors is able to detect automatically horizontal and vertical frequencies of input signals with those of the installed video card. An autoscan monitor can thus operate with a wide range of video cards. MultiSync, a registered trademark of NEC, provides a similar function.
Glossary C CE Mark CE mark is displayed on products per EMC and LV ( low Voltage Device ) directives in compliance with European Community safety, EMI and EMS requirements and is compulsory on products for sale in the European Community. Color temperature A way of describing the color of a radiating source in terms of the temperature (in degrees Kelvin) of a black body radiating with the same dominant frequency as the source.
Glossary Points where convergence error is specified. Convergence-error correction A method of correcting for convergence error to insure that all three beams land simultaneously in the same triad. This is usually accomplished by means of special convergence-error correction coils in the deflection yoke. CRT Cathode-ray tube - the general term for all tubes in which one or more electron beams emitted by a cathode are periodically scanned across a phosphor screen by means of deflection circuitry.
Glossary DDC is a communication channel for displays and computers. The DDC feature allows the monitor controller to be automatically configured to make optimal use of the display without manual user interaction. DDC is implemented as part of the new Plug & Play approach introduced into the PC market to increase user friendliness.
Glossary Dot rate Frequency in MHz of the dot clock. It is a measure of the speed with which data is transferred between the video card and subsequent processing circuitry. Also known as video dot rate. RETURN TO TOP OF THE PAGE E Electromagnetic radiation standards International standards set to limit electromagnetic emissions from monitors. There are currently two important standards both derived from regulations originally laid down by Swedish authorities.
Glossary In 1991, the Swedish Tjänstemannens Central Organization (TCO, Swedish confederation of Professional Employees ) set a standard even more severe than MPR-II, especially for alternating electric fields (AEF). The TCO standard is more severe since not only are the permitted field levels reduced compared with MPR-II, but the measuring distance is also reduced (see table).
Glossary Also called line frequency and expressed in kHz, it is the number of video lines written on the screen every second (from left to right). The higher the horizontal scanning frequency, the better the resolution (i.e., the higher the resolution and/or the higher the refresh rate). RETURN TO TOP OF THE PAGE I INF File INF file (Information File) Information (INF) files store information in a specific format.
Glossary L Linearity The degree to measure the actual location of a pixel on the screen corresponds with its intended location. ( see figure ) Line frequency See Horizontal scanning frequency. Low-emission monitor A monitor that complies with international standards on radiation. See Electromagnetic radiation standards. Low-frequency electric and magnetic fields Alternating fields generated by the deflection yoke.
Glossary M Moiré effect A fringe pattern arising from the interference between two superimposed line patterns. In a monitor it comes from the interference between the shadow mask pattern and the video information (video moiré), and between the shadow mask pattern and the horizontal line pattern (scan moiré). It shows itself as wavy patterns on the screen and becomes more noticeable as monitor resolution increases. Since the video signal varies continuously, little can be done about video moiré.
Glossary screen area, resulting in an image that is smaller (and less legible) than it needs to be. RETURN TO TOP OF THE PAGE P Parallelogram Distortion See Geometric distortion. Phosphor Generic name for the class of substances that exhibit luminescence. To produce a picture on screen, phosphors are deposited on the inner surface of the picture-tube screen and excited into luminescence by the electron beam.
Glossary R Raster The area on screen that electron beam can reach. Refresh rate See Vertical scanning frequency. Resolution The number of pixels that can be displayed on the screen. The resolution is specified as the number of pixels in a line multiplied by the number of horizontal lines. See also video graphic adapter. Rotation function The feature that allows users to adjust the whole screen rotating to be horizontal.
Glossary Anti-Static coatings Due to bombardment by beam electrons, monitor screens become electrically charged when in use. Electrically charged screens surfaces can attract dust particles. An Anti-Static coating is a conductive coating deposited on the screen (or on a glass panel immediately in front of the screen) that conducts away the charge and prevents screen dust build-up.
Glossary The ARAS coating reflects only about 0.5% of the incident light. AGRAS (Anti-Glare anti-Reflection Anti-Static) coating. A combined anti-reflection, anti-glare, anti-static coating. Self-test function A monitor equipped with hardware or software to automatically detect cable connection status. Shape Deviation of a reproduced picture from its intended shape. The following types of distortion are most common: file:///G|/manual/english/107B/glossary/glossary.
Glossary SOG (Synchronization On Green) A properly functioning color monitor requires five kinds of signals: horizontal sync pulse, vertical sync pulse, red color signal, green color signal and blue color signal. Signals from a PC are transmitted to a monitor using one of three methods: 1. Separate sync: Horizontal and Vertical sync signals transmitted separately 2. Composite sync: Horizontal and vertical sync pulses mixed into a single signal train. 3.
Glossary See rotation function. Trapezoid distortion See Geometrical distortion. TTL signal A TTL (Transistor-transistor-logic) signal is a digital signal level for controlling the screen colors. With TTL driving, the red, green and blue signals can only be switched on or off or provided with an intensity signal. A TTL-driven monitor can thus display a maximum of 64 colors. Video standards such as MDA, CGA and EGA are based on TTL level.
Glossary signaling. A hub consists of two portions: the Hub Controller and Hub Repeater. The repeater is a protocol-controlled switch between the upstream port and downstream ports. It also has hardware support for reset and suspend/resume signaling. The controller provides the interface registers to allow communication to/from the host. Hub specific status and control commands permit the host to configure a hub and to monitor and control its ports.
Glossary V Vertical dot pitch See Dot pitch. Vertical scanning frequency Expressed in Hz, this is the number of fields written to the screen every second in interlaced mode. In non-interlaced mode vertical scanning frequency is the number of frames (complete pictures) written to the screen every second (also known as refresh rate). Vertical sync pulses A train of square shaped waveforms that define the start of a new frame.
Glossary resolutions from 1280 x 1024 to 1600 x 1280, horizontal line frequencies up to 90 kHz and bandwidths up to 200 MHz. VIS (Viewable Image Size) The real screen dimensions that users can see measured diagonally. The VIS of a monitor is always less than the so called screen size of a monitor. For example, the VIS of a 17-inch monitor is only about 16 inches. It depends on the useful screen size of CRT and the opening of a monitor's front cabinet.