T2150 T2250 Operator’s manual Matrix printer en ll to pu en ll to pu op op
Important Information This equipment generates and uses radio frequency energy and if not installed and used properly, that is, in accordance with the manufacturer’s instructions, may cause interference in radio and television reception. It has been type tested and found to comply with the limits for class B computing devices in accordance with the specification in subpart J of part 15 of FCC rules, which are designed to provide reasonable protection against such interference in a residential installation.
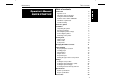
Quick Start-up Table of contents Table of contents Operator’s Manual QUICK START-UP Table of contents Introduction Symbols used Important safety instructions Using the Online-CD-ROM Contents of the Online CD-ROM Hardware requirements Troubleshooting 2 2 2 3 3 3 3 Printer at a glance 4 Installation Unpacking the printer Placing your printer Checking the printer voltage Connecting the printer Switching on the printer 5 5 6 7 8 8 Control panel Online mode Offline mode Setup mode 9 9 9 10 Changing t
Introduction Quick Start-up Introduction ! Ah ha! ➤ Symbols used This Operator’s Manual is intended as a quick introduction into working with the printer and is to enable also unexperienced users to handle the device properly. It describes the most important functions of the printer and contains the essential information for your everyday work with the printer.
Quick Start-up Introduction ➤ Using the First install the Adobe Acrobat Reader on your hard disk unless the program has already been installed. To install it, follow the steps described in the README file in the READER directory. Online-CD-ROM To start the online documentation, call the Windows Explorer and double click on the START.PDF file. Then follow the instructions and menus on the screen.
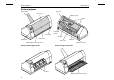
Printer at a glance Quick Start-up Printer at a glance Paper support Top cover Front cover Ribbon cassette Latches ll to en op pu Power inlet and fuse ll to Power switch en op pu Tear edge Bottom cover Control panel Rear cover Printhead Manual single sheet feeder closed Interface connector Printer in fanfold paper mode Printer in single sheet mode ll to en op pu Tractor 1 Manual single sheet feeder open 4
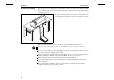
Quick Start-up Installation Installation ➤ Unpacking the printer Place your printer on a solid base.Make sure that the “Up” symbols point to the correct direction. ➁ ➀ ➃ Open the packaging and take out the ribbon cassette. Pull the printer out of the cardboard box towards you and remove the remaining packaging material. Check the printer for any visible transport damage and completeness.
Installation Quick Start-up ➤ Placing your printer Place the printer on a solid, flat and non-slip surface in such a way that it cannot fall down. Make sure to facilitate access to the control panel and the paper input trays and to leave sufficient space for the paper ejected. If you expect that frequent forward and reverse feeds will occur, you should place the printer as shown in the figure, if possible.
Quick Start-up Installation ➤ Checking the printer Make sure that the device has been set to the correct voltage (e.g. 230 V in Europe, 120 V in the USA). To do this, check the type plate above the power inlet at the back of the printer. voltage Never switch on the printer if the voltage setting is incorrect, since this may result in severe damage. STOP You can set the printer to the correct mains voltage yourself. To do this, cautiously place the printer on its back side.
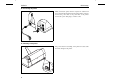
Installation Quick Start-up ➤ Connecting the printer Make sure that the printer and the computer are switched off and connect the data cable between the printer and the computer. Connect the power cable to the power inlet of the printer. Connect the power cable plug to a mains socket. ➤ Switching on the printer The power switch for switching on the printer is located at the front bottom right of the printer.
Quick Start-up Control panel Control panel The control panel and the keys are used for controlling printer operation. The upper line of the display shows whether the printer is in Online or Offline mode and the paper path selected (Tractor1 or Single). ➤ Online mode Online 1 2 After switching on, the printer is automatically set to online mode. Only in this mode it can receive data from the computer.
Control panel Quick Start-up ➤ Setup mode Adjust Menu 1 2 In this mode, the following settings are available: Paperway Char 3 4 Online Setup Setup key: Sets the printer to setup mode, in which the following settings can be selected: Menu key (1): Other menu settings. Adjust key (2): Tear position, first printing line and print head gap. Paperway key (3): Paper path. Char key (4): Font and number of characters per inch. Access to the other menu settings (Menu) may be disabled by the manufacturer.
Quick Start-up Changing the ribbon cassette Changing the ribbon cassette Remove all the paper from the printer and make sure that the printer is switched off before opening the cover. Press the two slide latches, raise the top cover to an angle of 90 degrees relative to the top cover of the printer and remove it. 90° Cautiously slide the print head carriage to the left stop (viewed from the printer front). STOP The print head becomes hot during printing.
Changing the ribbon cassette Quick Start-up Turn the coloured ribbon feed knob at the right of the new ribbon cassette in the direction of the arrow in order to take up slack of the ribbon. Slightly tilt the ribbon cassette forwards in such a way that it is parallel to the housing top and thread in the ribbon in front of the print head. Locate the two projections in the left and right guide rails of the printer and gently press down on both sides until it clicks into place.
Quick Start-up Paper handling Paper handling This section describes how to set the paper type, load fanfold paper and single sheets, transport paper and move the paper to the tear position. ➤ Paper path quick You can change the paper type either from an application program, by means of the paper path quick selection feature or in the Setup menu.
Paper handling ➤ Loading paper Quick Start-up Your printer can print both fanfold paper and single sheets. For information on the paper sizes you can use, please refer to page 24 (Paper specifications). You should only use those paper types which are approved for this printer. For more information, refer to the reference manual on the online CD-ROM. Fanfold paper en ll to pu op Make sure that the printer is set for fanfold paper printing.
Quick Start-up Paper handling Align the right-hand tractor to the width of the paper and insert the paper. Make sure that it is inserted by the same length as on the left-hand tractor in order to avoid any paper jam. Close the tractor flap and slide the tractor to the right until the paper is slightly tensioned.
Paper handling Quick Start-up Single sheets Make sure that the printer is set to single sheet mode. If necessary, change the paper type (see page 13, Paper path quick selection). Press the latch at the middle of the front cover. The single sheet input tray opens downwards. en ll to pu op Install the paper support as required for the paper width. You can use an additional paper support in order to position wide single sheets properly (see Accessories, page 24).
Quick Start-up Paper handling ➤ Paper transport Loaded paper can be transported in the printer in several ways. Offline Tractor1 Park LF/FF 1 2 3 4 Online Setup Make sure that the printer is in offline mode; press the Online key, if necessary Key Park (1): If fanfold paper is loaded in the printer, it is fed to the tear position. If a single sheet is loaded, it is ejected.
Paper handling Quick Start-up ➤ Moving the paper to You can use the Tear key to move the paper to the tear position. the tear position Online 1 2 Tractor1 Tear 3 4 Online Make sure that the printer is in online mode. Press the Tear (4) key. The printer moves the perforation edge of the fanfold paper to the tear edge (see below).
Quick Start-up Settings Settings This section describes how to set the tear position, the first printing line, the print head gap as well as the font and the character density. ➤ Setting the tear If the tear position of the paper is not aligned with the tear edge of the printer, you can adjust it. Loaded paper may have to be torn and repositioned to the park position. position Adjust Menu 1 2 Paperway Char 3 4 Online Setup Press the Tear (4) key.
Settings Quick Start-up ➤ Setting the first You can use the TOF function for setting the position of the first printing line for each paper source and each menu individually. printing line (TOF) Before using the TOF function (if fanfold paper is used), you should first set the tear position (see above). Adjust Menu 1 2 Paperway Char 3 4 Online Setup TOF Head 1 Tear 2 3 4 FormAdj= 12/72"* Set < > Exit 1 2 3 Default TOF 0–220/72" Readjusted TOF 20 4 Press the Setup key.
Quick Start-up Settings ➤ Setting the print head gap The printer features automatic print head gap adjustment to the thickness of the paper used (AGA funcion). In setup mode, you can enter a correction value to modify the head gap determined automatically. This correction is useful for modifying the appearance of the type face and the impact force for multi-layer paper. The AGA (automatic gap adjustment) function must be set to “always” or “once”.
Settings Quick Start-up ➤ Selecting character density and font Adjust Menu 1 2 Font Paperway Char 3 4 You can use the CPI key in setup mode to select the number of characters per inch to be printed. You can use the Font key to select fonts. Press the Setup key, then the Char (4) key. Online Setup Press the CPI (3) or Font (2) key (in our example, press CPI).
Quick Start-up Specifications ➤ Printer specifications Printing method Serial with 24-needle print head Printing width Narrow printer Wide printer Print speed (in bidirectional mode) DPQ 500 cps at 10 cpi CPQ 225 cps at 10 cpi NLQ 180 cps at 10 cpi LQ 90 cps at 10 cpi Printing rate 430 pages/h; 7,2 pages/min (ECMA) Character density 5 / 6 / 7,5 / 8,6 / 10 / 12 / 15 / 17,1 / 20 cpi Resolution (max.
Accessories ➤ Paper specifications Quick Start-up Fanfold paper tractor 1 Continuous single forms Continuous set of forms (requires individual testing) Paper weight No. of copies Form thickness (max.) 60–120 g/m2 1+5 0.60 mm Single sheet input tray Continuous single forms Continuous set of forms (requires individual testing) Paper weight No. of copies Form thickness (max.) 80–120 g/m2 1+5 0.60 mm Sets of forms Sets of forms can only be processed if the top edge is bound.
“All rights reserved. Translations, reprinting or copying by any means of this manual complete or in part or in any different form requires our explicit approval. We reserve the right to make changes to this manual without notice. All care has been taken to ensure accuracy of information contained in this manual. However, we cannot accept responsibility for any errors or damages resulting from errors or inaccuracies of information herein.
TALLY REPRESENTATIVES GERMANY Tally Computerdrucker GmbH Postfach 2969 D-89019 Ulm Deutschland Tel.: +49 731 2075 0 Fax: +49 731 2075 100 http://www.Tally.de ITALY Tally S.R.L. Via Borsini 6 I-20094 Corsico (MI) Italia Tel.: +39 02 48608 1 Fax: +39 02 48601 141 http://www.Tally.it SPAIN Tally SRL Joaquin Lorenzo 4, Local 28033 Madrid España Phone: +34 902 196 183 Fax: +34 913 739 943 http://www.Tally.es SINGAPORE Tally AMT Printers Pte.