I N S T RUCTI O N MANUAL
PREPARATION & TOOL CHECK LIST Before You Begin: Important Product Safety and Pre-Installation Information The following installation instructions are provided to guide you through the installation process of the Tam‑Rail® Railing System. TAMKO® Building Products, Inc. shall not be held liable for improper or unsafe installations. Failure to follow these instructions may lead to an unsafe product and will adversely affect coverage under the Limited Warranty.
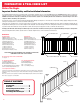
STRAIGHT RAIL INSTALLATION 6', 8' or 10' Straight Rail Kit available in 36" or 42" rail heights Fig. 3 Installation Steps: 1. Install and prepare posts or other mounting surfaces for TAM‑RAIL Railing installation. Ensure mounting surfaces are level and plumb. (Fig. 1) TAMKO recommends using TAM‑RAIL Post Mount Systems or wood posts covered with our matching TAM‑RAIL Post Sleeve. Fig. 1 Fig. 2 MINIMUM 1-7/8" Fig. 4 2. Measure the length between posts and confirm the TAM‑RAIL Railing Kit required. (Fig.
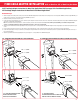
STAIR RAIL INSTALLATION 6' or 8' Stair Rail Kit available in 36" or 42" rail heights Fig. 3 Installation Steps: 1. Install and prepare posts for TAM‑RAIL Railing installation. Ensure mounting surfaces are level and plumb. (Fig. 1) TAMKO recommends using TAM‑RAIL post mount systems or wood posts covered with our matching TAM‑RAIL post sleeve. MINIMUM 2-3/8" FIG. 2 FIG. 1 Fig. 4 2. Measure the length between posts and confirm the TAM‑RAIL Railing Kit required. (Fig.
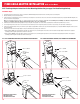
STAIR RAIL INSTALLATION (continued) 10. Determine the location of the top rail metal brackets (marked “T”). Insert balusters in the first and last holes of the bottom rail. (Fig. 7) Align top rail over the balusters and install. Ensure the top rail is fully nested and level with the bottom rail. Position the top rail metal brackets on the rail and mark the bracket locations on each post. 11. Remove the top rail.
POST MOUNT INSTALLATION WOOD/COMPOSITE DECK APPLICATION Post Mount Kit 4" x 4" x 38" for use with all TAM‑RAIL 6', 8' and 10' x 36" Railing Kits Post Mount Kit 4" x 4" x 44" for use with all TAM‑RAIL 6' and 8' x 42" Railing Kits ® ® TOOLS REQUIRED FOR INSTALLATION: POST MOUNT COMPONENTS: Tape measure, level, drill, 3/8" drill bit, wrench, safety glasses, and hearing protection. 4" × 4" Post Sleeve (1) Pyramid Post Cap (1) INSTALLATION STEPS: New England Post Ring (1) 1.
POST MOUNT INSTALLATION CONCRETE APPLICATION Post Mount Kit 4" x 4" x 38" for use with all TAM‑RAIL 6' x 36" Railing Kits Post Mount Kit 4" x 4" x 44" for use with all TAM‑RAIL 6' x 42" Railing Kits ® ® CONCRETE ANCHORS: POST MOUNT COMPONENTS: TAMKO requires the use of the Hilti HIT‑RE 500‑SD adhesive anchoring system in the installation of this post mount. The anchoring system must be installed in accordance with Hilti HIT‑RE 500‑SD Instructions and ESR‑2322.
POST MOUNT INSTRUCTIONS CONCRETE APPLICATION (continued) 8. Insert the supplied threaded rods into the boreholes to the required depth, slowly twisting the rods as they are inserted (see Hilti HIT‑RE 500‑SD Instructions, Steps 11‑13). Remove excess epoxy above the boreholes and ensure that the mounting surface remains clear of debris. IMPORTANT: Once installed correctly, do not disturb the threaded rods until the appropriate setting time has elapsed.
FIXED ANGLE ADAPTER INSTALLATION 22.5° on Wood Post, 45° on Wood Post/Post Mount 22.5º Fixed Angle Adapter Instructions for Wood Post Applications ONLY (see page 10 for Post Mount Applications) 45º Fixed Angle Adapter Instructions for Wood Post & Post Mount Applications Installation Steps: 1. 2. 3. 4. 5. 6. 7. Install and prepare all mounting surfaces and posts to which the TAM‑RAIL Railing will be installed. Ensure the mounting surface is level and plumb.
FIXED ANGLE ADAPTER INSTALLATION 22.5° on Post Mount 22.5° Fixed Angle Adapter Instructions for Post Mount Applications Only (see page 9 for Wood Post Applications) Installation Steps: 1. Install and prepare all mounting surfaces and posts to which the TAM‑RAIL Railing will be installed. Ensure the mounting surface is level and plumb. 2. Measure and mark post 6" above the deck surface. 3. Position the bottom rail angle adapter on the post so that the top of the adapter is 6" above the deck surface.
FIXED ANGLE ADAPTER INSTALLATION Straight Rail Kit Between Posts Accommodates 45º and 22.5º horizontal angle applications for attaching TAM‑RAIL Straight Rail Kits to a TAM‑RAIL Post Mount System, or wood post covered by a TAM‑RAIL Post Sleeve ® INSTRUCTIONS FOR INSTALLING STRAIGHT RAIL KIT BETWEEN POSTS WITH PRE‑INSTALLED 22.5° OR 45° ANGLE ADAPTERS: 1. Measure opening between the bottom rail metal brackets.
Building products for the professional. Since 1944, building professionals and homeowners have looked to TAMKO for quality products that are built to perform. Our extensive line of residential products includes: Heritage® series and Vintage® laminated asphalt shingles, 3-tab shingles, MetalWorks® steel shingles, EverGrain® and EverGrain® Envision® composite decking, Tam-Rail® and Marquee Railing®, rolled roofing products, waterproofing materials, ventilation products and asbestosfree cements and coatings.