Single Arm Pole Mount Installation Manual 2016 Edition v1.01 For models: UNI-SA/14 UNI-SA/21.
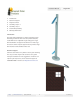
Installation Manual Single Arm Table of Contents 1 Introduction 1 Customer Support 2 Project Essentials 3 4 Assembly: Steps 1-2 Assembly: Steps 3 5 Installer Responsibility 5 Warranty Information Introduction The Single Arm Pole Mount is a simple and universal pole mounting solution for small area solar photovoltaic (PV) needs. With its user-adjustable angle settings, the Single Arm Pole Mount can support installations in a wide range of locations. Panel and pole support varies by model.
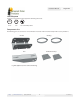
Installation Manual Single Arm Tools Required A wrench and screwdriver that support the following size heads: 144 in-lbs 84 in-lbs 5/16” 1/4” 1/4” or #2 Phillips drive Components List The following parts are used across various models of our Side of Pole mount and ship with necessary hardware: Bracket Banding Arm PV Module Clamps Lag Bolts (Optional, for Flat Surface Mounting) info@ | tamaracksolar.com | (800) 819-7236 2 2016 v1.
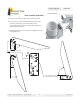
Installation Manual Single Arm Step 1. Mounting Arm to PV Module A. With the arm oriented as shown, insert 1/4-20 x 3/4” bolt, washer and PV module clamp through each slot. Place a flat washer, lock washer and hex nut on the end of the bolts and tighten loosely. Some modules can be attached by bolting through panel directly to arm. B. Repeat step 1 attaching the remaining clamp to the other slot on the arm. C. Lay the PV Module face-down on a protected flat surface.
Single Arm Installation Manual Step 3. Attaching Panel/Arm Assembly to Bracket A. Place the panel/arm assembly on the bracket as shown. B. Insert 5/16-18 x 3/4” bolt and flat washer from the inside out. Place a flat washer, lock washer, and hex nut on the outside. This orientation allows you to tighten the bolt with just one wrench. C. Adjust the tilt of the panel as desired, and tighten the bolts to 144 in-lbs (dry).
Installation Manual Single Arm Installer Responsibility The installer is solely responsible for: i. Complying with all applicable local or national building codes, including any that may supersede this manual; ii. Ensuring that Tamarack Solar and other products are appropriate for the particular installation and the installation environment; iii. Using only Tamarack Solar parts and installer-supplied parts as specified by Tamarack Solar. Substitution parts may void the warranty; iv.