
Flush Mount Installation Guide


2019 TAMARACK SOLAR - REVISION G FLUSH MOUNT MANUAL
7
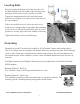
Leveling Rails
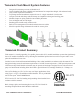
Start by leveling the bottom rail of the array rst. Set
the Rail Adapters near the middle of the leveling range
and adjust as necessary to have visually level rails.
Tighten the attachment bolts to the specied torque
when they are aligned. Level the top rail of the array in
the same manner.
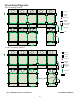
If there are multiple rows of rails in the array, use a
string level or straight edge to help adjust the remaining
rows to be level with the top and bottom rails. It is also
possible to visually align rails in the middle of the array.
Tighten all hardware to the specied torque.
Grounding
Tamarack rails and PV modules are bonded by 50-50 Module Clamps and bonding splices.
The 50-50 clamps acheive bonding to the module frames by stainless-steel pins in the clamping
surface of the clamp tops, which penetrate module frame coating. The rails and channel nuts
are bonded because of the conductive surface of the mill nish aluminum used in the rail con-
struction.
SolarEdge Optimizers and Enphase Microinverters are bonded to the rail with the Tamarack
MPLE adapters.
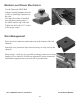
Bonding Method 1: Rail Lug
Use a Ground Clamp to bond a ground conductor to a rail.
Bonding Method 2: Frame Lug
Use a module ground lug to bond a module frame to a ground conductor. The
resulting system is bonded primarily through the module frames.