
Product Manual


WWW.TANAKAPOWEREQUIPMENT.COM CUSTSVC@NIKKO-TANAKA-USA.COM
13
4)
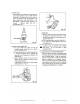
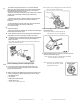
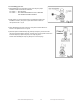
Remove the screws securing cylinder and pull cylinder off of the
crankcase, before installing cylinder apply a thin coat of oil to the piston.
Align each piston ring with the locator pin, slowly insert piston into
cylinder while compressing the rings in with your fingers.
Then install and tighten the cylinder screws. Fig. 26
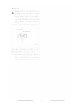
CHECK: Cylinder for wear and damage, exhaust port for carbon
build-up and cylinder fins for debris. Fig. 27
5)
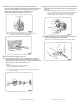
Disassembling and assembling crankcase
A.
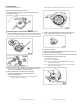
Before separating crankcase, make sure woodruff key is removed,
then remove the crankcase screws. To divide crankcase, lightly tap
crankshaft with a soft hammer, taking care not to damage the crankcase
fitting surface and remove the crankshaft. Fig. 28
CHECK:
1. For any damage to the ball bearing and oil seal.
2. Rod bearing for damage and clearance.
NOTE: Use a new crankcase gasket and cut off excess gasket material
when assembling.
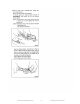
B.
Apply a coat of grease to the lip of each oil seal, then install shims
on the starter side of the crankshaft and insert crankshaft into the
crankcase.
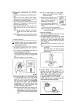
NOTE: After tightening the crankcase screws, move the crankshaft
to one side and measure the crankshaft side play with a feeler
gauge. Install shims on the starter side of the crankshaft to
adjust clearance, which should be 0.1 - 0.3mm. Fig. 29
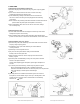
6)
Remove ring/s from the piston by separating the ring with your
thumbs just enough to get it off of the piston.
CHECK: Wear on piston ring/s and replace as necessary. Fig. 30