Installation and Usage TANDBERG Microsoft Exchange Integration TANDBERG offers an optional component to fully integrate the TANDBERG Management Suite (TMS) with Microsoft Exchange and Outlook. This integration gives the users the ability to schedule videoconferences, book meeting rooms and invite participants using their Microsoft Outlook client. The videoconferencing systems are registered as resources in Exchange, allowing end users to view their availability when making the booking. V 11.
Table of Contents Server Requirements 3 Supported Clients 3 TMS requirements 3 Limitations 3 Technical Description Installation 6 Uninstallation 15 4 Upgrading 16 Post installation setup 18 Making a booking using Outlook Appendix A - Troubleshoot Appendix B - Logging 33 38 39
Server Requirements Server OS Windows 2000 Server SP3 with Internet Explorer V5.5 or later Windows 2003 Server with Internet Explorer V6.0 or later Exchange Server Microsoft Exchange 2000 with Microsoft Exchange service pack 3 Microsoft Exchange 2003 plain, service pack 1 or service pack 2 Exchange System Manager must be installed.
Technical Description Both TMS and Exchange have their own database for booking information. For Exchange the database contains resource availability based on free/busy information for resource accounts. This information is stored in Exchange mailboxes and public folders. TMS knows the resource availability based on its SQL Server database. That means that there are two different systems that are separate, but must show the same resource availability.
tion. These log files include nearly all of the program activities, but the main ones of interest are: • Installation • Account Creation • Syncronizer Logs • Calendar Sink Microsoft log files can be accessed through Event View under Administrative Tools.
Installation Before you start installing the TMS Exchange Integration component on the Exchange server, make sure you are logged in as a user that has the following permissions: - Is a Domain Administrator for the local domain - Is a Local Machine Administrator - Is an Exchange Administrator You will also need a set of user credentials that is - Is an Site Administrator in TMS - Is an Administrator of the Windows Server TMS runs on Close all other applications running on the server.
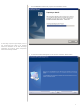
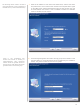
1. The TANDBERG installer will prepare the installation wizard. At this stage a picture might display a list of the components that need to be installed before the installation of the TMS Exchange Integration can continue. These components will be automatically installed. 2. A welcome window will appear on the screen. Press the ‘Next’ button.
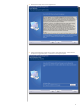
3. Read and accept the License Agreement. 4. Select the destination folder where Setup will install the files. Click ‘Next’ to accept the suggested path, or ‘Browse’ to change the path.
5. The installer will create a service account with a mailbox on the Exchange server. Select which store on the Exchange server you would like to use from the scroll-down menu, and click ‘Next’. If choosing an existing TMS account, this account needs to be configured for Exchange booking capabilities. Go into the Users tab of TMS, of the particular user, and set ‘Exchange Integration Service Account’ to ‘Yes’. 6. The Exchange integration uses credentials from an account that is defined in this step.
The Exchange server needs to be able to reach port 80/HTTP or port 443/HTTPS on the TMS server (in case of firewall issues). 7. Enter the IP-address or host name of the TMS server, and the user name and password to an account that has at least local computer admin rights on the TMS server and Site administrator rights in TMS. HTTPS can now be used between the servers. If this is enabled a trusted root certificate needs to installed on both servers.
9. The next page allows you to put all the TMS-Exchange integration users and groups in a separate container in Active Directory. If you want to put them under an Organizational Unit (or create a new Organizational Unit), click on the ‘Browse AD’ button. Otherwise click on the ‘Next’ button. Post-install moving of the users and groups to a different Active Directory Container/organizational unit through “Active Directory Users and Computers” is not supported. 10.
11. Confirm the settings defined in the installation process and select ‘Next’ to start copying files. 12. The installer will now start to copy files and perform necessary operations.
. Click FINISH to complete the installation. Notes about the Exchange installation In order to perform, supervise and synchronize all the bookings between Exchange an TMS, the installation of the Exchange component causes 2 user-accounts to be created. In the domain where the exchange server resides, a user ‘tms-service’ is created if choosing to let the installer create the user.
Permissions needed by the Exchange integration This section describes the permissions needed by the accounts that are required for the Exchange integration. The information explains the permissions required for each account, to give an administrator an overview of the security model of the integration.
Uninstallation Run ‘setup.exe’ again to uninstall the TMS Exchange Integration component from the Exchange Server or use ‘Add/Remove programs’ from the Control Panel of the server. If you tick of the checkbox before you click the ‘Next’ button, the uninstallation script will also remove the security groups, the service user and all resource accounts with mailboxes on the server.
Upgrading Upgrading from a previous version of the TANDBERG Exchange Integration should be considered done during non-office hours, as the integration will not be able to detect changes from the Outlook clients when it’s not running. The upgrade will ask for a reboot, but this is not required. The impact of opting to not reboot, is that one file will be marked for deleteion when the server reboots. Other than that, not rebooting will not impact the functionality of the product.
To install the new version, start the setup file again. If opting to keep the settings, you will notice that some of the screens shown in the installer when first installing the product will not be shown, as the information is already present from the previous installation. When the installation is finished, make sure to launch the TANDBERG Microsoft Integration Configuration tool, and start the Syncronizer by clicking the ‘Start Synchronizer’ button.
Post installation setup Once the TMS Exchange Integration component is installed on the Exchange server, three important steps need to be done in order to make the installation complete. 1. Publish the provided Videoconference form. 2. Create Exchange User representations for each system registered in TMS 3.
Press ‘OK’ to save Organizational Forms Library. In order to publish the Videoconference form in the Organizational Forms Library, an Outlook user needs to be granted “owner” permissions to the Organizational Forms Library. It is recommended only to give one single end user the ‘owner’ permission (preferably an administrator) , and use this user for publishing the form. Users who shall have availability to the form need ‘Read’ permissions granted to the Organizational Forms Library.
Note that the permission level must be ‘owner’ in order to publish into the library. Publish Custom Form Once the Organizational Forms Library is in place, the Custom Form provided by TANDBERG can be placed here. As this has to be done from an Outlook client, you need to log on to the mailbox of a user with “owner” permissions to the Organizational Forms Library (permission levels set as described above). On the PC where Outlook is running, open the videoconference.oft file provided by TANDBERG.
A screen for publishing the form will then pop up. It is important that the fields are filled in exactly as described below (case sensitive). Look in: select Organizational Forms Library Display name: enter ‘Meeting’ Form name: enter ‘VideoConference’ ‘Form Name’ is case sensitive and must be entered exactly as described above. Press ‘Publish’ when done. You have now completed step 1 (out of 3) of the post installation process.
Click ‘Browse’ and browse to the network path of the Exchange Server. The file is located where the Exchange Integration component was installed. If you have admin rights to the exchange server and the default path was not changed during installation, this would be: \\\C$\Program Files\TANDBERG\TMSExchange\Video Conference Form\ videoconference.oft You can then publish the form as normal.
may modify the Display Name of the account. The configuration tool can be found on the Exchange server on which the TANDBERG Exchange Integration component was installed. Click ‘Start’ menu, ‘Programs’ -> ‘TANDBERG’ -> ‘TANDBERG Microsoft Exchange Integration Configuration’. Make sure you are logged in with a user that has both Domain Administrator and Exchange Administrator rights on this Exchange Server to properly run the Integration Tool.
A window will pop up for account configuration. You can decide for each system if you want the tool to create the accounts for you, or if you want to associate the systems with an existing account. Let tool create accounts By selecting the ‘Create an AD account for This System’, the tool will auto create the needed account and mailbox for the system with all the required permissions and properties.. The tool will then ask you the default password to use for this account.
In the AD browser, select the OU where you want the account to be created. If accounts should be created for all systems selected in the same OU, press the ‘Create the Remaining accounts in this folder’ button. For each system that you ‘Enable’, a user account with the name tms-’system id’ is created (e.g. from the previous picture, the following users are created: tms-6, tms-7, tms-8 etc.). The number listed in front of the system name in the Integration Tool is the System ID from TMS for that system.
Use the AD browser to select the account you to be associated with the system. Review selections After accounts have been created/specified for all systems selected, a window will display your choices. If the information is correct, press OK, or if alterations are needed press the Edit button. If one or more of the systems imported were associated with existing accounts, you are asked if existing bookings for this account in Exchange should be booked in TMS as well.
Click Yes to update TMS with the calendar information from the associated systems. The configuration tool will now start to import systems from TMS, create accounts and mailboxes if needed, and set up the associations. Please note that this process can take several minutes depending on the number of systems you are importing. After importing, the system will then be moved over to the column ‘Exchange enabled TMS Systems’.
Advanced Configuration The ‘Advanced’ Button allows you to change the password for the tms-service account created in Active Directory. You can also change the log path, define email options for outgoing e-mails, rebuild the TMS server connection and select options for Asynchronous meeting requests. Change password for tms-service Used to set a new password for the tms-service account, used by the syncronizer. This account is created during installation.
ity when multiple updates are sent or they may not realize the meeting was not successfully booked. However if support for Microsoft Outlook Web Access is needed, this needs to be enabled, since Web Access does not support calendar sinks. Rebuild TMS server connection This is used to re-configure the TMS connection. This might be needed if the TMS server has changed IP-address, or if you want to use another user account in TMS to book the meetings.
on as each user representing the different videoconferencing system, using user names and passwords created by the above-mentioned tool. See section ‘Manually set accounts to accept meeting requests’ for instructions on how to do this. Configure Calendar Rights and Sinks This option re-registers the calendar sinks, making sure that the sinks run properly. Reconfigure Accounts from TMS This fetches updated data from TMS for the selected accounts.
‘None’ implies that Outlook will not use your NT logon information when Outlook is opened, but will prompt you for username and password. This way, you only need to restart Outlook to change to a different user instead of logging completely off your PC. These steps may vary in other Microsoft Outlook versions. To change Network Logon Security in Outlook 2003, right click on your Outlook icon and select ‘Properties’.Click on the ‘Show Profiles’ button and select the Exchange profile you are using.
Tick off the ‘Automatically accept meeting request and process cancellations’ and press ‘OK’. If you are asked about setting default permissions when clicking “OK” then do so! Even if you want to change the permissions later. Customize Calendar permissions If you would like to customize the calendar permissions, you can right-click on the calendar folder icon in the “Folder List” pane and click “Properties”. In the “Calendar Properties” page that pops up, switch to the “Permissions” tab page.
Making a booking using Activating the VideoConference Form Before an end-user can customize the bookings using the videoconferencing Outlook form, each user must have the new Videoconference form activated on their Outlook client. If the custom form is not to be used, the form does not need to be activated. You can change the default form in Outlook by making changes to the Microsoft Windows Registry. The registry settings specify which forms are substituted for the default Outlook forms.
Booking meetings with Videoconferencing rooms Booking your videoconference meeting can now be done in the same way as an ordinary meeting room/resource booking in Outlook. When adding videoconferece systems to the meeting, these can be found in the ‘VideoConference Rooms ’ address book. It is recommended to add each videoconference system as Resource to the meeting. Select all the videoconference systems and users you want to participate in your meeting.
them in the same way as regular participants (‘Required’), you will get the confirm/reject message per email later. Under the ‘Attendee Availability’ folder of your meeting request you will see the free/busy overview of all the participants in your meeting, including the videoconference systems. This will assist you locating a suitable time for your meeting.
default value is configured in TMS. Setting this parameter to ‘Automatic call launch’ will cause the video conference to be set up automatically when the meeting is due. Setting launch type to ‘Manual Call launch’ requires an end user to confirm the call setup from each of the endpoints before the call is initiated. Billing code This field allows you to enter the billing code which shall be used for the booking.
played. When the meeting is successfully booked, the meeting will be saved into your calendar and invites will be sent to the meeting participants. Additionally the meeting organizer will receive an email detailing the connection details for the scheduled meeting. If the meeting is not able to be booked, the meeting will not be saved, no invites will be sent, and the meeting organizer will receive an email detailing why the meeting could not be booked.
Appendix A Slow update of meetings from TMS to Exchange Troubleshoot If meetings are slow to be updated, make sure that there is no firewall that blocks e-mail from the TMS server to the Exchange server. When a meeting is booked in TMS, and e-mail is sent to the TMS-service account of the Exchange Integration, trigging the synchronizer to start.
Appendix B To control the logging of TANDBERG Exchange Integration, the registry is used. This is used both to disable logging, and control the amount of events that are logged. Logging All values are stored in the ‘HKEY_LOCAL_MACHINE\SOFTWARE\Tandberg\ TANDBERG Management Suite Exchange Integration’ hive. All values in this hive are strings (REG_SZ). To specify the log directory, set the destination path in the string ‘Log directory’.