EXEO AMP
CONTENTS SAFETY INFORMATION 1 IMPORTANT SAFETY INSTRUCTIONS 2 ACCESSORIES 4 CONNECTIONS 5 REMOTE CONTROL INFORMATION 7 FRONT PANEL INFORMATION 9 REAR PANEL INFORMATION 10 OPERATION AND FUNCTIONS 11 TROUBLESHOOTING GUIDE 13 SPECIFICATIONS 14
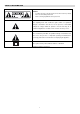
SAFETY INFORMATION Caution: - To reduce the risk of electric shock, do not remove Cover (or back) - No user-serviceable parts inside. - Refer servicing to qualified service personnel. This lightning flash with arrowhead symbol, within an equilateral triangle is intended to alert the user to the presence of uninstalled “dangerous voltage” within the product’s enclosure that may be of sufficient magnitude to constitute a risk of electric shock to persons.
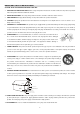
IMPORTANT SAFETY INSTRUCTIONS CAUTION: READ THIS BEFORE OPERATING YOUR UNIT. 1. READ AND FOLLOW INSTRUCTIONS: All the safety and operation instructions should be read before the product is operated. Follow all operation instructions within this manual. 2. RETAIN INSTRUCTIONS: The safety and operation instructions should be retained for future reference. 3. HEED WARNINGS: Comply with all warnings on the product and in the operation instructions. 4.
IMPORTANT SAFETY INSTRUCTIONS 12. CONDITIONS REQUIRING SERVICE: Unplug this product from the wall outlet and refer servicing to qualified service personnel under the following conditions. a) If the unit exhibits sudden unusual operation or unusual display characteristics. b) If liquid has been spilled, or objects have fallen into the product. c) If the product has been exposed to rain or water.
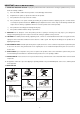
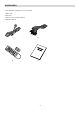
ACCESSORIES You should find the following accessories included: 1. Mains cord 2. RCA cord 3. Remote control + batteries AAA x 2 4. Operator’s Manual.
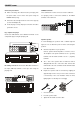
CONNECTIONS Connection precautions SUB OUT terminals When connecting, either disconnect the power plug from These terminals are used to connect to an active subwoofer. the power outlet or turn off the unit’s power using the Use pin-plug cords to connect the terminals to the INPUT POWER switch (if any). terminals on the subwoofer. Check the left and right channels and connect properly (Left to L and Right to R). Insert the plugs securely. Improper connection can lead to generation of noise.
CONNECTIONS PHONO Connect the turntable’s output cord L (white) plug to the L PHONO terminal and the R (red) plug to the R PHONO terminal. If your turntable is equipped with a grounding cable, connect it to the unit’s GND terminal. But disconnect it if you notice increased humming. AUDI O AUX1 terminals This terminal have an electrical performance which is equivalent to that of the CD terminals which means that it can be used as the audio output terminals for a line level source.
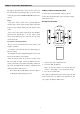
REMOTE CONTROL INFORMATION By using the provided remote control unit, the receiver can be controlled from your listening position. To use the remote control unit, point it at the REMOTE SENSOR window of the receiver. REMOTE CONTROL OPERATION RANGE Use the remote control unit within a range of about 7 meters (23 feet) and the angles of up to 30 degrees aiming at the remote sensor.
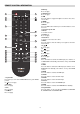
REMOTE CONTROL INFORMATION 1 2 3 4 6 5 6. Memory Does not apply. 7. Number Keys Does not apply. 8. DIM Press this button to toggle the brightness between: 25%, 50%, 75% & 100%. 9. MODE Does not apply. 10. Menu Press the AMP button and then press the Menu button to enter the menu. 11. Cursor keys◄►▲▼ 12. Enter To confirm selection. 13. Tuning +/Does not apply. 14. Volume+/To increase or decrease the volume. 15. Mute Press this button to mute the audio, press it again to cancel the mute function. 16.
FRONT PANEL INFORMATION 5 1 1. 2 3 4 7 Standby/On Press it to turn on the unit and press it again to turn it off. 2. LED Indicator Is OFF when the amplifier is turned on. It is red when the amplifier is in standby mode. 3. Input Rotate this knob clockwise or counterclockwise to choose the input source between: CDP, NET, DAB, AUX1, AUX2, PHONO. Press it to confirm the selection. Press and hold this button to enter the menu for the below settings: EQ, SPEAKER, LOUDNESS, DISPLAY, HP FILTER, PHONO.
REAR PANEL INFORMATION 1 2 3 4 6 7 8 9 1. PHONO: For connection of a turn table (Note: Additional ground terminal available above inputs) 2. CDP: For connection of a CD player e.g. EXEO CDP 3. NET: For connection of a NET tuner e.g. EXEO NET 4. DAB: For connection of e.g. a DAB tuner 5. AUX1 : For connection of a line level source 6. PRE OUT: For connection of e.g. a external power amplifier 7. REC OUT: For connection of e.g. an external tape deck. 8. SUB OUT: For connection of e.g.
OPERATION AND FUNCTION ON, Off and Standby 1. Turn on the unit by pressing the Standby/ON button on the front panel or the AMP button on the remote control. 2. If you wish to turn off the unit to avoid any power consumption, you must remove the power cord. Selecting an Input Source You can choose an input source by the left hand side knob, and press the knob to select. In addition the remote has dedicated input selection. Volume Control On the right hand side knob the volume can be adjusted.
OPERATION AND FUNCTION HP Filter A highpass filter can be set on and off, to match the system with a active subwoofer. The corner frequency is 80Hz and it has a 12dB slope. PHONO The phono input can be set for MM and MC cartridges, the gain is 40 and 60dB respectively. Factory Reset The function brings back the unit to default settings. Firmware This function shows the firmware version.
TROUBLESHOOTING PROBLEM CAUSE/REMEDY No power when the unit is turn on - Switch on the current at the mains outlet socket - Check that the plug has been correctly inserted in the socket - The internal fuse has blown and must be replaced by a qualified service technician - The power cord has been damaged and must replaced No Sound - The unit has not been turned on - The volume control is set at minimum or muted - The speaker cables have not been correctly connected - A wrong input source has been select
SPECIFICATIONS Parameter Value Note Power Standby Power Consumption Power Supply Rating 0.73Wrms 300Wrms Audio - Connectors Line Level Inputs Connectors 3.5mm Line Level Inputs Connector Line Level Outputs Connectors 1/4 Headphone Output Connectors Binding Post RCA (Phono), gold plated 3.5mm mini-jack, tin-plated RCA (Phono), gold plated 1/4" (6.