
Operation Manual


12
SELECT button after each character. Note that WEP and WPA codes are
sensitive to upper and lower case characters so you must enter them exactly.
After the final character, use the TUNE knob to select the END character and
press the SELECT button.
The radio should now be able to connect to the network.
Steps for connecting your radio to your wired
network
For connection via a wired network, simply plug in the Ethernet cable from your
switch or hub before you connect the radio to power. The radio will always
prioritize a wired network in front of a wireless network if it is available.
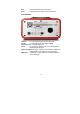
The RJ-45 connecter has two LEDs near the port that shows the status of the
connection. The Green LED indicates if a live connection is present. The yellow
LED indicates if thare are any on going traffic on the wired connection.
If you wish to make sure the radio only will attempt to connect to either a wired or
a wireless network, you can lock it to use only a wired or wireless connection.
1. Press the SELECT button to return to the top-level menu.
(Note: if you make a mistake at any point, press the BACK button to
go back to the previous screen.)
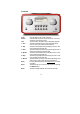
< Stations >
2. Turn the TUNE button until the display says < Configure > and press
SELECT to confirm.
< Configure >
3. Turn the TUNE button until the display says < Network Config > and
press SELECT to confirm.
< Network Config >