SAFETY INSTRUCTIONS 1. 2. 3. 4. 5. 6. 7. Read these instructions. Keep these instructions. Heed all warnings. Follow all instructions. Do not use this apparatus near water. Clean only with a dry cloth. Do not block any ventilation openings. Install in accordance with the manufacturer’s instructions. 8. Do not install near any heat sources such as radiators, heat registers, stoves, or other apparatus (including amplifiers) that produce heat. 9.
19. Exposure to extremely high noise levels may cause permanent hearing loss. Individuals vary considerably in susceptibility to noise-induced hearing loss, but nearly everyone will lose some hearing if exposed to sufficiently intense noise for a period of time. The U.S. Government’s Occupational Safety and Health Administration (OSHA) has specified the permissible noise level exposures shown in the following chart.
Getting Started The following steps will help you set up your amplifier, and get the levels just right. SETTINGS: 1. Be sure the amplifier’s POWER switch is off. 2. Turn down both Level controls. 3. On the rear panel, set the SUBSONIC FILTER switch OFF and the CLIP LIMIT switch ON. 4. Determine which AMP MODE is best for your application: STEREO mode is the typical setup for amplifying stereo signals. INPUT 1 is routed to CHANNEL 1 output, and INPUT 2 is routed to CHANNEL 2 output.
• Before making connections to an amp or reconfiguring an amp’s routing, turn the amp’s level controls down, turn the power off, make the changes, turn the power back on, and then turn the level controls back up. • If you shut down your equipment, turn off the amplifiers first. When powering up, turn on the amplifiers last. • Save the shipping box and packing material! You may need it someday. If not, it makes a great end table or hiding place for your cat. Contents Safety Instructions .........................
Introduction Thank you for choosing a TAPCO® Juice™ power amplifier. The TAPCO product line hails back to the days of TAPCO Corporation, Greg Mackie’s first company. TAPCO revolutionized the audio industry in 1969 with the very first 6-channel mixer specifically designed for keyboards and rock ‘N’ roll PA. In essence, TAPCO re-defined the price performance ratio and made high-quality professional audio mixers accessible to virtually anyone.
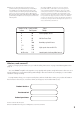
Hookup Diagrams OPTIONAL CONNECTION USING BINDING POSTS TO SPEAKERS Stereo Hookup CHANNEL 2 CHANNEL 1 BRIDGED SPEAKER CONNECTION INPUT 2 INPUT CONNECTION OFF FROM MIXING CONSOLE LEFT AND RIGHT MAIN OUT ON CAUTION SUBSONIC FILTER AT 30Hz LINE TO REDUCE THE RISK OF FIRE OR ELECTRIC SHOCK, DO NOT EXPOSE THIS APPARATUS TO RAIN OR MOISTURE. SEE INSTRUCTIONS BEFORE USING.
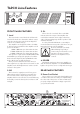
TAPCO Juice Features 2 1 SIG 3 2 2 OL SIG 3 OL 1 1 OO dBu 30 OO dBu 4 30 POWER FRONT PANEL FEATURES 3. OL This is short for “overload.” These red LEDs indicate when the output of the amplifier has reached the maximum, and is right on the hairy edge of clipping. Clipping is bad for speakers and should be avoided. It is okay if the OL LED blinks occasionally. It means that the transient peaks of the music are just hitting the full output of the amplifier.
6. BREAKER This is a resettable circuit breaker that monitors the amount of current being drawn by the amplifier. Under normal operating conditions, this should never pop. An unusual condition may cause the breaker to pop, such as a mains voltage surge occurring at the same time as a peak amplifier output. Turn the POWER switch off, and push the BREAKER button in to reset the circuit breaker. Turn the POWER switch back on and the amplifier should resume normal operation.
shelf across the back of the rack, or angle brackets attached between the rear support rails and the rear rails of the rack. This is recommended for all components mounted in a rack that is going to be moved frequently (or thrown in the back of a pickup truck and transported down a bumpy gravel road to that outdoor festival!). Thermal Considerations The Juice amplifiers are fan-cooled with two separate fans.
Using the 1/4" TRS INPUT 1s a “Thru” Connector Because the XLR connector and the 1/4" TRS connector are in parallel, you can use the 1/4" TRS jack as a “Thru” connector to pass the input signal on to another amplifier’s input (see Figure below). INPUT 2 INPUT CONNECTION OFF FROM MIXING CONSOLE LEFT AND RIGHT MAIN OUT ON Note: If you use an unbalanced 1/4" TS cable to daisy-chain the TRS input jack to another amplifier, you will unbalance the XLR input on the Juice amplifier.
D N G Stereo and Mono Modes Binding Posts When using the binding post outputs in stereo or mono modes, you can terminate your speaker cables with single or double banana plugs, spade lugs, or leave them unterminated (bare wires): unscrew the amp’s binding posts enough to reveal the holes on their sides, then insert your stripped wires (stripped about 3/8" back) into the holes and retighten the posts (finger tight is fine). Be careful that no runaway strands touch the chassis or other terminal.
Dual-Channel Connection The BRIDGED connector has the added feature of providing both speaker outputs on a single connector. This allows you to use a single cable to carry both channels from the amplifier to the speakers. Many speakers with Speakon connectors provide an Input connector and a “Thru” connector for connecting a second speaker in parallel. You can use the Thru connector to connect the CHANNEL 2 amplifier output to the CHANNEL 2 speaker.
Appendix A: Service Information Warranty Service Details concerning Warranty Service are spelled out in the Warranty section on page 19. If you think your amplifier has a problem, please do everything you can to confirm it before calling for service. Doing so might save you from the deprivation of your amplifier and the associated suffering. These may sound obvious to you, but here are some things you can check. Read on.
Noise/Hum • • • • Check the signal cable between the mixer and the amplifier. Make sure all connections are good and sound. Make sure the signal cable is not routed near AC cables, power transformers, or other EMIinducing devices. Is there a light dimmer or other SCR-based device on the same AC circuit as the amplifier? Use an AC line filter, or plug the amplifier into a different AC circuit. If possible, listen to the signal source with headphones plugged into the console.
Appendix B: Technical Info Do The Math: Ohms, Loads, and Such An ohm is a unit of resistance — the more ohms, the more resistance (or, more accurately in this case, impedance). The more the resistance, the less the power. If you’re dealing with just one speaker (or cabinet) per output, the load in ohms is usually printed on it somewhere. That’s your load, usually 8 ohms or 4 ohms. If you’re driving an assortment of speakers, things can get complicated.
Juice Series Specifications Continuous Sine Wave Average Output Power for each channel with both channels driven, 20 Hz to 20 kHz 2 ohms: 4 ohms: 8 ohms: J•800 480 W 300 W 205 W J•1400 800 W 450 W 310 W J•2500 1400 W 750 W 575 W Bridged Mono Operation, 20 Hz to 20 kHz 4 ohms: 8 ohms: J•800 800 W 560 W J•1400 1400 W 900 W J•2500 2500 W 1500 W Note: Power ratings are specified at 120 VAC line voltage.
BREAKER TAPCO JUICE SERIES BLOCK DIAGRAM 05.05.
TAPCO LIMITED WARRANTY A. LOUD Technologies Inc. warrants all materials, workmanship and proper operation of this TAPCO product for a period of one year from the original date of purchase. If any defects are found in the materials or workmanship, or if the product fails to function properly during the applicable warranty period, LOUD Technologies, at its option, will repair or replace the product. This warranty applies only to equipment sold and delivered within the U.S.