
User guide
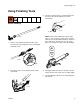

Using Finishing Tools
3A0245A 13
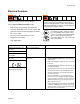
Automatic Taping
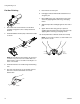
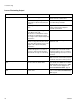
1. Remove creaser wheel trigger pin.
2. Attach taper tool to inline valve.
3. Position creaser wheel trigger and insert pin into
trigger assembly.
4. Load tape into taper tool.
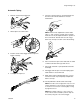
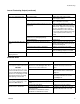
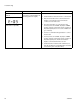
5. Use flow control knob (C) to set material flow rate.
Turn flow control knob clockwise to increase
material flow.
NOTE: Fine flow rate adjustments can be made
using “+” and “-” buttons on inline valve controller.
Flow rate can only be adjusted relative to position of
flow control knob. The fine flow rate can only go
down from, and up to the flow control knob setting.
6. Place one hand on taper control tube and one hand
on Inline Controller Valve (JJ) while in use.
7. Place tape at bottom of joint (slide tube forward to
feed tape).
8. Pull trigger and roll tape over seam keeping taper
head wheels in contact with wall.
9. When taper reaches approximately 3 in. (7.5 cm)
from end of seam, stop completely and pull tube
back to cut tape.
10. Use drywall knife to detail seams and overlap.
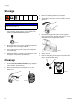
NOTE: Clean all tools thoroughly after every use. Use
a brush and water to remove all joint compound from
tools. Once tools have been cleaned, lightly oil using
any light machine oil.
NOTE: When taping ceilings or corner seams, the
creaser wheel can be actuated to push the tape into
the seam by using the creaser wheel trigger.
ti15679a
ti15748a
ti15678a
ti15682a
ti8794a
C
+
-
ti15675a