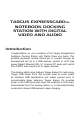
ExpressCardTM Notebook Docking Station with Digital Video and Audio USER GUIDE
TARGUS EXPRESSCARDTM NOTEBOOK DOCKING STATION WITH DIGITAL VIDEO AND AUDIO Introduction Congratulations on your purchase of the Targus ExpressCard Notebook Docking Station with Digital Video and Audio. This portable expansion module allows you to connect through an ExpressCard slot up to 4 USB devices, monitor or LCD, high speed Gigabit Ethernet/LAN, 5.1 channel PC audio with optical fiber S/PDIF, and a serial port for legacy devices.
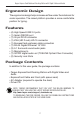
Targus ExpressCard Notebook Docking Station with Digital Video and Audio Ergonomic Design The ergonomic design helps increase airflow under the notebook for cooler operation. The raised platform provides a more comfortable position for typing. Features • (4) High Speed USB 2.0 ports • (1) Serial (RS232) port • (1) 24 pin DVI-D connector • (1) VGA (HD D-sub) HD-15 connector • (1) ExpressCard upstream cable connection • (1) RJ-45 Gigabit Ethernet 10/1000 • (3) 5.
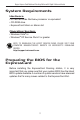
Targus ExpressCard Notebook Docking Station with Digital Video and Audio System Requirements Hardware • PC with an Intel® Pentium® processor or equivalent • CD-ROM drive • ExpressCard 34mm or 54mm slot Operating System • Windows Vista® or • Windows® XP Service Pack 2 or greater NOTE: TO DOWNLOAD THE LATEST SERVICE PACKS, PLEASE VISIT YOUR COMPUTER MANUFACTURER’S WEBSITE OR MICROSOFT’S DOWNLOAD CENTER: http://support.microsoft.
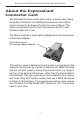
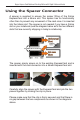
Targus ExpressCard Notebook Docking Station with Digital Video and Audio About the ExpressCard Connector Card The ExpressCard dock comes with a cable, a spacer (see “Using the Spacer Connector” for additional instructions) and a 34mm card to connect to an ExpressCard slot in your notebook. The cable is removable from the card. The card can be left in your notebook when not in use. The 34mm card has a small switch highlighted in the circular area of the below diagram.
Targus ExpressCard Notebook Docking Station with Digital Video and Audio Using the Spacer Connector A spacer is supplied to ensure the proper fitting of the 34mm ExpressCard into a 54mm slot. This spacer has no functionality other than to prevent any movement of the card once it is inserted into the 54mm slot. The spacer is not needed if you have a 34mm slot on your notebook (see the diagram below as to the two different slots that are currently shipping in today’s notebooks).
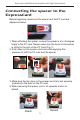
Targus ExpressCard Notebook Docking Station with Digital Video and Audio Connecting the spacer to the ExpressCard Before beginning, make sure the spacer and the PC card are aligned as below. 1. When attaching the spacer, ensure the spacer is at a 45 degree angle to the PC card. Please make sure the hook on the spacer is sitting in the slot on the PC Card (Fig. 1). 2. Push down on the spacer as shown while applying firm pressure to both the PC card and the spacer. Fig. 1 2 1 3.
Targus ExpressCard Notebook Docking Station with Digital Video and Audio Installing the Docking Station Driver Installing the docking station driver enables your operating system to recognize the docking station and its ports once it’s connected. To install the docking station driver: 1. Turn on your computer. 2. Insert the driver software CD into your computer’s CD-ROM drive. If setup does not begin automatically, click Start, Run, and enter D:\Setup.
Targus ExpressCard Notebook Docking Station with Digital Video and Audio 2. Insert the pin section into the base section as shown. 3. Press and hold the button located on the pin section. 4. While holding on to the pins, rotate the pin section clockwise until it clicks into place. To Disassemble the AC Power Adapter When not in use, the AC power adapter can be disassembled for convenient storage.
Targus ExpressCard Notebook Docking Station with Digital Video and Audio 1. Press and hold the button located on the pin section. 2. While holding on to the pins, rotate the pin section counterclockwise. 3. Remove the pin section from the base section.
Targus ExpressCard Notebook Docking Station with Digital Video and Audio Connecting the Docking Station to your Computer 1. Connect one end of the assembled AC power adapter to the AC power jack on the docking station and the other end to a power outlet. 2. Connect one end of the ExpressCard cable to the docking station and the other end into the ExpressCard card.
Targus ExpressCard Notebook Docking Station with Digital Video and Audio Click Finish and restart your computer when prompted by the docking station’s installation software. In order to install the driver files properly, you must make sure the installation is completed before restarting the computer. WINDOWS VISTA WILL PROMPT A MESSAGE BOX TO RESTART THE COMPUTER DURING THE DRIVER INSTALLATION PROCESS. PLEASE IGNORE THIS MESSAGE.
Targus ExpressCard Notebook Docking Station with Digital Video and Audio LED Status Indicator Lights Once all device drivers are installed, the USB LED status indicator lights on on each side of the docking station glow when you connect devices to the docking station. • Green Tx light illuminates when connected to a network and the yellow Rx light flashes when data is transmitting to or from the network. • The Power LED will glow when the AC power cord is plugged into the docking station.
Targus ExpressCard Notebook Docking Station with Digital Video and Audio Connecting New Devices To avoid possible damage when connecting a new device, do not force the cable connector into the port on the docking station. If the cable connector does not attach smoothly, turn the connector over and try attaching it again. Connecting a Serial Mouse / Keyboard To connect a serial mouse or keyboard, attach the cable connector to the serial port on the docking station.
Targus ExpressCard Notebook Docking Station with Digital Video and Audio Connecting to a Local Area Network To connect an Ethernet cable with an RJ-45 connector, attach the cable connector to the Ethernet/network port on the docking station. Additional procedures to connect to an actual network depend on the type of network you are using. Contact your network administrator for detailed instructions. NOTE: THE DOCKING STATION SUPPORTS HOT SWAPPING OF THE NETWORK CABLE.
Targus ExpressCard Notebook Docking Station with Digital Video and Audio Connecting and Configuring an Audio Device This docking station comes with a 5.1 audio support. The back of the device has 5 ports dedicated to audio. NOTE: IF YOU ARE HAVING PROBLEMS WITH YOUR SPEAKERS AFTER ATTACHING THE DOCKING STATION, PLEASE SEE THE TROUBLESHOOTING SECTION FOR MORE INFORMATION.
Targus ExpressCard Notebook Docking Station with Digital Video and Audio 2. To connect a microphone, plug it into the pink 3.5mm port. 3. To enable your headphones or speakers, you must first choose C-Media USB Sound Device in the Properties Settings. 4. For Windows XP, go to the Control Panel and choose Sound and Audio. Select the Audio tab. Under Sound Playback, change Preferred Device to C-Media USB Sound Device from the drop down list. Click Apply, then click OK. 5.
Targus ExpressCard Notebook Docking Station with Digital Video and Audio Installing and Configuring a S/PDIF (Sony/ Philips Digital Interface) Device 1. In order to enable S/PDIF, you have to turn it on. This can be done by opening the USB 3D Sound Configuration applet located in your system tray (click on the USB icon to open up the Configuration Screen). 2. Click on the button next to the S/PDIF Output text to enable S/PDIF. 3. Set the Audio Output from the tray to digital audio. 4.
Targus ExpressCard Notebook Docking Station with Digital Video and Audio Connecting to a Monitor or LCD Any monitor or LCD connected to the video port of the docking station will be limited to a maximum resolution of 1600x1200, 32bit color. Video Menu Options Video menu options can be accessed by right-clicking on the Targus Display icon in the system tray or through the Windows Display Properties. The only menu option not accessible through Windows Display Properties is Mirror.
Targus ExpressCard Notebook Docking Station with Digital Video and Audio Primary: You are using a monitor or LCD (not your notebook screen) as your primary screen. Extended: You are using your notebook screen as your primary display and your monitor or LCD is a secondary screen, extending your desktop to span both screens. Mirror: You are using your notebook screen as your primary display and your monitor or LCD replicates your notebook screen.
Targus ExpressCard Notebook Docking Station with Digital Video and Audio Video output will support the following resolutions and color quality: Mode Aspect ratio Resolution Color Depth Refresh Rate UXGA 4:3 1600x1200 16 60HZ, 65HZ, 70HZ, 75HZ, 85HZ UXGA 4:3 1600x1200 32 16:10 1680x1050 32 SXGA+ SXGA 4:3 5:4 1400x1050 1280x1024 16 16,32 QVGA 4:3 1280x960 16,32 16:10 15:9 16:10 4:3 1440x900 1280x768 1280x800 1024x768 32 16,32 16,32 16,32 SVGA 4:3 800x600 16,32 VGA 4:3 640x48
Targus ExpressCard Notebook Docking Station with Digital Video and Audio Troubleshooting Device Not Working • Make sure that the device is fully inserted into the correct port on the docking station. • Plug the device into a different port on the docking station. If it still doesn’t work, test the device by connecting it directly to your computer. • Verify that you ran the Setup or Install program for the device. • Make sure that the device appears in Device Manager.
Targus ExpressCard Notebook Docking Station with Digital Video and Audio Verifying Devices are Installed You can view the devices installed on the docking station from the Device Manager window in System Properties. Right-click My Computer, Properties, then click the Hardware tab, and then the Device Manager button.
Targus ExpressCard Notebook Docking Station with Digital Video and Audio Video Can I get a higher resolution on my monitor? • The highest resolution is 1600 x 1200, 32-bit color. Movie playback is not smooth when played at 1600x1200x32 bit resolution. It is worse when playing a media clip in full screen. The Targus ExpressCard Docking station is not primarily designed for playing back movie content at maximum resolution and color depth.
Targus ExpressCard Notebook Docking Station with Digital Video and Audio Why does my system crash during boot up with the Card connector installed? Try switching the Pre-boot switch to the “on” position and boot again. Can two separate displays be connected to the ExpressCard Docking station (VGA and DVI-D) and display two separate images or work to extend the display across three screens (including the notebook’s screen)? No. The output from the VGA port and the DVI port are the same.
Targus ExpressCard Notebook Docking Station with Digital Video and Audio Technical Support For technical questions, please visit: US Internet: www.targus.com/support.asp Australia Internet: www.targus.com/au Email: infoaust@targus.com Telephone: 1800-641-645 New Zealand Telephone: 0800-633-222 Product Registration Targus recommends that you register your Targus accessory shortly after purchasing it. To register your Targus accessory, go to: http://www.targus.com/registration.
Targus ExpressCard Notebook Docking Station with Digital Video and Audio Regulatory Compliance This device complies with Part 15 of the FCC Rules. Operation is subject to the following two conditions: (1) This device may not cause harmful interference, and (2) This device must accept any interference received, including interference that may cause undesired operation.
Visit our website at www.targus.com Features and specifications are subject to change without notice. © 2008 Targus Group International, Inc. and Targus, Inc.