Bluetooth® Laser Rechargeable Notebook Mouse USER GUIDE Visit our Website at www.targus.com Features and specifications subject to change without notice. © 2007 Targus Group International, Inc. and Targus, Inc.
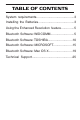
TABLE OF CONTENTS System requirements...........................................3 Installing the Batteries.........................................3 Using the Enhanced Resolution feature...............5 Bluetooth Software: WIDCOMM...........................5 Bluetooth Software: TOSHIBA............................10 Bluetooth Software: MICROSOFT......................15 Bluetooth Software: Mac OS X...........................19 Technical Support..............................................
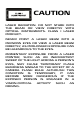
CAUTION LASER RADIATION. DO NOT STARE INTO THE BEAM OR VIEW DIRECTLY WITH OPTICAL INSTRUMENTS. CLASS I LASER PRODUCT. NEVER POINT A LASER BEAM INTO A PERSON’S EYES OR VIEW A LASER BEAM DIRECTLY, AS PROLONGED EXPOSURE CAN BE HAZARDOUS TO THE EYES. MOMENTARY EXPOSURE FROM A LASER POINTER, SUCH AS AN INADVERTENT SWEEP OF THE LIGHT ACROSS A PERSON'S EYES, MAY CAUSE TEMPORARY FLASH BLINDNESS SIMILAR TO THE EFFECT OF A CAMERA FLASH BULB.
TARGUS BLUETOOTH® LASER RECHARGEABLE NOTEBOOK MOUSE Introduction Congratulations on your purchase of the Targus Bluetooth® Laser Rechargeable Notebook Mouse. This mouse has a special EDR (Enhanced Data Rate) technology that provides faster data transmission rate and allows multiple Bluetooth devices running without conflict. System Requirements Hardware - Bluetooth-enabled notebook or desktop PC Operating System - Windows® 98SE / 2000 / ME / XP Windows VistaTM Mac OS X (10.
TARGUS BLUETOOTH® LASER RECHARGEABLE NOTEBOOK MOUSE slide the battery cover in this direction Battery cover release button ID OPEN on off On/Off switch connect button WARNINGS: WHEN REPLACING THE BATTERIES, ALWAYS REPLACE WITH NiMH BATTERIES OR OTHER RECHARGEABLE BATTERIES. NEVER USE ALKALINE BATTERIES IN THIS DEVICE. AVOID MIXING NEW AND USED BATTERIES IN A DEVICE • Snap the battery cover back into position • Turn on the mouse by sliding on/off switch on the bottom to the “on” position.
TARGUS BLUETOOTH® LASER RECHARGEABLE NOTEBOOK MOUSE 1. Charge the mouse for at least 8 hours before using it. And please make sure only rechargeable batteries (the ones that come with your product) are used. 2. Your computer needs to stay powered on for the mouse to charge.
TARGUS BLUETOOTH® LASER RECHARGEABLE NOTEBOOK MOUSE NOTE: TO CONTINUOUSLY CHARGE THE BATTERIES VIA THE USB CHARGE CABLE, YOUR COMPUTER MUST BE ON AND AWAKE . FOR BEST RESULTS , TURN OFF YOUR COMPUTER ’S POWER MANAGEMENT / SLEEP MODE FEATURE WHILE CHARGING THE MOUSE. Initial Configuration Before you can begin using Bluetooth connectivity on your computer and other Bluetooth devices, you must perform some initial setup tasks.
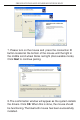
TARGUS BLUETOOTH® LASER RECHARGEABLE NOTEBOOK MOUSE 2. The Bluetooth configuration screen will prompt. Please follow the onscreen instructions. Click Next to continue. 3. Continue to setup your bluetooth device profile.
TARGUS BLUETOOTH® LASER RECHARGEABLE NOTEBOOK MOUSE 4. Click Next to continue setup. 5. Please select the service which the bluetooth device offers. (Default setting allows the most coverage. It is recommend to keep as default). Click Next. 6. Installation will perform setup and click Next when setup is completed.
TARGUS BLUETOOTH® LASER RECHARGEABLE NOTEBOOK MOUSE 7. Please turn on the mouse and press the connection ID button located at the bottom of the mouse until the light in the middle scroll wheel blinks red light (discoverable mode). Click Next to continue pairing. Targus BT Laser Notebook Mouse 8. The confirmation window will appear as the system installs the drivers. Click OK. When this is done, the mouse should be functioning. The bluetooth mouse has been successfully installed.
TARGUS BLUETOOTH® LASER RECHARGEABLE NOTEBOOK MOUSE (There may be one or more different bluetooth device detected.) If the mouse is not detected, please make sure the power is on and in discoverable mode. Press Search Again to re-pair the device. connection with Targus BT laser notebook mouse has been established successfully. To confirm that the correct mouse is being connected please use it to click the button below. 9.
TARGUS BLUETOOTH® LASER RECHARGEABLE NOTEBOOK MOUSE Bluetooth Software: TOSHIBA How to check your version of the Toshiba Bluetooth Stack 1. Launch the Bluetooth Manager. 2. Select the Help menu. 3. Select About. NOTE: TO ENSURE OPTIMAL PERFORMANCE OF YOUR BLUETOOTH PRODUCT YOU NEED TOSHIBA BLUETOOTH STACK V3.20.00 OR HIGHER. IF YOU HAVE A DIFFERENT VERSION PLEASE UPDATE IT FROM WWW.SUPPORT.TOSHIBA.COM 1. Double click on the Bluetooth Manager icon in the system tray, and then click “New Connection.” 2.
TARGUS BLUETOOTH® LASER RECHARGEABLE NOTEBOOK MOUSE 3. Please turn on the mouse and press the connection ID button located at the bottom of the mouse until the light in the middle scroller wheel blinks red light (discoverable mode). Click Next to continue pairing. 4. The computer will now search for the bluetooth mouse and other bluetooth devices. Please wait until the search is completed.
TARGUS BLUETOOTH® LASER RECHARGEABLE NOTEBOOK MOUSE 5. Please choose the device you wish to connect. There maybe more then one bluetooth device detected. Select Targus bluetooth mouse and click Next to continue. If the mouse is not detected, please make sure the mouse is in discoverable mode and click Refresh. Targus BT Laser Notebook Mouse 6. The computer will begin connecting with the mouse. If an authentication is required, a dialogue will appear. The mouse does not require a passkey (PIN code).
TARGUS BLUETOOTH® LASER RECHARGEABLE NOTEBOOK MOUSE 7. Please follow the on-screen instructions to continue setting up your bluetooth mouse. Click OK. 8. You may want to create a connection name or change icon for the device. Once completed, press Next to finalize setup.
TARGUS BLUETOOTH® LASER RECHARGEABLE NOTEBOOK MOUSE 9. The connection is established and setup is complete. The mouse is ready to use. If the connection is not successful, please click Back and search the device again. Click Finish to exit setup. 10. The following screen should show the newly added mouse connection. You may want to continue to add other bluetooth device or close the window.
TARGUS BLUETOOTH® LASER RECHARGEABLE NOTEBOOK MOUSE Bluetooth Software: MICROSOFT Make sure the Bluetooth radio is turned on. If necessary, check your computer’s manual to determine if the radio is activated. To add the Targus mouse, proceed with the following steps: 1. Double click on the Bluetooth Manager icon in the system tray. 2. This window should appear. Click Add to launch the bluetooth device wizard.
TARGUS BLUETOOTH® LASER RECHARGEABLE NOTEBOOK MOUSE 3. Please turn on the mouse and press the connection ID button located at the bottom of the mouse until the light in the middle scroller wheel blinks red light (discoverable mode). Check the box “my device is set up and ready to be found” then click Next to continue. 4. The computer will now search for the bluetooth mouse.
TARGUS BLUETOOTH® LASER RECHARGEABLE NOTEBOOK MOUSE 5. Please choose the device you wish to connect. There maybe more then one bluetooth device detected. Select Targus bluetooth mouse and click Next to continue. If the mouse is not detected, please make sure the mouse is in discoverable mode and click search again. Targus BT Laser Notebook Mouse New device 6. The mouse does not require a passkey (PIN code). Please check the “don’t use a passkey” circle and click Next to continue.
TARGUS BLUETOOTH® LASER RECHARGEABLE NOTEBOOK MOUSE 7. Windows will begin connecting with the bluetooth mouse. Please wait until this process is complete. 8. The setup is complete. Click Finish to exit setup.
TARGUS BLUETOOTH® LASER RECHARGEABLE NOTEBOOK MOUSE Bluetooth Software: Mac 1. Go to the Bluetooth icon located on your desktop or in the system bar and click the icon to begin setup. Select “Turn Bluetooth On” to enable the device. 2. Scroll down the list to “Set up Bluetooth Device...” and select the option. 3. Bluetooth Setup Assistant will begin. Please follow the on-screen instructions.
TARGUS BLUETOOTH® LASER RECHARGEABLE NOTEBOOK MOUSE 4. Please select “mouse” and click continue to proceed with setup. Please make sure your mouse is in “discoverable” mode. To enable “discoverable” mode, turn on the mouse and press the connection ID button located at the bottom of the device until the light in the middle scroll wheel blinks red light. 5. Your computer will begin to search for the mouse. Once the mouse is found, it will show up in the list.
TARGUS BLUETOOTH® LASER RECHARGEABLE NOTEBOOK MOUSE 6. The bluetooth mouse will now begin pairing. Click continue to proceed. 7. Congratulations. Your bluetooth mouse is setup and is ready to use. You can choose to setup another device or click Quit to exit setup.
TARGUS BLUETOOTH® LASER RECHARGEABLE NOTEBOOK MOUSE Operating Hints • Avoid using the mouse on a metal surface. Metals, such as iron, aluminum or copper, shield the radio frequency transmission and may slow down the mouse response time or cause the mouse to fail temporarily. • The mouse will enter a suspend mode at the same time your computer does. To activate the mouse, press any mouse button, or simply move the mouse. Please note that it will take about 2 seconds to wake up.
TARGUS BLUETOOTH® LASER RECHARGEABLE NOTEBOOK MOUSE • Scroller Wheel will glow when the power is low. To recharge the mouse, plug in the USB Recharging Cable to the mouse, and plug the USB tip to the computer. The mouse is operational while charging.
TARGUS BLUETOOTH® LASER RECHARGEABLE NOTEBOOK MOUSE Safety Measures • To avoid possible eye damage, never point the mouse’s laser at people, especially their faces, or look directly into the mouse’s laser beam. • Avoid pointing the mouse’s laser beam at a mirror or other highly reflective surface. • Keep the mouse away from young children. • Never view the mouse’s laser beam using telescopic devices, such as a microscope or binoculars.
TARGUS BLUETOOTH® LASER RECHARGEABLE NOTEBOOK MOUSE Technical Support For technical questions, please visit: Internet: http://www.targus.com/support.asp Product Registration Targus recommends that you register your Targus accessory shortly after purchasing it. To register your Targus accessory, go to: http://www.targus.com/registration.asp You will need to provide your full name, email address, phone number, and company information (if applicable).