USB Mobile Port Replicator NOTEBOOK COMPUTER MOBILE PORT REPLICATOR User’s Guide
INTRODUCTION Congratulations on your purchase of the Targus USB Mobile Port Replicator! It is an intelligent expansion module that easily connects to a PC or notebook via a USB port. This user’s guide provides descriptions of the Targus USB Mobile Port Replicator’s features, and gives instructions for connecting various devices and installing the software. System Requirements ❖ Pentium-class CPU with USB port ❖ One USB V.1.
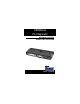
Figure 1. USB Mobile Port Replicator Ports Figure 2.
LED Status Indicators Once the USB Mobile Port Replicator is connected, all of the following LED lights glow green: the Hub Link, both USBs, and the serial (RS232). The PS/2 lights glow green after a PS/2 device is connected. SOFTWARE INSTALLATION Now you will install the drivers to support each port on the port replicator. For the initial installation, you must complete each of the following three steps to configure your USB Port Replicator ports and enable them for use.
Step 2: Installing the Parallel Port Drivers Next, the New Hardware Detected dialog box will appear, indicating that the Targus Parallel Interface Controller is found. The Add New Hardware Wizard window will then appear. Click Next to continue. Insert the Targus USB Mobile Port Replicator disk (if not already inserted) and select Floppy disk drives. Click Next to initiate the search. When the software driver is located, and Windows is ready to install it, click Next to continue with the installation.
CONNECTING DEVICES TO THE PORT REPLICATOR When connecting a new device to any port on the port replicator, the corresponding software drivers must be installed. Consider the following guidelines when preparing to connect new devices: If your operating system is Windows 98, you will be prompted by a series of screens beginning with Add New Hardware Wizard. You may need your Windows 98 CD to complete the installation.
Installing a Parallel Printer - First-Time Installation Follow the installation instructions that come with your printer. When prompted to select a port, choose PB1284-1 (USB port). If this port does not appear in the list, choose the LPT1 port, complete the manufacturer’s setup for your printer, and follow the instructions below for Printer Reconfiguration.
Using the Reset button The Reset button is used in conjunction with the serial port on the port replicator. Whenever changing the serial devices connected to the serial port, press and hold the Reset button until the Hub Link LED light blinks so that the new device will be detected. Everytime your notebook computer is powered on, press and hold the Reset button until the Hub Link LED light blinks (about 5 seconds).
TROUBLESHOOTING Perform these self-tests before calling technical support. Device not recognized Step 1 If a device attached to the port replicator is not recognized, press and hold the Reset button until the lights flash. Verify that the device is now recognized. If not, proceed to step 2. Step 2 Detach all cables from the port replicator. Plug in the AC Adapter. Connect the power cable to the power input jack. Plug in each device, one at a time.
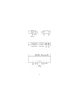
Figure 2. Serial Interface Controller Modem connection Step 1 When attaching a modem to the serial (RS232) port, verify that the port assigned to your modem is Serial USB (COMx) , where x is the number of the COM port. Step 2 If Windows does not Autodetect your modem on Serial USB (COMx) , rerun the Hardware Wizard. Choose Select from a list instead of Autodetect, then select Serial USB (COMx) as the COM port. Printer Step 1 The parallel port is designed to support parallel printers.
Step 2 If your mouse is attached to the PS/2 port, and the enhanced features are not working, you may need to disable the builtin mouse drivers on your computer. Please refer to the user manual provided with your device for instructions. FEDERAL COMMUNICATIONS COMMISSION (FCC) STATEMENT This device complies with Part 15 of the FCC rules.
The Leading Global Supplier of Portable Solutions Visit our Web site at www.targus.com NEW YORK • LOS ANGELES • TORONTO • TOKYO • HONG KONG SINGAPORE • SYDNEY • LONDON • PARIS • BRUSSELS • HANNOVER Features and specifications are subject to change without notice. ©2000 Targus Corp.