D01332620B 202)$" Double Cassette Deck OWNER’S MANUAL MODE D’EMPLOI MANUAL DEL USUARIO ENGLISH FRANÇAIS ESPAÑOL
IMPORTANT SAFETY INSTRUCTIONS 10) Protect the power cord from being walked on or pinched particularly at plugs, convenience receptacles, and the point where they exit from the apparatus. 11) Only use attachments/accessories specified by the manufacturer. CAUTION: TO REDUCE THE RISK OF ELECTRIC SHOCK, DO NOT REMOVE COVER (OR BACK). NO USERSERVICEABLE PARTS INSIDE. REFER SERVICING TO QUALIFIED SERVICE PERSONNEL.
V Precautions concerning batteries Misuse of batteries could cause them to rupture or leak leading to fire, injury or the staining of nearby things. Please read and observe the following precautions carefully. oo Be sure to insert the batteries with correct positive (¥) and negative (^) orientations. oo Use batteries of the same type. Never use different types of batteries together. oo If the remote control is not used for a long time (more than a month), remove the batteries to prevent them from leaking.
Trademarks and copyrights TASCAM is a trademark of TEAC Corporation, registered in the U.S. and other countries. For European Customers Disposal of electrical and electronic equipment and batteries and/or accumulators a) All electrical/electronic equipment and waste batteries/ accumulators should be disposed of separately from the municipal waste stream via collection facilities designated by the government or local authorities.
Contents Thank you for choosing TASCAM. Read this manual carefully to get the best performance from this unit. After reading it, keep it in a safe place for future reference. IMPORTANT SAFETY INSTRUCTIONS . . . . . . . . . . . . . . . . . . . . . . . . . . . . . . . . 2 Trademarks and copyrights. . . . . . . . . . . . . . . . . . . . . . . . . . . . . . . . . . . . . . . . . 4 Using the TEAC Global Site. . . . . . . . . . . .
Capabilities of this unit Cassette tape playback Moving to counter ( ) locations when listening e page 17 Adjusting the pitch when listening e page 17 Listening to cassette tapes e page 15 Listening to a set interval repeatedly (repeat playback) e page 18 Cassette tape recording Recording from line inputs to a cassette tape (TAPE 1 or TAPE 2) e page 18 Recording from a cassette tape to a computer e page 24 Computer or or TAPE1 Connected equipment Mixing line input sounds when recording e page 21 TAP
Before use Included items Check to be sure the box contains all the included items shown below. Please contact the store where you purchased this unit if any of these items are missing or have been damaged during transportation. Remote control (RC-1331) × 1 Batteries for remote control (AA) × 2 Rackmount screw kit × 1 Owner’s manual (this document, including warranty) × 1 oo Keep this manual in a safe place for future reference. oo Please see the end of the manual for information about the warranty.
Before use (continued) Maintenance Cassette tapes Cassette tapes that can be used with this unit Wipe dirt from the top cover and other panel surfaces using a soft cloth that has been slightly dampened with a diluted neutral cleanser. Do not wipe with chemical cleaning cloths, thinner or other chemical agents. Doing so could damage the surface.
Tape slackening Accidental erasure prevention tabs Confirm that the tape in the cassette is not slack before use. Slack can cause the tape to get tangled in the capstan or other rotating parts. To prevent this, take up all tape slack using a pencil or the like inserted into the reel hole. Tabs on cassettes allow you to prevent important recordings from being erased by mistake. There are two tabs on each cassette shell: one for side “A” and the other for side “B”.
Names and functions of parts (main unit) A J B C D E F G H I K L M A Cassette compartment L A R P Q Press to turn the unit on and off. ” counter position and Press to reset the tape counter to “ ”. D Remote control signal receiver When operating the remote control, point it towards here. E DIMMER button Press to change the brightness of the display. F REPEAT button This allows repeat playback of a selected section of the tape (page 18).
Using the remote control M MIC connector and mic LEVEL knob When using a mic to record, insert the mic cable plug into this connector and turn the knob to a suitable level (page 21). oo This unit does not support stereo mics. Use a mono mic. oo When a mic is connected, the tape playback level is lowered slightly. When the mic is disconnected, the playback level will return to normal. N REC LEVEL (recording level) knob Use to adjust the recording level.
Names and functions of parts (remote control) a DIMMER button Press to change the brightness of the display. a d b e c c b PARALLEL REC (parallel recording) buttons These buttons start simultaneously recording to both TAPE 1 and TAPE 2. Press both buttons at the same time (page 24). c TAPE 1 and TAPE 2 operation buttons RTZ button Press to return the tape to the “ stop (page 17). ” counter position and COUNTER RESET button Press to reset the tape counter to “ ”.
Names and functions of parts (display) a b c d a Peak level meters These show recording and playback levels. c d Dubbing (NORM DUB) indicator This appears when dubbing (page 23). b Parallel recording (PARALLEL) indicator This lights when parallel recording to TAPE 1 and TAPE 2 (page 24). c TAPE 1/TAPE 2 status indicators Play/record (y) indicator During playback/recording, y appears. Pause (9) indicator This appears when playback/recording is paused.
Connections VV Complete all other connections before turning the unit on. A oo Carefully read the manuals of the devices that you are connecting and follow their instructions when making connections. oo Do not bundle connecting cables with power cords. Doing so could cause noise. oo Connect all plugs completely.
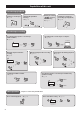
Listening to a cassette tape This unit can play normal (type I), chrome (type II) and metal (type IV) tapes. 1 Press the POWER button to turn the unit on. ATTENTION oo Confirm that the tape is not slack (page 8). oo Do not use deformed or slack tapes because they could cause malfunction. Do not force the door of the compartment by hand when opening it. 4 Press the play (y) button to start playback. 2 Press the EJECT (-) button to open the cassette compartment.
Listening to a cassette tape (continued) Stopping playback Press the stop (8) button to stop playback. Removing cassette tapes When a tape is stopped, press the EJECT (-) button to open the cassette compartment it is in. Pausing playback Rewinding/fast-forwarding Press the PAUSE button to pause playback. To resume playback, press the PAUSE button again or press the play (y) button. 16 Press the rewind/fast-forward (m/,) button. Winding stops when the end of the tape is reached.
Returning to zero Pitch control (TAPE 1 only) The pitch can be controlled during TAPE 1 playback. Press the RETURN TO ZERO button to fast-forward or rewind the TAPE 1 or TAPE 2 until the counter reaches “ ” and the tape stops. oo This function cannot be used if the counter is between “ and “ ”. ” Turning the PITCH CONTROL knob clockwise (toward +) increases the playback speed and raises the pitch. (The maximum is 12%, which is about two semitones higher.
Repeat playback You can listen to a set interval repeatedly. 1 During playback, press the REPEAT button at the point where you want to start the repeat playback interval. Recording to cassette tapes Using this unit, the sound from devices connected to the line input connectors can be recorded on cassette tapes. This unit can record to normal (type I) and chrome (type II) tapes. oo This unit does not support recording to metal (type IV) tapes.
3 Adjusting the recording level. 4 Press the PAUSE button to start recording. Before recording, adjust the recording level. If the recording level is not suitable, the sound of the recording could be distorted (level too high) or noisy (level too low). 1. Play the source (external source) to be recorded. Examples: Play the input source of a connected amplifier. Play the connected audio player. Tune in a station on a connected radio tuner. 2.
Recording to cassette tapes (continued) Erasing already recorded tapes Creating silences (REC MUTE) Erasing unnecessary parts and creating spaces between songs while recording is possible. If you press the REC MUTE (record muting) button when recording or in recording standby, the unit records no signal for about 4 seconds and then enters recording standby. You can erase a cassette tape by setting the recording level to the minimum value (0) and recording silence.
Mic mixing with recording Mixing line input sounds when recording 2 Adjust the mic level. You can mix in the sound of a mic connected to this unit with an audio source from a connected device when recording. You can also record only the sound from the mic. This unit does not support stereo mics. Use a mono mic. While inputting sound with the mic, turn the mic LEVEL knob to adjust the balance between the source and mic sounds. 3 Adjust the overall level.
Mic mixing with recording (continued) oo When recording a mic, we recommend using headphones for monitoring to prevent feedback.* If monitoring with speakers, be sure to lower their output volume and keep the mic away from them to prevent feedback. *Feedback explanation Feedback is when sound output from a speaker is picked up by a mic and returned causing oscillation. This could cause very loud noise that could even damage speakers. oo Silences can also be created (page 20) when recording with mic input.
Dubbing TAPE 1 can be dubbed to TAPE 2. 1 Load a cassette tape for playback into the TAPE 1 compartment and a cassette tape for recording into the TAPE 2 compartment. 2 Press the DUB START (dubbing start) button to start dubbing. oo The TAPE 2 REC MUTE (record muting) can be used to record silences (page 20) even while dubbing. (The TAPE 1 REC MUTE (record muting) button cannot be used.) Erasing unnecessary parts and creating spaces between songs is possible while dubbing.
Parallel recording Recording with a computer This function allows you to record the same source from a connected device to both TAPE 1 and TAPE 2 simultaneously. Connect this unit to a computer using a commercially-available USB cable to convert audio signals from a cassette tape to digital data and send them to the computer. 1 Load cassette tapes for recording into both the TAPE 1 and TAPE 2 compartments.
Connecting with a computer 1 Turn the computer on. Confirm that the operating system is working correctly. 2 Use the USB cable to connect the computer and this unit. Computer settings The following example explains the settings to make using Windows 7. 1 From the Start menu, select Control Panel. 2 Click “Sound”. 3 Click the “Recording” tab, and confirm that “USB Audio CODEC” is set as the “Default Device”. 4 Select “Microphone USB Audio CODEC”, and click the Properties button.
Timer-controlled playback and recording Recording and playback by this unit can be started at set times by connecting a commercially-available timer. oo Only cassette tapes loaded in this unit can be played back using timer playback. Timer playback cannot be used with other connected equipment. oo Timer recording sources are limited to connected equipment that can be operated by timer. This can be used for timed recording of radio broadcasts, for example.
5 Set the timer to your desired start (power on) and stop (power off) times. When this setting is completed, the power to all components should be turned off. At this time, do not press this unit’s POWER button. Leave the button pushed in (the on position). If the POWER button is in the off position, timer playback will not function. Timer-controlled recording oo Timer recording sources are limited to connected equipment that can be operated by timer.
Timer-controlled playback and recording (continued) 6 Adjusting the recording level. Before recording, adjust the recording level. If the recording level is not suitable, the sound of the recording could be distorted (level too high) or noisy (level too low). 7 Set the timer to your desired start (power on) and stop (power off) times. When this setting is completed, the power to all components should be turned off. 1. Play the source (external source) to be recorded. 2.
Playback modes Automatic power saving function Use the PLAY MODE switch to activate the special playback mode that uses the double cassette feature. NORMAL This is the ordinary playback mode. Activity switches to TAPE 1 or TAPE 2 in response to playback operation, and the playback sound is output from the LINE OUT and the headphone connectors. The same sound is output from the LINE OUT and the headphone connectors. SPECIAL This is a special playback mode using the double cassette deck.
Troubleshooting If you are having trouble with the operation of this unit, please try the following before seeking repair. If these measures do not solve the problem, please contact the store where you purchased this unit or TASCAM customer support service. The unit does not turn on. ee Check that the power cord is plugged into a working power outlet. ee Check that the power cord is properly connected to this unit. ee Check that the power cord is completely plugged into the power outlet.
Specifications Cassette recorder Tracking system. . . . . . . . . . . . . . . . . . . . . . . . . . . . 4-track, 2-channel stereo Head construction Recording/playback head (1 each for TAPE 1 and TAPE 2) Erase head (1 each for TAPE 1 and TAPE 2) Tape speed. . . . . . . . . . . . . . . . . . . . . . . . . . . . . . . . . . . . . . . . . . . . . . . . . 4.8 cm/s Pitch control. . . . . . . . . . . . . . . . . . . . .
✂ WARRANTY < In the United States > WHAT WE WILL PAY FOR < Europe > This warranty gives you specific legal rights and you may also have other rights which vary from state to state. This warranty is only valid within the country the unit was originally purchased. We will pay all labor and material expenses for items covered by the warranty. Payment of shipping charges is discussed in the next section of this warranty. This product is subject to the legal warranty regulations of the country of purchase.
TEAC CORPORATION https://tascam.jp/jp/ Phone: +81-42-356-9143 1-47 Ochiai, Tama-shi, Tokyo 206-8530 Japan TEAC AMERICA, INC. http://tascam.com/ Phone: +1-323-726-0303 1834 Gage Road, Montebello, California 90640 USA TEAC UK Ltd. http://tascam.eu/ TEAC EUROPE GmbH http://tascam.eu/ TEAC SALES & TRADING (SHENZHEN) CO., LTD http://tascam.