
Owner's Manual
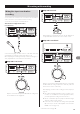
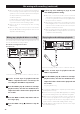
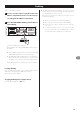
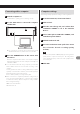
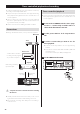
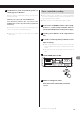
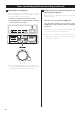
Table Of Contents
- Owners Manual
- Table of Contents
- Supplied Accessories
- Parts & Controls
- Capabilities of This Unit
- Before Use
- Cassette Tapes
- Using the Remote Control
- Connections
- Listening to a Cassette Tape
- Returning to Zero
- Repeat Playback
- Recording to Cassette Tapes
- Mic Mixing with Recording
- Dubbing
- Parallel Recording
- Recording with a Computer
- Timer-Controlled Playback and Recording
- Playback Modes
- Automatic Power Saving Function
- Troubleshooting
- Specs
- Warranty

22
o When recording a mic, we recommend using headphones
for monitoring to prevent feedback.* If monitoring with
speakers, be sure to lower their output volume and keep the
mic away from them to prevent feedback.
*Feedback explanation
Feedback is when sound output from a speaker is picked up
by a mic and returned causing oscillation. This could cause
very loud noise that could even damage speakers.
o Silences can also be created (page20) when recording
with mic input.
o When recording a mix of the line input sound and mic
input, the REC LEVEL (recording level) knob can be used to
adjust the volume after mixing.
Mixing tape playback when recording
You can mix in the sounds of TAPE 1 and input from a mic con-
nected to this unit when recording to TAPE 2.
This unit does not support stereo mics.
Use a mono mic.
Connect the mic plug to the MIC connector on the front of the unit.
1 Load a cassette tape for playback into the
TAPE 1 compartment and a cassette tape for
recording into the TAPE 2 compartment.
2 Press the TAPE 1 play (y) button to start tape
playback. Then, turn the mic LEVEL knob to
adjust the balance between the playback and
mic sounds.
3 Press the TAPE 1 rewind (m) button and cue
the song to play.
4 Press the TAPE 1 stop (8) button to stop the
tape.
Mic mixing with recording (continued)
5 Follow step 2 for dubbing on page23, and
start dubbing with mic mixing.
o When a mic is connected to the MIC connector on the front
of the unit, the tape playback level is lowered slightly. This is
to ensure enough headroom when the tape playback and
mic input sounds are combined.
o When playing a dubbed tape, the playback level will be
lowered slightly if a mic is connected to the MIC connector
on the front of the unit. When the mic is disconnected, the
playback level will return to normal.
o When recording a mix of the tape playback sound and mic
input, the REC LEVEL (recording level) knob cannot be used
to adjust the volume after mixing.
Enjoying karaoke with tape playback
Connect the mic plug to the MIC connector on the front of the unit.
1 Load a cassette tape for playback into the
TAPE 1 compartment.
2 Press the TAPE 1 play (y) button to start tape
playback. Then, turn the mic LEVEL knob to
adjust the balance between the playback and
mic sounds.
Sing along with the song.
o Use the PITCH CONTROL knob to adjust the pitch of the karaoke
backing track as necessary.
o Karaoke can also be enjoyed with TAPE 2 playback, but controlling
the pitch of the backing track is not possible when using TAPE 2.
o When a mic is connected to the MIC connector on the front
of the unit, the tape playback level is lowered slightly. This is to
ensure enough headroom when the tape playback and mic
input sounds are combined while dubbing with mic mixing.
o The REC LEVEL (recording level) knob cannot be used to adjust
the volume after mixing.