424@$ OWNER’S MANUAL 3D0023100A
Table Of Contents Safety Instructions Introduction The Recording System The three steps to multitrack Understanding the Mixer Signal flow in the 424 MKIII mixer Tape cue monitor system Multitrack Cassette Recorder Track Format and Tape Recommendations PORTASTUDIO 424 MKIII Brief Guide Step-By-Step Operations Guide Let's try the 424 MKIII mixer How to record on track 1 Track 1 playback through TAPE CUE How to make an overdub on track 2 How to record tracks 3 and 4 How to record many sources onto a single tra
Safety Instructions CAUTION: • Read all of these Instructions. • Save these Instructions for later use. • Follow all Warnings and Instructions marked on the audio equipment. 1) Read instructions — All the safety and operating instructions should be read before the product is operated. 2) Retain instructions — The safety and operating instructions should be retained for future reference. 3) Heed Warnings — All warnings on the product and in the operating instructions should be adhered to.
Introduction The PORTASTUDIO 424 MKIII is... The PORTASTUDIO 424 MKIII is a 4-track "Multitrack Master" cassette tape recorder and a full-function mixer with 8 inputs/stereo outputs combined into a single workstation. Its high audio quality and creative flexibility reflect the experience and innovation that have allowed TASCAM to earn its reputation in professional audio production fields, and its userfriendly design makes the 424 MKIII suitable for anyone, from expert to novice.
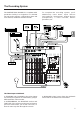
The Recording System The PORTASTUDIO 424 MKIII is a complete audio production facility in a single box. It is divided into two major sections: a full-function mixer and an 4-channel, multitrack cassette recorder. To complete the recording system, you'll additionally need these: Input devices (microphones, instruments), Output devices (headphones), 2 track recorder, Effects processors, etc.
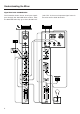
Understanding the Mixer Signal Flow in the 424 MKIII Mixer The illustration below shows how input signals pass through the 424 MKIII Mixer section. After the MASTER fader they go to the L/R LINE OUT 6 jacks. This is the most important signal route in the mixer and is called "Main Mix".
Tape Cue Monitor System The TAPE CUE mix and MONITOR switches are also crucial for successful multitrack recording, because they control what you hear in the headpnones. This CUE mix is totally independent from the Main Mix going to tape. If you don't use the CUE mix, you run the risk of accidentally "bouncing tracks" every time you record new material. The 4 TAPE CUE controls act like a separate 4x1 mixer, dedicated solely to enabling you to hear playback from the multitrack recorder in your headphones.
Multitrack Cassette Recorder The 424 MKIII records on readily available standard (Philips) Compact Cassette tape, high bias Type II. The recorder has 4 tracks while the mixer has a stereo output; however, using the DIRECT feature you can record on any or all of the 4 tracks at one time. For more details, see "Recording on More Than Two Tracks Simultaneously", page 22. The 424 MKIII's dbx Noise Reduction virtually eliminates unwanted tape noise.
Track Format and Tape Recommendations Tape Speed and Track Format The Portastudio 424 MKIII uses a HIGH speed of 9.5 cm/sec. (3-3/4 inches per second) which is two times (2X) the normal speed of a standard audio cassette. Its NORMAL speed is 4.8 cm/sec (1-7/8 i.p.s.), the same as that used by conventional recorders.
Accidental Erase/Record Protection To protect a finished master tape, it is necessary to punch out both record protect tabs. Even though you are recording in only one direction, the 424 MKIII uses the entire width of the tape, as mentioned above. If, for example, you remove only one of the tabs, you could accidentally insert the cassette into the 424 MKIII backwards and erase all four tracks of the master. Side B safety tab Side A safety tab Tape Length Use the shortest possible tape for a given work.
PORTASTUDIO 424 MKIII Brief Guide For detailed information on each feature, see "Features and Controls", pp. 39-45 of the supplied manual. Input Selection and Adjustment Ch.1-4 Ch.5-6 MIC/LINE INPUTS: These are the input jacks for the mixer channels. Primarily, the 3-contact, XLR-type connectors are for connection to balanced microphones, and the 1/4" jacks are for line-level, unbalanced signal sources (such as electronic instruments).
PORTASTUDIO 424 MKIII Brief Guide Rear Panel Connections Recorder Controls REHEARSAL : Lets you program a punch-in/out sequence to be used for rehearsals and for AUTO IN/OUT. AUTO PUNCH : Executes the punch-in recording actually on tape as you practiced in REHEARSAL. CLEAR : Disables the REHEARSAL and AUTO IN/OUT functions.
Step-By-Step-Operations Guide Let’s try the 424 MKIII mixer To learn how the mixer works, first you need to plug a signal source into one of the 1-8 jacks located at upper top of the unit, in your easy reach. As an example, we'll use a microphone as the source. Notes to be read prior to making connections ■ Although both XLR-type and 1/4" phone jacks are provided for connection to each of channels 1-4, don't use both jacks on the same channel at the same time.
Panning 6. Turn the channel 1 PAN control all the way to the left. Channel level 7. Raise the channel fader to "7" on the scale. Master level 8. Raise the MASTER fader to "7". Monitor selection 9. Set the MONITOR SELECT LINE OUT switch to the left (L-R) position. TRIM adjustment 10. While speaking into the microphone, turn the TRIM control in channel 1 to the right/MIC until the monitor level meter reads around "0" in average. Listening level 11. Slowly turn the MONITOR LEVEL control to the right.
Resetting the counter 4. Press the COUNTER RESET switch, so you can use the RTZ (Return-To-Zero) function to get back to this point. Selecting tracks 5. Set the RECORD FUNCTION switch for TRK 1 to its BUSS L position. The REC "1" indicator will start blinking in the display window, indicating track 1 is in Record Ready mode. Mic level adjustment 6. Speak into the mic. You will see meter 1 move.
Track 1 playback through TAPE CUE Switching TAPE CUE on 1. Set the EFFECT 2/TAPE CUE selection switch located below the LEVEL control to the right/TAPE CUE position. Monitor selection 2. Slide the MONITOR SELECT LINE OUT switch to the center MONO position. Locating tape to zero 3. Press the RTZ key. The tape will rewind, automatically stopping at the zero counter point. Begin to play 4. Press PLAY. Listening level adjustment 5.
How to make an overdub on track 2 Overdubbing entails recording one or more additional tracks on the same tape, while listening to previously recorded tracks using TAPE CUE. Leave the microphone connected to the channel 1 input. There is no need to repatch it to channel 2 to record on track 2. You can send any mixer input to any track of the recorder through the combination use of PAN and RECORD FUNCTION. Routing input 1. Set the channel 1 INPUT selection switch to the left (MIC/LINE) position.
Begin to record Monitoring input/tape 9. Hold RECORD and press PLAY to initiate recording. The REC "2" indicator that was blinking will turn on solid, indicating track 2 is now being recorded. 10. You will hear track 1 play, together with the new signal going to track 2, in the headphones. NOTE: Adjust only the TAPE CUE control of channel 1 if you need to change the balance between the old and new tracks in your headphones.
œ Set the PAN control of each channel to the same setting, for example : In this example, all instruments plugged into channels 1-4 will be recorded onto Track 1 or 3. œ Lower the MASTER fader to make overall level adjustments once you have each channel's TRIM and fader level set. œ Make sure the INPUT switch of every channel you want to record is set to MIC/LINE. ∑ You can't record channels 7 and 8 onto a single track.
∑ Set the MONITOR SELECT LINE OUT switch to L-R or MONO, and set the EFFECT 2/TAPE CUE switch to TAPE CUE if you need to hear tape tracks or MIDI virtual tracks. Recording is the same procedure as for one track. In the example above, set both the TRK 3 and TRK 4 RECORD FUNCTION switches to BUSS to record on tracks 3 and 4 simultaneously. Restrictions : The 424 MKIII mixer section has only two main mixes, Left and Right.
How to mix down When the 4 tracks are all recorded, the final step is mixing them into a standard stereo format. This procedure is known as Remixing or Mixing down. During this procedure the tracks are blended together and balanced to create the desired sound. Connections 1. Connect the LINE OUTPUT L jack of the 424 MKIII to the left line input of the mixdown deck, and the LINE OUTPUT R jack to the right line input. Master level 2. Raise the MASTER fader to the shaded area between 7 and 8.
Review 8. When the signal balance, level, and tonality sound right, rewind the tape, and press PLAY again to check the result. 9. Rewind the multitrack tape again. Put a blank tape in the mixdown deck and let it play for 5 seconds, then stop it and reset the mixdown deck's counter to zero. 10. Press PLAY on the 424 MKIII. Record level 11. Put the mixdown deck into its "Record Ready" mode, and adjust its input level controls for the desired record level. 12.
Using Memory Location Points Loading MEMO points Two autolocation points can be established in the 424 MKIII's memory system. MEMO 1 At the desired moment, hold the MEMO IN key and press the LOC 1 key. The MEMO 1 indicator will turn on, showing that the current tape location is loaded into that register. MEMO 2 Similarly, if you hold MEMO IN and press LOC 2, the current tape location is loaded as memory point 2 into that register.
Locating the tape To zero Press the RTZ key to fast wind the tape to the counter zero point. If you press COUNTER RESET during the RTZ process, the tape counter is reset to 0000 and the tape stops. To MEMO 1 Hit the LOC 1 key to fast wind the tape to the MEMO 1 point. Note : Only touch the LOC key. If you hold it down for 0.5 second or more, autolocation does not start and only the tape counter shows the location point. To MEMO 2 Hit the LOC 2 key to fast wind the tape to the MEMO 2 point.
Repeat Play The REPEAT function provides a "Playback Loop" or "Block Repeat" between the two programmed MEMO points. The 424 MKIII understands the lower MEMO point as the start point of the loop, and the higher point as the end. Operating procedure To interrupt REPEAT sequence 1. Use MEMO IN and LOC 1 and LOC 2 (as explained above) to establish the beginning and the end of loop. 2. Press the REPEAT key. The tape will fast wind to the lower MEMO point. 3.
PUNCH-IN or INSERT Recording "Punching in" or "insert recording" is recording over a small section of previously recorded track to correct or improve a performance, while keeping the rest of the track intact. The mixer settings should be exactly the same as they were during the original recording. In the following, we'll use track 2 as the punch-in track as an example. Preliminary Selecting in and out points 28 1.
Rehearsal and Auto In/Out Procedures Rehearsing Punch-in (Insert) recording You can rehearse your punch-in as many times needed without affecting the existing recording. During rehearsal, what you hear in the monitor mix and read on the level meters will be the same as during recording, but signal won't be recorded on tape. Storing the punch-in and out points into memory Rehearsal 1. Cue the tape up a few seconds before you reach the expected punch-in point. 2. Press the REHEARSAL switch.
When the tape reaches the preset punch-out point, you will be able to hear the old material existing on track 2, letting you check that the new material is smoothly followed by the old one. The RECORD LED will turn off, indicating that the "dry-run" record is over. After 3 seconds of play ("postroll") the tape will automatically rewind, stopping at the START point, so you can again go through the rehearsal procedure. ● To change the punch-in and out points, press CLEAR, and restart from the beginning.
8. Press the AUTO PUNCH switch. "RHSL" will turn off and "AUTO" will start blinking in the display. 9. Press PLAY. What you have anticipated in REHEARSAL will automatically occur in sequence: preroll, punch in, punch out, postroll, rewind, and stop. "AUTO" will be solidly displayed when the 424 MKIII punches out of record. Auto Review 10. Press PLAY (or the optional footswitch). The tape will play the entire length of insert and rewind to the START point.
Using the remote footswitch (RC-30P) 32 If you are recording alone and are too busy playing an instrument to push the switches, the optional remote footswitch really comes in handy. 1. Plug the RC-30P into the REMOTE PUNCH IN/OUT jack on the rear panel of the 424 MKIII. 2. Check that the REC 2 indicator is blinking, and locate the tape to a point a little before the error, then press PLAY. 3. When you reach JUST BEFORE the error, press the footswitch.
Bouncing Tracks (Ping-Pong) The recording capability of the PORTASTUDIO 424 MKIII is not limited to four tracks. You can "bounce" or combine tracks you have recorded to an empty track, and then replace the original tracks with new material. A bounce is like a mixdown, except you are recording to one of the tracks of the 424 MKIII instead of to an external recorder. The following diagrams depict the process.
6. Use channel faders 1 through 3 to make any necessary level adjustments. You may want to repeat this step several times to get the balance correct. 7. When the balance is right and the level is peaking at no more than +6 on the track 4 meter, stop and rewind the tape to the beginning of the track. 8. Hold RECORD and press PLAY. The REC 4 indicator that was blinking will turn on solid and track 4 will record a copy of what is on tracks 1-3. 9.
Using Effects With the PORTASTUDIO 424 MKIII Effects and signal processing are areas where you can really start to have fun customizing your sound, and develop your own unique recording style. Because there are so many possibilities, it also can be confusing. There are many different effect units on the market, all with different controls, types of inputs and outputs, and other characteristics.
How to Connect Your Effects Devices There is no absolute "right" or "wrong" way to do this—there are several ways, each with its own consequences. CHORUS LEFT/MONO RIGHT INPUTS LEFT RIGHT OUTPUT Mono returns: A special feature of the STEREO INPUT allows continuously variable control between left and right if desired: a mono effect connected to 7/MONO will go to 7-8 LEVEL control if nothing is plugged into jack 8.
Syncing MIDI-Tape1Using the TASCAM MTS-30 Troubleshooting MIDI clocks are themselves a computer type digital language and cannot be recorded on analog tape; it is necessary to convert them to recordable FSK (Frequency Shift Keying) signals using an appropriate converter, such as the MTS-30.
Features and Controls 424 MKIII MIXER 7. INPUT select switches: 1. POWER switch (on the rear panel): Turns the 424 MKIII on and off. (channels 1-4) This is used to control what the source of the channel is: 2. Power connector: Connect the power adaptor for the 424 MKIII to this connector. It is important that you use only a power adaptor specially designed for the 424 MKIII which is designed for use with the voltage in your area.
11. EFFECT 1 send controls: These controls get their signal from a point just after the channel fader (i.e., "post fader send") and route the corresponding channel signal to the EFFECT 1 SEND jack. Turn the control to the right to increase volume to the EFFECT 1 SEND jack. 12.
24. EFFECT 1 SEND jack : The signal available at this jack comes from post-fader, for connection to effects devices. Nominal level is –10 dBV (0.3 V). 424 MKIII RECORDER 25. EFFECT 2 SEND /TAPE CUE OUT jack: This jack is for connection to an additional effects device, or to a studio speaker amplifier. The signal source is determined by the EFFECT 2/TAPE CUE select switch (# 20). Nominal output level is –10 dBV (0.3 V). 29.
Transport Controls 31. REW key: Winds tape at high speed in reverse direction. 32. F FWD key: Winds tape at high speed in the forward direction. 33. STOP key: Stops any tape motion and disables all transport modes. 34. PLAY key: a) Press this key alone to start playback. b) If pressed together with RECORD, recording ("punch in") starts. c) Press this key during recording to stop recording ("punch out") without stopping tape motion. 35. RECORD key: Pressing this key alone has no effect.
Track Controls 38. RECORD FUNCTION switches 1-4: These switches put the respective tracks into Record Ready. Recording starts when RECORD is pressed after or together with PLAY. In the center position (SAFE) no recording takes place. 42. Tape counter: Displays the distance the tape has moved from a zero reference point selected by pressing the COUNTER RESET key beneath. NOTE: Don't operate the RECORD FUNCTION switches to punch in and out. Otherwise, "clicks" will remain on tape. 43.
49. CLEAR key: Turns off the REHEARSAL and AUTO PUNCH IN/OUT functions (pp.30-31). 50. COUNTER RESET switch: This resets the COUNTER to "0000" so you can assign any point on the tape as a starting location. Pressing RTZ (#44) gets you back to that location. 51. REHEARSAL switch: Helps you rehearse a punch-in without erasing anything until you are ready to actually record (p.29). 52.
Care and Maintenance Optional Accessories RC-30P Remote Footswitch MIDI-Tape Synchronizer Even though the heads used in your 424 MKIII have high wear resistance and are rigidly constructed, performance degradation or electromechanical failure can be prevented if maintenance is performed regularly. Cleaning the Heads and Tape Guides All heads and metal parts in the tape path must be cleaned after every 6 hours of operation, or before starting and after ending a recording session.
How the dbx Works Cleaning the Pinch Roller 1. Press a cotton swab that has been moistened with rubber cleaner to the pinch roller on the right hand side of the capstan shaft (or, on the left hand side if REW is pressed). This will prevent the swab from becoming tangled in the mechanism. 2. Clean it until there is no visible residue coming off onto the swab. 3. Using a clean cotton swab, wipe off all the excess rubber cleaner from the pinch roller.
Specifications Mechanical Characteristics Tape: Track Format: Head Configuration: Motor: Tape Speed: Pitch Control: Wow and Flutter: Fast Winding Time: Dimensions (W × H × D) Weight: Compact Cassette (C-30 to 90), High-Bias (CrO2) 4-track/4-channel 4-channel record/play (permalloy) x 1 4-channel erase (ferrite) x 1 DC servo motor x 1 Switchable two speeds: 9.5 cm/sec. (3-3/4 ips) and 4.8 cm/sec. (1-7/8 ips), ± 1% ± 12 % (approx.) 0.06% WRMS at 4.8 cm/sec., 0.05% WRMS at 9.5 cm/sec. 120 sec. (approx.
EFFECT 2 SEND/TAPE CUE OUT (1/4" phone jack) Output Impedance: Nominal Output Level: Minimum Load Impedance: TAPE OUTPUT (RCA jack x 4) Output Impedance: Nominal Output Level: Minimum Load Impedance: MONITOR OUTPUT (RCA jack x 2) Output Impedance: Nominal Output Level: PHONES (1/4" stereo phone jack x 1) Nominal Load Impedance: Maximum Output Level: Equalizer HIGH (Shelving): MID (Parametric): LOW (Shelving): Frequency Response: MIC INPUT to LINE OUTPUT: LINE INPUT to LINE OUTPUT: LINE INPUT to EFFECT OUTPU
Others Power Requirements USA/CANADA: U.K./EUROPE: AUSTRALIA: Power Consumption: 120 V AC, 60 Hz 230 V AC, 50 Hz 240 V AC, 50 Hz 22 W In these specifications, 0 dBV is referenced to 1 Volt. Actual voltage levels are also given in parentheses (0.316 V for -10 dBV rounded off to 0.3 V). * dbx is a registered trademark of dbx Incorporated. n Changes in specifications and features may be made without notice or obligation.
Block Diagram 53 54
Level Diagram 424@$ 55 TEAC CORPORATION 3-7-3, Nakacho, Musashino-shi, Tokyo 180-8550, Japan Phone: (0422) 52-5082 TEAC AMERICA, INC. 7733 Telegraph Road, Montebello, California 90640 Phone: (323) 726-0303 TEAC CANADA LTD. 5939 Wallace Street, Mississauga, Ontario L4Z 1Z8, Canada Phone: 905-890-8008 Facsimile: 905-890-9888 TEAC MEXICO, S.A. De C.V Privada De Corina, No.