
User Manual


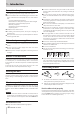
Table Of Contents
- ENGLISH
- IMPORTANT SAFETY PRECAUTIONS
- IMPORTANT SAFETY INSTRUCTIONS
- Wireless equipment precautions
- 1 – Introduction
- Conventions used in this manual
- Features
- Items included with this product
- About compact discs
- Beware of condensation
- Cleaning the unit
- Notes about power supplies
- Precautions for placement and use
- Slot loading of discs
- About TASCAM customer support service
- Bluetooth®
- Product registration
- SD cards and USB flash drives
- Using the TEAC Global Site
- 2 – Names and Functions of Parts
- 3 – Preparation
- 4 – CD/SD/USB playback
- Files that can be played back
- Tracks and folders on SD cards and USB flash drives
- Basic playback operations
- Playback area
- Selecting tracks for playback
- Folder playback (SD cards and USB flash drives only)
- Playback modes
- Searching backward and forward
- Using the repeat playback function
- Using the power-on-play function
- Using the resume function
- Time and text information display
- Using the incremental playback function
- 5 – Bluetooth device playback
- 6 – Listening to AM/FM radio
- 7 – Dubbing (copying) functions
- 8 – Other functions
- 9 – Troubleshooting
- 10 – Specifications
- ESPAÑOL
- PRECAUCIONES IMPORTANTES DE SEGURIDAD
- 1 – Introducción
- Características
- Elementos incluidos
- Acerca de este manual
- Precauciones relativas a la ubicación y uso
- Notas acerca de las fuentes de alimentación
- Cuidado con la condensación
- Limpieza de la unidad
- Acerca de los compact discs
- Introducción de los discos por la ranura
- Tarjetas SD y unidades USB flash
- Bluetooth®
- Uso de la web global TEAC
- Acerca del servicio de atencion al usuario de TASCAM
- 2 – Nombres y funciones de las partes
- 3 – Preparativos
- Conexiones
- Preparativos del control remoto
- Encendido y apagado de la unidad
- Ajuste del brillo de la pantalla
- Inserción y extracción de discos
- Inserción y extracción de tarjetas SD
- Conexión y desconexión de unidades USB flash
- Ajuste de la recepción del control remoto
- Funciones de bloqueo del panel
- Selección de la fuente de reproducción
- 4 – Reproducción CD/SD/USB
- Ficheros que pueden ser reproducidos
- Pistas y carpetas en tarjetas SD y unidades USB flash
- Zona de reproducción
- Operaciones básicas de reproducción
- Selección de pistas para la reproducción
- Reproducción de carpeta (solo en tarjetas SD y unidades USB flash)
- Modos de reproducción
- Búsqueda adelante y atrás
- Uso de la función de reproducción repetida
- Uso de la función power-on-play
- Uso de la función de continuación
- Uso de la función de reproducción consecutiva
- Indicación de tiempo e información de texto
- 5 – Reproducción de dispositivo Bluetooth
- 6 – Escucha de la radio AM/FM
- 7 – Funciones de duplicación (copia)
- 8 – Otras funciones
- 9 – Resolución de problemas
- 10 – Especificaciones técnicas

10
TASCAM CD-400U
1 – Introduction
Precautions for placement and use
0
The operating temperature range of this unit is 5–35 °C.
0
Do not install this unit in the following types of locations. Do-
ing so could make the sound quality worse or cause malfunc-
tion.
Locations with frequent vibrations
Near windows or other places exposed to direct sunlight
Near heaters or other extremely hot places
Extremely cold places
Very humid or poorly ventilated places
Very dusty places
0
Install the unit so that it is level.
0
To enable good heat dissipation, do not place anything on
top of the unit.
0
Do not place the unit on top of a power amplifier or other de-
vice that generates heat.
Notes about power supplies
0
Insert the included power cord all the way into the AC IN con-
nector.
0
Do not connect a power supply other than one that is
AC100V - 240V (50/60Hz).
0
Hold the power cord by its plug when connecting or discon-
necting it.
Beware of condensation
Condensation could occur if the unit is moved from a cold place
to a warm place, it is used immediately after a cold room has
been heated or it is otherwise exposed to a sudden temperature
change.
To prevent this, or if this occurs, let the unit sit for one or two
hours at the new room temperature before using it.
Cleaning the unit
Use a dry soft cloth to wipe the unit clean. Do not wipe with
chemical cleaning cloths, thinner, alcohol or other chemical
agents. Doing so could damage the surface or cause discolor-
ation.
About compact discs
In addition to commercially-available music CDs, this unit can
play CD-R and CD-RW discs recorded in the audio CD (CD-DA)
format as well as CD-R and CD-RW discs that contain MP3 audio
files.
CAUTION
8cm CDs cannot be used. If an 8cm CD is inserted, it will au-
tomatically be ejected. During ejection, if it stops at a place
where it cannot be removed, press and hold the EJECT but-
ton.
Precautions for use
0
Always insert discs with the label facing upward.
0
To remove a disc from its case, press down on the center of
the disc holder, then lift the disc out, holding it carefully by
the edges.
0
Do not touch the signal side (the unlabeled side). Finger-
prints, oils and other substances can cause errors during play-
back.
0
If fingerprints or dust adhere to the signal recording side of
a disc, wipe gently with a soft dry cloth from the center to-
wards the outside edge.
0
Dirt on discs can lower the sound quality, so clean them and
always store them in a clean state.
0
Do not use any record spray, anti-static solutions, benzene,
paint thinner or other chemical agents to clean CDs as they
could damage the delicate playing surface. It may cause CDs
to become unplayable.
0
Do not apply labels or other materials to discs. Do not use
discs that have had tape, stickers or other materials applied
to their surface. Do not use discs that have sticky residue
from stickers, etc. Such discs could become stuck in the unit
or cause it to malfunction.
0
Never use a commercially available CD stabilizer.
0
Using stabilizers with this player will damage the mechanism
and cause it to malfunction.
0
Do not use cracked discs.
0
Only use circular compact discs. Avoid using non-circular pro-
motional, etc. discs.
0
Copy Control CDs have been sold by several record compa-
nies in an attempt to protect their copyrights. Since some of
these discs do not comply with the CD specifications, they
may not be playable on the unit.
Slot loading of discs
1.
As shown in the illustration, hold the disc with the labeled
side up and insert it part way into the slot.
2.
Push the disc in further until just before it disappears. It will
automatically be drawn in to the slot.
If a disc will not load properly
If a disc becomes stuck during insertion, for example, and is diffi-
cult to push, do not try to force the disc in. Pull the disc out once,
press the EJECT button, and then try inserting it again. (Trying
to force the disc in could damage the unit.)