D01136920A CD-500/500B CD Player OWNER'S MANUAL
IMPORTANT SAFETY INSTRUCTIONS CAUTION: TO REDUCE THE RISK OF ELECTRIC SHOCK, DO NOT REMOVE COVER (OR BACK). NO USERSERVICEABLE PARTS INSIDE. REFER SERVICING TO QUALIFIED SERVICE PERSONNEL. The lightning flash with arrowhead symbol, within equilateral triangle, is intended to alert the user to the presence of uninsulated “dangerous voltage” within the product’s enclosure that may be of sufficient magnitude to constitute a risk of electric shock to persons.
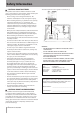
Safety Information ªª RACK-MOUNTING THE UNIT Use the supplied rack-mounting kit to mount the unit in a standard 19-inch rack, as shown below. Remove the feet of the unit before mounting. NOTE •• Leave 1U of space above the unit for ventilation. •• Allow at least 10 cm (4 in) at the rear of the unit for ventilation. ªª For U.S.A. TO THE USER This equipment has been tested and found to comply with the limits for a Class A digital device, pursuant to Part 15 of the FCC Rules.
Safety Information ªª CAUTIONS ABOUT BATTERIES This product uses batteries. Misuse of batteries could cause a leak, rupture or other trouble. Always abide by the following precautions when using batteries. •• Never recharge non-rechargeable batteries. The batteries could rupture or leak, causing fire or injury. •• When installing batteries, pay attention to the polarity indications (plus/minus (+/–) orientation), and install them correctly in the battery compartment as indicated.
Contents 1 – Introduction...............................................7 Selecting the playback mode . ..............................23 Differences between the CD-500 and CD-500B models..................................................................................... 7 Features................................................................................... 7 Included items...................................................................... 8 About this manual......................................
Contents 9 – Error Messages.........................................36 10 – Specifications.........................................37 Media and formats............................................................37 Analog audio output .......................................................37 Digital audio output ........................................................37 Control input and output ..............................................37 Audio performance.................................................
1 – Introduction Thank you very much for purchasing the TASCAM CD‑500/500B CD Player. Before connecting and using the unit, please take time to read this manual thoroughly to ensure you understand how to properly set up and connect the unit, as well as the operation of its many useful and convenient functions. After you have finished reading this manual, please keep it in a safe place for future reference. You can also download the Owner's Manual from the TASCAM web site (http://tascam.com/).
1 – Introduction Included items Trademarks The included items are listed below. Take care when opening the package not to damage the items. Keep the package materials for transportation in the future. Please contact the store where you purchased this unit if any of these items are missing or have been damaged during transportation. •• Main unit. ....................................................................................... 1 •• Power cord...........................................................
1 – Introduction Cleaning the unit To clean the unit, wipe it gently with a soft dry cloth. Do not wipe with chemical cleaning cloths, benzene, paint thinner, ethyl alcohol or other chemical agents to clean the unit as they could damage the surface. About discs In addition to commercially-available music CDs, this unit can play CD-R and CD-RW discs that have been recorded in audio CD (CD-DA) format, as well as CD-R and CD-RW discs that have MP3 audio and WAV audio files recorded on them.
2 – Names and Functions of Parts Front panel 1 POWER switch Press to turn the power on and off. CAUTION Before turning the power on, minimize the volume of other equipment that is connected to this unit. Failure to do so might cause sudden loud noises, which could harm your hearing or result in other trouble. 2 Disc slot After inserting a disc partway, it will automatically be pulled in. 3 EJECT button Press to eject a disc. 4 Display Shows various types of information.
2 – Names and Functions of Parts When in shift mode (when the SHIFT indicator is lit), press the 1 [FLASH] button to turn the flash start function on and off. w CLEAR [1-10/11-20] button Press this button to cancel the input of a number button. Press and hold when the program menu is open to clear the program. Press this button to switch between track and flash start program numbers 1-10 and 11-20.
2 – Names and Functions of Parts Rear panel CD-500 rear panel CD-500B rear panel o CONTROL I/O START (RELAY IN) and DISC EOM (RELAY OUT) jacks (3.5-mm mini-jacks) Use these jacks for fader start and event start, as well as for relay playback of multiple CD-500 and CD-500B units. (See “Relay playback” on page 30 and “Fader and event start” on page 32.) p CONTROL I/O RS-232C connector This is a D-sub 9-pin RS-232C serial control connector. Connect an external controller, for example, here.
2 – Names and Functions of Parts Display •• Program playback mode: •• Random playback mode: PGM appears RANDOM appears 8 Repeat mode indicators The repeat mode is shown. (See “Repeat playback” on page 25 and “A-B repeat playback” on page 25.) REPEAT appears •• Repeat mode: •• A-B repeat mode: REPEAT and A-B appear (Before the A and B points have been set, the indicator shown here will vary depending on the status. For details, see “A-B repeat playback” on page 25.
2 – Names and Functions of Parts Wireless remote control (TASCAM RC-500) 6 MENU button Press this button to enter menu mode. When in menu mode, press this button to exit menu mode. (See “Menu operation basics” on page 19.) 7 ENTER button When in menu mode, press to confirm a menu item selection or setting value. (See “Menu operation basics” on page 19.) When using the A-B repeat function, press this to set the A and B points. (See “A-B repeat playback” on page 25.
2 – Names and Functions of Parts the first 10 seconds of each track in succession. (See “Intro check mode” on page 26.) u REPEAT button Press to turn the repeat playback function on and off. (See “Repeat playback” on page 25.) Press and hold for more than one second to turn the A-B repeat function on. (See “A-B repeat playback” on page 25.) i NEXT button When in menu mode, press to select the next value (menu item or setting value). (See “Menu operation basics” on page 19.
3 – Preparation Making connections The illustration below shows an example of connecting other equipment with a CD-500B. Precautions before making connections •• Before connecting other devices to the unit, read their manuals carefully. •• Turn off the power (or put power into standby mode) for this unit and all equipment that will be connected to it. •• Connect all the devices to the same power supply line.
3 – Preparation Connecting analog audio equipment Connect the analog inputs of stereo amplifiers, mixers, recorders and other analog equipment to this unit’s analog output connectors. NOTE Cables are not included with this unit Using parallel control (CD-500B only) To use an external controller for parallel control of the CD-500B, use the CONTROL I/O PARALLEL connector (D-Sub 15-pin). For the pin assignments of the PARALLEL connector, see “Using the parallel connector [CD-500B only]” on page 32.
3 – Preparation Panel lock function When in shift mode (when the SHIFT indicator is lit), press and hold the DISPLAY [LOCK] button to turn the panel lock function on or off. When it is on, all the buttons on the front panel of the unit (except the SHIFT and DISPLAY [LOCK] buttons) and the remote control are disabled. LOCKED will appear on the display if you push any of the buttons.
4 – Menu Use the unit’s menu system to make various settings. Among the menu setting items are some that can also be set using dedicated buttons on the remote control. The center area of the display shows the menu item selected. The menu item that was selected the last time that the unit was in menu mode appears. Menu item number Menu item name Setting Menu structure The menu structure of the unit includes the following items.
5 – Operation Compatible disc and file types This unit can play the following types of discs and files. CD-DA format discs (audio CDs) This unit can play commercially-available music CDs and CD-R and CD-RW discs that have been recorded in audio CD format. These types of discs are called “audio CDs” in this manual. This unit cannot play unfinalized CD-R or CD-RW discs.
5 – Operation Loading discs Inserting a disc Hold the disc with its label side up and insert it part way into the disc slot. Push the disc in a little further and, just before it disappears, it should automatically be pulled into the player. After a disc is loaded, the player will read its information. If it is an audio CD, the display will show the total number of tracks and total playback time. If it is a data CD, the display will show the total number of tracks in the current directory.
5 – Operation When paused If the auto-cue function is off, playback pauses at the beginning of the selected track. If the auto-cue function is on, playback pauses at the instant when sound begins in the track. NOTE If you press the  button once during playback or when paused, playback will skip to the beginning of the current track. However, if playback is one second or less from the beginning of the current track, pressing the  button will skip to the previous track.
5 – Operation NOTE In jog mode, if you stop searching, playback will pause, but the sound at the current position will be output continuously. Playback modes This unit has 4 playback modes. The current playback mode is indicated on the display. ªª Continuous playback mode (default setting) Nothing appears in the playback mode indication area at the top of the display. The tracks on the disc are played back in numerical order.
6 – Various Playback Functions This chapter explains the various playback functions of the unit. Auto-cue function If the auto-cue function is on and you select a track to play, any silence at the beginning of the track will be skipped, and the player will pause at the instant when a sound signal is first detected. This means that sound can be heard immediately when playback starts. NOTE •• When the flash start function is used for playback, the auto-cue function is disabled.
6 – Various Playback Functions NOTE NOTE The resume function on/off setting is retained even when the power is turned off. The incremental play function on/off setting is retained even when the power is turned off. Call function Repeat playback During playback or when paused, press the CALL [PLAY MODE] button on the player or the CALL button on the remote to locate to the point when playback last started and pause playback.
6 – Various Playback Functions the display. 2 Press the PITCH [MENU] knob on the player or the REPEAT button on the remote at the beginning of the interval that you want to repeat (A point). A-B will blink at the top of the display. 3 Once again, press the PITCH [MENU] knob on the player or the REPEAT button on the remote at the end of the interval that you want to repeat (B point).
6 – Various Playback Functions Using the remote control: Press the PITCH button to turn the pitch control function on. Use the + and − buttons to adjust the setting in the range between −16% and +16%. Program setting mode Use the following procedures to enter program setting mode and add tracks to the empty program. NOTE To set the adjustment increment for pitch control playback (pitch step) use the 12 P-STEP menu item. •• You can add tracks to the program regardless of the current playback mode.
6 – Various Playback Functions 2 Use the number buttons or SKIP Â/¯ buttons to select the number of the track that you want to add at the currently displayed program number. The selected track number blinks. 3 Press the SEARCH button to add the selected track. The next program number is shown. 4 Repeat steps 2 and 3 to add tracks as desired. NOTE After selecting a track, pressing the SEARCH button adds the track to the program.
6 – Various Playback Functions item differs slightly from the others. Use the following procedures with this item. 1 Select the 05 FADE menu item. Press the PITCH [MENU] knob to enter fade in/out setting mode. The screen appears as follows. 2 Press the PITCH [MENU] knob or the remote ENTER button to enter fade in setting mode. Skip back playback During playback, you can skip back by a preset amount of time and continue playback. During playback, press the Á (play) [REPEAT] button.
6 – Various Playback Functions 3 While the beginnings of the tracks are being loaded into memory, the word FLASH blinks on the display. After loading completes, FLASH 01-10 appears on the display and the Á PLAY indicator blinks. 4 Press the number button for the program number (when program set) or track number (when program not set) that you want to play.
7 – Other Functions Changing the playback time display mode You can select the playback time that is shown on the display. During playback or when paused, press the DISPLAY [LOCK] button on the player or the DISPLAY button on the remote. Each press of the button cycles through the three types of time display. The currently selected display mode is shown in the playback time mode display area. •• T.
7 – Other Functions Outputting in mono This player can output analog and digital signals in mono. To make the player output in mono, set the 08 Mono menu item to ON (default value: OFF). Foot switch mode settings The functions of the controls in each mode are as follows. Footswitch controls MODE 1 When mono output is on, MONO appears at the bottom of the display. 2 3 NOTE The mono output on/off setting is retained even when the power is turned off.
7 – Other Functions For details about using the CONTROL I/O PARALLEL connector, see “Using the parallel connector (CD-500B only)” on page 33. Event start ªª Using the CONTROL I/O START (RELAY IN) connector Wire the event output connector of another device with a 3.5-mm miniplug, and connect that 3.5-mm miniplug to the CONTROL I/O START (RELAY IN) connector on the rear panel of this unit. Then, set the 06 RELAY menu item to ON.
7 – Other Functions User data settings (CD-500B only) You can set whether or not a USER DATA BIT is output with the digital output from the DIGITAL OUT (AES/EBU) connector. To set output of the USER DATA BIT, use the 22 U-DATA menu item (default value: ON). NOTE •• If the signal output from this connector does not play back correctly, set this item to OFF. •• The user data setting is retained even when the power is turned off.
8 – Troubleshooting Please check the following items if the unit is not functioning properly. If you are still unable to resolve the problem please contact the retailer where you purchased the unit or TASCAM customer support. ªª Power does not turn on Make sure that the power plug is firmly inserted. ªª Unit cannot be controlled from the front panel Make sure that the panel lock function is not on. ªª Unit cannot be controlled with the remote control.
9 – Error Messages When one of the following error messages appears, refer to the response below and resolve the cause. If you are still unable to resolve the problem please contact TASCAM customer support. Message Meaning Err01 TOC Read Error Err09 Flash ROM Error Err10 SDRAM Error Err13 SYSTEM Error 36 TASCAM CD-500/500B Response Clean or change the disc. If one of these errors appears, turn the power off and back on. If you are unable to turn the power off, disconnect the power cord.
10 – Specifications Media and formats Device type CD player Digital out connector (AES/EBU, CD-500B only) Connector: XLR-3-32 (1: GND, 2: HOT, 3: COLD) Supported signal format: IEC60958-4 (AES/EBU) Output impedance: 110Ω Compatible discs Compact discs (12-cm only) Control input and output Playable disc types CD, CD-R, CD-RW Playable disc and file formats Audio CD (CD-DA), MP3, WAV Number of channels 2 Quantization rate 16-bit Sampling frequencies 32 kHz, 44.
10 – Specifications General Power supply AC 100-240 V, 50-60 Hz Power consumption 10 W (CD-500), 11 W (CD-500B) Dimensions (W x H x D) 482.6 x 44.9 x 300.5 mm Weight 3.5 kg (CD-500), 3.7 kg (CD-500B) Operating temperature range 5º–40° C Installation tilt Within 30° 41.1 mm 434.2 mm 482.6 mm 14.5 mm 280 mm 432.6 mm 6 mm Dimensional drawings 31.8 mm 465 mm •• Illustrations in this manual might differ from the actual product.
Notes TASCAM CD-500/500B 39
CD-500/500B TEAC CORPORATION Phone: +81-42-356-9143 1-47 Ochiai, Tama-shi, Tokyo 206-8530, Japan http://tascam.jp/ TEAC AMERICA, INC. http://tascam.com/ TEAC CANADA LTD. http://tascam.com/ Phone: +1-323-726-0303 7733 Telegraph Road, Montebello, California 90640 USA Phone: +1905-890-8008 Facsimile: +1905-890-9888 5939 Wallace Street, Mississauga, Ontario L4Z 1Z8, Canada TEAC MEXICO, S.A. de C.V. http://www.teacmexico.