D01164320A CD-9010CF CD/Solid State Player OWNER'S MANUAL
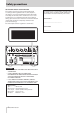
Important Safety Information 12 Use only with the cart, stand, tripod, bracket, or table specified by the manufacturer, or sold with the apparatus. When a cart is used, use caution when moving the cart/apparatus combination to avoid injury from tip-over. CAUTION: TO REDUCE THE RISK OF ELECTRIC SHOCK, DO NOT REMOVE COVER (OR BACK). NO USERSERVICEABLE PARTS INSIDE. REFER SERVICING TO QUALIFIED SERVICE PERSONNEL.
Safety precautions In North America use only on 120V supply. 88 For U.S.A. TO THE USER This equipment has been tested and found to comply with the limits for a Class A digital device, pursuant to Part 15 of the FCC Rules. These limits are designed to provide reasonable protection against harmful interference when the equipment is operated in a commercial environment.
Safety precautions 88 CAUTIONS ABOUT LASER RADIATION This product has been designed and manufactured according to FDA regulations “title 21, CFR, chapter 1, subchapter J, based on the Radiation Control for Health and Safety Act of 1968,” and is classified as a class 1 laser product. There is no hazardous invisible laser radiation during operation because invisible laser radiation emitted inside of this product is completely confined in the protective housings.
Contents 1 – Introduction....................................................................... 7 Features................................................................................... 7 Included items...................................................................... 7 Conventions used in this manual................................... 7 Intellectual property rights.............................................. 8 Precautions for placement and use...............................
Contents 6 – Working with files and folders. .......................35 9 – Operation using a computer keyboard. ..47 Opening the BROWSE screen........................................35 Navigating the BROWSE screen....................................35 Icons on the BROWSE screen.........................................35 File operations....................................................................35 Folder operations...............................................................
1 – Introduction Thank you very much for purchasing a TASCAM CD-9010CF CD/ Solid State Player. Please read this manual thoroughly before using the unit so that you understand correct operating procedures and can use its functions fully. We hope that you enjoy using this unit for many years. Please keep this manual so that you can refer to it at any time. A digital copy of this manual can also be downloaded from our website (http://tascam.com/).
1 – Introduction Intellectual property rights •• TASCAM is a trademark of TEAC Corporation, registered in the U.S. and other countries. •• CompactFlash is a registered trademark of SanDisk Corporation in the USA and other countries. •• Other company names, product names and logos in this document are the trademarks or registered trademarks of their respective owners.
1 – Introduction About discs In addition to commercially-available music CDs, this unit can play CD-R discs that have been recorded in audio CD (CD-DA) format, as well as CD-R discs that have WAV audio files recorded on them. It can also playback 8cm discs. Handling of compact discs •• Always load compact discs with their labels facing upward. •• To remove a disc from its case, press down on the center of the disc holder, then lift the disc out, holding it carefully by the edges.
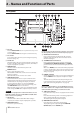
2 – Names and Functions of Parts Front panel Disc tray 11 Press the OPEN/CLOSE button to open the disc tray to load or remove discs. Press the OPEN/CLOSE button again to close the disc tray. CF card slot 22 Insert and eject CF cards here. (See “Inserting and ejecting CF cards” on page 19.) CF indicator 33 This blinks when a CF card is inserted and data is being read from the card. When data reading is complete, the indicator stays lit and playback is possible.
2 – Names and Functions of Parts This button lights during monitoring playback. r PLAY button/indicator Press when playback is stopped or in standby to start playback. This button lights during playback or when in playback standby. When the ON LINE button on a connected TASCAM RC-9010/RC-9010S remote control (sold separately) is lit, or the SYSTEM menu ONLINE FUNCTION item is set to AlwaysON, online playback occurs and the playback signal is output through the LINE OUTPUTS (R/L) and the DIGITAL OUTPUT.
2 – Names and Functions of Parts Rear panel d DIGITAL OUTPUT This is an AES-3id digital output. The digital output signal depends on the master clock setting. (See "Setting the master word clock" on page 43.) f MONITOR OUTPUTS (R/L) (balanced) These balanced analog XLR outputs can be connected to a monitoring system. The nominal output level is +4 dBu (or +6 dBu only when the maximum output level is +15 dBu).
2 – Names and Functions of Parts 4 Playback mode Home Screen Shows the current playback mode. The following information is shown on the display of the unit. Home Screen with audio CD Indicator Meaning CONTINUE Continuous playback mode SINGLE Single playback mode PROGRAM Program playback mode 5 Track number Shows the current track number. 6 Track playback position Shows the current playback position as a bar. As playback proceeds, the bar extends from the left.
2 – Names and Functions of Parts Menu structure Press the MENU button to show the MENU screen. The menu has six submenus. 1 PLAY Settings related to playback 2 PROGRAM/CUE Settings related to program playback and cue point 3 REMOTE Settings related external remote settings 4 CF Settings related to CF-specific operations 5 SYSTEM Settings related to the unit's system. 6 INFORMATION Settings related to media information and the system version, and operating time confirmation.
2 – Names and Functions of Parts Main menu item 4 5 6 CF SYSTEM INFORMATION Submenu item Function/Setting Reference 1 FORMAT (Quick) Quickly format a CF card P. 39 2 FORMAT (Full) Fully format a CF card P. 39 3 RIP CD Copy a CD to a CF card P. 40 1 DIGITAL REF LVL Digital reference level P. 41 2 ANALOG REF LVL Analog output reference level P. 41 3 ANALOG REF ADJ L Adjust the analog output reference level of the L channel P.
2 – Names and Functions of Parts Menu operation basics You can perform the following operations using the MENU screen. To select an item (vertically on the screen) •• Turn the DATA dial. The selected menu item appears as light letters on a dark background (highlighted in inverse). To confirm the selected item •• Press the DATA dial. To go back one menu level •• Press the MENU button. To return directly to the Home screen from the Menu screen •• Press the HOME button.
3 – Preparations Turning the power ON and OFF Press the POWER switch on the rear panel to turn the power ON. Setting the date and time The internal clock is used to add the date and time to files ripped to CF cards. 1. Press the MENU button to open the MENU screen. 2. The SYSTEM menu screen appears. 3. Select CLOCK ADJUST. 4. Press the DATA dial to open the CLOCK ADJUST screen. 5. Follow these procedures to change the date and time.
3 – Preparations Adjusting the display You can adjust the display contrast and brightness as necessary. Adjusting display contrast When the Home Screen is open, use the TIME DISPLAY button and DATA dial to adjust the display contrast. You can also use SYSTEM menu's LCD CONTRAST to adjust it. NOTE •• This operation only adjusts the contrast of this unit. It does not adjust the contrast of a connected TASCAM RC-9010/ RC-9010S remote control (sold separately).
3 – Preparations Inserting and ejecting CF cards Ejecting CF cards Either turn the power off, OR stop all operations before ejecting a CF card. Inserting CF cards Insert a CF card into the card slot on the front panel to use it for playback and ripping. CAUTION You can insert CF cards whether the power is ON or OFF. Never remove a CF card when the unit is in use (playing back, writing data to the card, etc.).
3 – Preparations Connecting headphones Connect stereo headphones to the PHONES jack on the front panel. Use the PHONES knob to adjust the headphones output level. CAUTION Before connecting headphones, use the PHONES knob to lower the volume. Failure to do so might result in sudden loud sounds, which could harm your hearing or result in other trouble. Setting the panel lock function The unit can be set so that it can only be operated using a TASCAM RC-9010/RC-9010S remote control (sold separately). 1.
4 – Playback Monitoring and online playback This unit has two playback modes: monitoring playback and online playback. The outputs for the two playback modes can be set to be independent of each other. For example, you can use the monitoring playback mode for broadcast use and on location to cue tracks and playback points in advance to prepare for online playback from those points. Monitoring playback The SYSTEM menu ONLINE FUNCTION item must be set to SWTCH. OK to enable monitoring playback.
4 – Playback Playing a track once from the beginning Follow these steps to select and check the desired track (monitoring playback), and then play it through the main outputs (online playback). These procedures assume that all menu items are at their default settings. 1. 2. Press the PLAY MODE button to select single mode. •• Press the PLAY MODE button as many times as necessary until the SINGLE playback mode indicator appears on the Home Screen.
4 – Playback Setting the playback point Selecting tracks Use the TRACK .// buttons to select tracks. . button Press to move to the start of the current track when the elapsed time of the current track is greater than one second. When the elapsed time is less than one second, press this to skip to the beginning of the previous track. / button Press to skip to the beginning of the next track. Press again to skip to the beginning of the track after that.
4 – Playback Auto ready function If the auto ready function is ON, when a track finishes playing, playback standby will occur at the beginning of the next track. 1. Press the MENU button to open the MENU screen. 2. Open the PLAY menu screen. 3. Select AUTO READY. 3. Press the DATA dial to move the cursor right to select the setting. 4. Turn the DATA dial to set the value to ON (default is OFF). 5. After setting the value, press the HOME button to return to the Home Screen.
4 – Playback ONLINE BACK CUE function If this function is on, when the ON LINE button is turned OFF on a connected TASCAM RC-9010/RC-9010S remote control (sold separately), the unit immediately enters playback standby at the last cue point (the last point where monitoring playback started). 1. Press the MENU button to open the MENU screen. 2. Open the PLAY menu screen 3. Select ONLINE BACK CUE. 4. Press the DATA dial to move the cursor right to select the setting. 5.
4 – Playback MONITOR PLAY STBY function You can set how the STANDBY button functions during monitoring playback. 1. Press the MENU button to open the MENU screen. 2. Open the PLAY menu screen 3. Select MONITOR PLAY STBY. 4. Press the DATA dial to move the cursor right to select the setting. 5. Turn the DATA dial to set the STANDBY button function during monitoring playback.
4 – Playback EOM functions You can set the unit to output EOM tally signals from the CONTROL I/O PARALLEL connector when the remaining time on the track is less than the time set here using the EOM function. Setting EOM tally output trigger Set the track remaining time that triggers output of an EOM tally signal. 1. Press the MENU button to open the MENU screen. 2. Open the PLAY menu screen. 3. Select EOM. 4. 5. To check how tracks end, turn the END CHECK function ON.
4 – Playback Pitch control playback You can modify the pitch and speed of the playback, following the procedures here. Turning pitch control playback ON/OFF 1. Press the MENU button to open the MENU screen. 2. Open the PLAY menu screen. 3. Select PITCH. 4. Press the DATA dial to move the cursor right to select the setting. 5. Turn the DATA dial to set pitch control ON or OFF (default is OFF). 6. After completing the setting, press the HOME button to return to the Home Screen.
5 – Program and cue playback Program playback You can create a program in advance to play up to 99 tracks you want in the desired order. 8. Program menu operation Press the DATA dial to open the BROWSE (ADD screen. PROGRAM) Select PROGRAM EDIT and press the DATA dial to open the PROGRAM screen (program list). Select the desired item, and press the DATA dial to open the PROGRAM MENU pop-up with the following options. ADD PROGRAM Adds the highlighted track to the program.
5 – Program and cue playback Clearing a program Moving tracks within a program 1. Press the MENU button to open the MENU screen. 1. Press the MENU button to open the MENU screen. 2. Open the PROGRAM/CUE menu screen 2. Open the PROGRAM/CUE menu screen 3. Select PROGRAM EDIT. 3. Select PROGRAM EDIT. 4. Press the DATA dial to open the PROGRAM screen. 4. Press the DATA dial to open the PROGRAM screen. 5. Turn the DATA dial to select TOTAL. 5.
5 – Program and cue playback Importing programs 1. Insert a CF card containing a program list into the CF card slot. 2. Press the MENU button to open the MENU screen. 3. Open the PROGRAM/CUE menu screen 4. Select PROGRAM IMPORT. Cue point playback You can locate to and play back from cue points you have set earlier. You can set up to nine cue points for each CD and CF card. CD cue points can be save for up to 500 discs.
5 – Program and cue playback 7. Press the DATA dial to add the cue point. The current time of the track being played back (or in standby) will be added as a cue point to the cue list. 8. Repeat steps 5–7 to add cue points as desired. The screen shows the track numbers and cue points. 9. When you are done adding cue point, press the HOME button to return to the Home Screen. NOTE CUE settings are retained even when the power is OFF. Clearing a cue point 1. 2.
5 – Program and cue playback Editing cue point names Editing text 1. Press the MENU button to open the MENU screen. Edit text using the following operations. 2. Open the PROGRAM/CUE menu screen 3. Select CUE LIST To move the editing (cursor) position Use the SEARCH m/, buttons. 4. Press the DATA dial to open the CUE screen. 5. Turn the DATA dial to select the cue point with the name to be edited, and press the DATA dial to open the CUE menu. 6. Turn the DATA dial to select EDIT EDIT.
5 – Program and cue playback Importing cue lists 1. Insert a CF card containing a cue list into the CF card slot. 2. Press the MENU button to open the MENU screen. 3. Open the PROGRAM/CUE menu screen 4. Select CUE LIST IMPORT. 5. Automatic cue point loading options Usually when a disc for which cue points have already been saved is loaded, the previous cue points are automatically loaded. Sometimes, though, you might not want to use the memorized cue points.
6 – Working with files and folders Using the BROWSE screen, you can manage audio files on CF cards in a folder structure. You can also manage WAV files on a data CD in a folder structure. You can select folders and files, and then enter folders and work with files. When working with CF cards, you can create folders, edit the names of folders and files, and delete folders and files, for example. NOTE You cannot use this screen with unfinalized data CDs containing WAV files.
6 – Working with files and folders Folder operations Select the desired folder on the BROWSE screen, and press the DATA dial to open the folder BROWSE MENU pop-up. Turn the DATA dial to select the desired item, and press the DATA dial to execute one of the following operations. NOTE All the BROWSE MENU functions can be used with CF cards. Only some of the functions can be used with data CDs with WAV files. SELECT Opens the selected folder. Editing folder names (CF cards) 1.
6 – Working with files and folders Editing file names (CF cards) Deleting folders and files (CF cards) 1. Select the folder that you want to edit, and turn the DATA dial to select RENAME. You can delete folders and files from CF cards. If you delete a folder, all the files in it will also be deleted. 2. Press the DATA dial to open the RENAME screen. 1. Select the folder or file to delete, and turn the DATA dial to select DELETE. 3. Edit the file name.
6 – Working with files and folders Creating new folders (CF cards) 1. Select the folder where you want to create a new subfolder, and turn the DATA dial to select NEW FOLDER. 2. Press the DATA dial to open the NEW FOLDER screen. 3. Input the name for the new folder. Follow the instructions in "Editing text" on page 33. 4. After you have completed entering the folder name, press the BROWSE button to confirm it.
7 – Managing CF cards Formatting CF cards quickly Use FORMAT (Quick) to format a CF card in a short amount of time. Formatting a CF card erases all the data on it. 1. Press the CD/CF button to activate the CF card. The CF indicator above the CD/CF button lights when it is active. 2. Press the MENU button to open the MENU screen. 3. Open the CF menu screen. 4. Select FORMAT (Quick). 5. 6. Press the DATA dial and a confirmation pop-up message appears.
7 – Managing CF cards Ripping CD tracks to CF cards 7. The RIP TARGET SELECT screen opens where you can select the destination for the copied tracks opens. You can rip (convert and copy) audio from audio CDs to CF cards. The audio from CDs is converted into and written as WAV files. The following procedures assume that the current device is set to CD, and the CD with the track that you want to copy and a CF card are loaded. 1. Press the MENU button to open the MENU screen. 2. Open the CF menu screen.
8 – Other settings and information display Setting the digital reference level You can set the digital headroom (number of dB below maximum analog output reference level (full scale). Setting the analog reference level 1. Press the MENU button to open the MENU screen. You can set the analog output reference level. The analog audio output reference level settings that are possible depend on the digital reference level setting. 2. Open the SYSTEM menu. 1. Press the MENU button to open the MENU screen.
8 – Other settings and information display Adjusting R/L analog reference levels You can adjust the analog output reference level separately for the left and right channels. 1. Press the MENU button to open the MENU screen. 2. Open the SYSTEM menu 3. Select ANALOG REF ADJ L or ANALOG REF ADJ R. 4. Press the DATA dial to move the cursor right to select the setting. 5. Turn the DATA dial to adjust the analog reference level. •• Setting range: ±6.0 dB (default value: 0dB, 0.1dB increments) 6.
8 – Other settings and information display Setting the master word clock Mono mix setting You can set the mono mix output for when the STEREO/MONO button is used to set the output to mono. The setting state is shown to the left of the level meters. You can set the source to use for word synchronization. 1. Press the MENU button to open the MENU screen. 2. Open the SYSTEM menu. 3. Select CLOCK MASTER. 4. Press the DATA dial to move the cursor right to select the setting. 5.
8 – Other settings and information display Setting the level meter display type You can change the type of the playback level meters on the Home Screen. Buttons disabled according to fail safe setting Fail safe setting Disabled buttons during playback standby Disabled buttons during online playback 1. Press the MENU button to open the MENU screen. CD/CF button 2. Open the SYSTEM menu. 3. Select METER TYPE.
8 – Other settings and information display Monitoring point setting You can set whether the monitoring output signal is from before or after the Online fader. Importing menu settings 1. Press the MENU button to open the MENU screen. You can import settings that have been saved on a CF card and use them as the unit's menu settings. Load a CF card containing saved menu settings. 2. Open the SYSTEM menu. 1. Press the MENU button to open the MENU screen. 3. Select MONITORING POINT. 2.
8 – Other settings and information display Restoring the factory settings CD INFORMATION screen example You can restore all the settings that are stored in the unit’s backup memory to the values when shipped from the factory. Follow these steps to restore the settings. NOTE The factory settings cannot be restored if media is loaded in the current device. Change the current or remove the media from it and conduct the operation again. 1. Press the MENU button to open the MENU screen. 2.
9 – Operation using a computer keyboard You can connect a USB computer keyboard to the KEYBOARD connector on the rear panel to input text efficiently. Setting the keyboard language Set the keyboard language according to the one you are connecting. 1. Press the MENU button to open the MENU screen. 2. Open the SYSTEM menu. 3. Select KEYBOARD. Using a keyboard to input text You can edit or enter a folder name or track name in the same manner as when typing text on a computer.
10 – Using the remote connectors Using the serial connector Using the REMOTE (SERIAL) connector (15-pin, D-sub, RS-232C standard), you can control the unit using a TASCAM RC-9010/ RC-9010S remote control (sold separately), a computer or other external device. Use the menu to make communication-related settings. Fader use setting Set whether or not the use of a fader on a TASCAM RC-9010/ RC-9010S remote control (sold separately) is enabled. 1. Press the MENU button to open the MENU screen. 2.
10 – Using the remote connectors Fader stop action setting When the fader start function is ON, you can set whether using the fader stop function (lowering the fader to ∞) on a TASCAM RC-9010/RC-9010S remote control (sold separately) causes playback to stop or pause (playback standby). 1. Press the MENU button to open the MENU screen. 2. Open the REMOTE menu screen. 3. Select FADER STOP ACT. 4. Press the DATA dial to move the cursor right to select the setting. 5.
10 – Using the remote connectors Using the parallel connector Using the REMOTE (PARALLEL) connector, you can control this unit with an external controller. The pin assignments are as follows. **Use the P.PORT P3/13 ASGN item on the REMOTE menu screen to set their functions. (See "Parallel port 3-pin/13-pin setting" below.) The following is an example of a connection for playback control of this unit using fader start/stop.
11 – Message list Error messages If one of the following error messages appears in a pop-up, press the DATA dial to close the message. Then try to resolve the issue. If you are still unable to correct the problem, please contact the dealer from which you purchased the unit or a TASCAM service center (see the back cover of this manual). 1st line 2nd line Meaning 1 - error - DECODE Failed to play WAV file. 2 - error - MIX DISC The disc has both WAV format files and audio CD format files on it.
12 – Troubleshooting If the unit is not functioning properly, please check the following items before calling for service. If you are still unable to resolve the problem please contact the retailer where you purchased the unit or TASCAM customer support (see the back cover). 88 Power does not turn on Confirm that the power plug is inserted completely. 88 Media is not detected Confirm that the CD or CF media is loaded properly. Stop playback or recording once.
13 – Specifications Media and file formats Supported media CF card (512MB – 64GB, Type I only) CD, CD-R (CD-DA audio discs, ISO9660 Level1/Joliet/Romeo data discs) Playback file formats WAV: 44.1/48kHz, 16/24-bit, Maximum file size 2GB CD-DA: 44.1kHz, 16-bit Number of channels 2 (stereo) 1 (mono) Inputs and outputs Analog audio inputs and outputs MIX INPUTS (BALANCED) Connector: XLR-3-31 (1: GND, 2: HOT, 3: COLD) Input impedance: 10 kΩ Nominal input level: +4 dBu (1.
13 – Specifications Backup memory General The following settings are backed up even when the power is turned OFF.
Notes TASCAM CD-9010CF 55
CD-9010CF TEAC CORPORATION Phone: +81-42-356-9143 1-47 Ochiai, Tama-shi, Tokyo 206-8530 Japan tascam.jp TEAC AMERICA, INC. tascam.com TEAC CANADA LTD. tascam.com Phone: +1-323-726-0303 7733 Telegraph Road, Montebello, California 90640 USA Phone: +1905-890-8008 Facsimile: +1905-890-9888 5939 Wallace Street, Mississauga, Ontario L4Z 1Z8, Canada TEAC MEXICO, S.A. de C.V. teacmexico.