
Operation Manual


10
TASCAM CD-9010CF
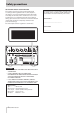
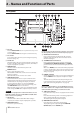
2 – Names and Functions of Parts
Disc tray
Press the OPEN/CLOSE button to open the disc tray to load
or remove discs.
Press the OPEN/CLOSE button again to close the disc tray.
CF card slot
Insert and eject CF cards here. (See “Inserting and ejecting
CF cards” on page 19.)
CF indicator
This blinks when a CF card is inserted and data is being read
from the card. When data reading is complete, the indicator
stays lit and playback is possible.
MANUAL EJECT
Use this to remove a disc when the power is off.
BROWSE button
Press to open the
BROWSE
screen.
With data CDs and CF cards, use this screen to look inside
folders, for example.
With audio CDs, use the screen to see its tracks.
TIME DISPLAY button
Press when the Home Screen is open to switch the time
display between elapsed track time and remaining track
time. This button only changes the display on this unit.
To change the time display on a connected TASCAM
RC-9010/RC-9010S remote control (sold separately), press
the TIME DISPLAY button on the remote.
When the Home Screen is open, press and hold this button
while turning the DATA dial to adjust the display contrast.
NOTE
This operation only adjusts the contrast of this unit. It does not
adjust the contrast of a connected TASCAM RC-9010/RC-9010S
remote control (sold separately).
CD indicator
This blinks when a CD is loaded. When data reading is
complete, the indicator stays lit and playback is possible.
OPEN/CLOSE button
Press this to open the disc tray.
NOTE
In order to reduce the amount of time required to remove a disc,
the disc tray will open before the disc has completely stopped.
CD/CF button and indicators
Press to switch between the CD and the CF card as the
playback media. The indicator above the button for the
selected media lights.
ST/MONO button and indicators
Press to switch between stereo and mono output from
the LINE OUTPUTS, MONITOR OUTPUTS and PHONES
jack. The indicator for the selected format lights above the
button.
When set to MONO, stereo audio tracks will be played back
in mono. Use the
MONOMIX
item on the
SYSTEM
menu screen
to set the format of the output mono mix. (See "Mono mix
setting" on page 43.)
PHONES jack/knob
Use this standard stereo jack to connect stereo headphones.
Use the PHONES knob to adjust the headphones output
level.
The knob can be pushed in and locked, allowing the unit
to be stored and transported safely. To unlock it, push it in
again. (See "Connecting headphones" on page 20.)
CAUTION
Before connecting headphones, use the PHONES knob to lower
the volume. Failure to do so might result in sudden loud sounds,
which could harm your hearing or result in other trouble.
STOP button/indicator
Press this button at any time to stop playback at the current
point.
Press this button during online or monitoring playback or
when in playback standby to stop playback.
This button lights when playback is stopped.
MONITOR button/indicator
Press this button to start monitoring playback.
The playback signal is output through the MONITOR
OUTPUTS (R/L) and the PHONES jack.
Front panel