
Operation Manual
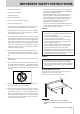

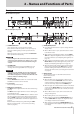
Table Of Contents
- 1 – Introduction
- 2 – Names and Functions of Parts
- 3 – Preparation
- Installing an SSD/HDD drive in the case
- Loading and removing SSD/HDD cases
- Connecting and disconnecting USB flash drives
- Installing I/O cards (sold separately)
- Turning the unit on and off (putting it in standby)
- Setting the built-in clock date and time
- Adjusting the brightness
- Preparing SSD/HDD drives and USB flash drives for use
- Connecting headphones
- Setting the lock function
- 4 – Recording
- Restrictions on recording operations
- Setting the master clock
- Making word/video connector settings
- Setting the reference level
- Setting input monitoring
- Making recording channel settings
- Setting the recording file format
- Setting the file name format
- Automatically incrementing take numbers
- Incrementing take numbers manually
- Adding marks automatically when recording
- Adding marks manually when recording
- Setting the pause mode function
- Setting input signal routing
- Making I/O card settings
- Timecode synchronized recording
- Recording duration
- 5 – Working with Folders (BROWSE screen)
- Opening the BROWSE screen
- Navigating the BROWSE screen
- Icons on the BROWSE screen
- Folder operations
- Take and file operations
- Editing folder, take and file names
- Deleting folders, takes and files
- Copying folders, takes and files
- Rebuilding folders
- Editing the start timecode of a take
- Creating new folders
- Folder structure overview
- Folder structure
- File formats
- 6 – Playback
- 7 – Internal Settings
- 8 – Mark and Locate Functions
- 9 – Loading Files Recorded by Other Devices
- 10 – Data Transfer Using a Computer
- 11 – Other Settings, Information Screens and Keyboard Operations
- INFO button and indicator appearance
- Checking the firmware version
- Firmware update procedures
- Viewing media information
- Setting peak hold time
- Setting the meter mode
- Using a USB keyboard to operate the unit
- Setting the power redundancy check function (DA-6400dp only)
- Exporting/importing system backup data
- Restoring factory default settings
- 12 – Troubleshooting
- 13 – Specifications
- 14 – Important notice regarding software

TASCAM DA-6400/DA-6400dp
3
IMPORTANT SAFETY INSTRUCTIONS
• The apparatus draws nominal non-operating power
from the AC outlet with its POWER or STANDBY/ON
switch not in the ON position.
• The mains plug is used as the disconnect device, the
disconnect device shall remain readily operable.
• Caution should be taken when using earphones or
headphones with the product because excessive
sound pressure (volume) from earphones or
headphones can cause hearing loss.
• If you are experiencing problems with this product,
contact TEAC for a service referral. Do not use the
product until it has been repaired.
CAUTION
• Do not expose this apparatus to drips or splashes.
• Do not place any objects filled with liquids, such as
vases, on the apparatus.
• Do not install this apparatus in a confined space
such as a book case or similar unit.
• The apparatus should be located close enough
to the AC outlet so that you can easily grasp the
power cord plug at any time.
• If the product uses batteries (including a battery
pack or installed batteries), they should not be
exposed to sunshine, fire or excessive heat.
• CAUTION for products that use replaceable lithium
batteries: there is danger of explosion if a battery is
replaced with an incorrect type of battery. Replace
only with the same or equivalent type.
WARNING
• Products with Class ! construction are equipped
with a power supply cord that has a grounding
plug. The cord of such a product must be plugged
into an AC outlet that has a protective grounding
connection.
8
RACK-MOUNTING THE UNIT
Use the supplied rack-mounting kit to mount the unit in a
standard 19-inch rack, as shown below.
Remove the feet of the unit before mounting.
CAUTION
•
Leave 1U of space above the unit for ventilation.
•
Allow at least 10 cm (4 in) at the rear of the unit for venti-
lation.
1 Read these instructions.
2 Keep these instructions.
3 Heed all warnings.
4 Follow all instructions.
5 Do not use this apparatus near water.
6 Clean only with dry cloth.
7 Do not block any ventilation openings. Install in
accordance with the manufacturer's instructions.
8 Do not install near any heat sources such as radiators,
heat registers, stoves, or other apparatus (including
ampliers) that produce heat.
9 Do not defeat the safety purpose of the polarized
or grounding-type plug. A polarized plug has two
blades with one wider than the other. A grounding
type plug has two blades and a third grounding
prong. The wide blade or the third prong are provid-
ed for your safety. If the provided plug does not fit
into your outlet, consult an electrician for replace-
ment of the obsolete outlet.
10 Protect the power cord from being walked on or
pinched particularly at plugs, convenience recepta-
cles, and the point where they exit from the appara-
tus.
11 Only use attachments/accessories specified by the
manufacturer.
12 Use only with the cart, stand, tripod, bracket, or table
specied by the manufacturer, or sold with the appa-
ratus. When a cart is used, use caution when moving
the cart/apparatus combination to avoid injury from
tip-over.
13 Unplug this apparatus during lightning storms or
when unused for long periods of time.
14 Refer all servicing to qualified service personnel.
Servicing is required when the apparatus has been
damaged in any way, such as power-supply cord or
plug is damaged, liquid has been spilled or objects
have fallen into the apparatus, the apparatus has
been exposed to rain or moisture, does not operate
normally, or has been dropped.