
DIGITAL PORTA STUDIO OWNER'S MANUAL DP-02, DP-02CF


IMPORTANT SAFETY PRECAUTIONS
46 TASCAM DP-02/DP-02CF
2 – Advanced techniques
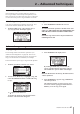
6. Use the DATA dial to select the WAV file to be
imported and press YES/ENTER.
The display shows the amount of free space on the
current partition, and the size of the selected WAV
file.
NOTE
Make sure the target track is an empty track. You
cannot import a track unless the target track is empty.
7. Use the DATA dial to select the track into which the
WAV file will be imported. Press YES/ENTER.
Appropriate messages are shown if there is not
enough space, the file is in the wrong format, etc.
The unit reads the file from the FAT partition into the
track, with the start of the file at the “zero” position in the
song.
Once the file has been read into the track, it can be edited
(moved, copied, etc.) like any other recorded track. See
“About track editing” on page 47.
Exporting tracks
Any track can be exported as a mono, 16-bit 44.1kHz WAV
format file.
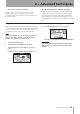
1. From the MENU screen, select and enter the WAVE
menu.
2. Select the EXPORT TRACK action and press the
YES/ENTER key.
The display shows a list of suggested file names,
based on the song tracks which contain audio:
NOTE
If a track does not contain audio, it does not appear in
this list.
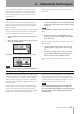
3. Use the DATA dial or cursor (§,¶) keys to highlight
a track, and rotate the DATA dial clockwise to mark
it for export. A “ ” appears on the check box.
Repeat this action to select multiple tracks to export.
To deselect a track, use the cursor (§,¶) keys to
highlight and rotate the dial countercolckwise. The
check mark disappears.
When the cursor is by a track, you can press SHIFT and
MENU to bring up a titling screen:
Edit the name, and press YES/ENTER when you’re
finished (“Titling” on page 11).
4. When all tracks for export have been selected, press
YES/ENTER.
The display shows the free space on the FAT parti-
tion (the destination of the exported tracks) and the
space which the exported tracks will occupy.
5. Press YES/ENTER to export the selected tracks.
The tracks are exported with the names you entered
(a .WAV extension is added). If you already have
exported a track file with the same name as one you
have chosen, a message appears asking you if you
want to overwrite the older file.
6. Connect the unit to the computer and “open” the
recording media (““Open” and “Close”” on page 43).
7. Use the PC operating system to copy or move the
exported tracks from the WAVE directory of the unit
FAT partition to the PC.
Once the tracks are on the PC, you can “close” the unit.
The exported tracks on the PC can then be backed up to
CD-R, etc.