
Reference Guide

6
TASCAM DR-05X
2 – Names and Functions of Parts
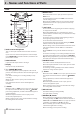
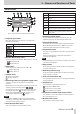
Front
1 Built-in stereo microphone
This is a stereo pair of unidirectional electret condenser
mics.
If you connect an external microphone or external input
to the MIC/EXT IN jack between the mics, the built-in mic
pair becomes inactive.
2 PEAK indicator
Lights when the input volume is too high.
3 Display
Displays a variety of information.
4 ¤ (HOME) [8] button
Press during playback to pause playback at the current
position. Press when paused to return to the beginning of
the track.
Press when recording or in recording standby to stop
recording.
When any other screen is open, press to return to the
Home Screen.
Press and hold to turn the unit on and off (put into
standby).
5 + button
When the Home or TUNER screen is open, press to increase
the output level from the built-in speaker or /LINE OUT
jack. During adjustment, a volume indicator will appear in
a pull-up window.
When the Playback Control screen is open, press to
increase the playback speed.
When a setting screen is open, use this button to change
the setting of the selected item.
6 MENU button
When the Home Screen is open, press this to open the
MENU screen.
Press this button to return to the MENU screen from the
various setting screens.
When the IN and OUT points are set in the track and the
Playback Control screen is open, press this to turn loop
playback on or off.
7 . button
Press to return to the beginning of a track that is playing
or stopped in the middle.
When IN and OUT points are set between the current
position and the end of the track, press this button to skip
to those points.
Press when a track is stopped at its beginning to skip to
the beginning of the previous track.
Press and hold to search backwards.
Press this button while pressing and holding the MARK
button to return to the previous mark.
On the setting screens, use this button to move the cursor
left. Use this button to answer “NO” to a confirmation
message.
On the BROWSE screen, press this button to move up a
level.
Press when recording or in recording standby to decrease
the input level from the built-in microphone or MIC/EXT
IN jack. During adjustment, a pull-up with meters showing
the input level will appear at the bottom of the display.
8 PB CONT button
This button activates the Playback Control screen.
When the Playback Control screen is open, press to return
to the Home Screen.
Press during recording standby to turn off the self-timer
function or change the time period.
9 - button
When the Home or TUNER screen is open, press to decrease
the output level from the built-in speaker or /LINE OUT
jack.
During adjustment, a volume indicator will appear in a
pull-up window.
When the Playback Control screen is open, press to
increase the playback speed.
When a setting screen is open, use this button to change
the setting of the selected item.
0 REC indicator
This flashes during recording standby.
This lights while recording.
q RECORD [0] button
When stopped, press this button to put the unit into
recording standby. The REC indicator will start to blink. If
INPUT is ON on the MONITOR MIX screen, a pop-up menu to
set whether overdubbing is ON/OFF will open.
When in standby, press to start recording. The REC
indicator will light when recording.
When recording, press to pause recording.