D01354020B DR-40X Linear PCM Recorder REFERENCE MANUAL
Table of Contents 1 – Introduction.....................................................................4 Features................................................................................................... 4 Conventions used in this manual.................................................. 4 Trademarks and copyrights............................................................. 5 About SD cards..................................................................................... 5 Precautions for use...
Table of Contents Stopping playback.......................................................................47 Searching backward and forward..........................................47 Repeating playback (REPEAT).......................................................48 Special playback control functions.............................................48 Playback Control screen.............................................................48 Loop playback of a selection..............................................
1 – Introduction ii Self-timer function to start recording after a set period of time.
1 – Introduction Trademarks and copyrights ii TASCAM is a trademark of TEAC CORPORATION, registered in the U.S. and other countries. ii SDXC Logo is a trademark of SD-3C, LLC. ii The MPEG Layer-3 audio coding technology is licensed from Fraunhofer IIS and Thomson.
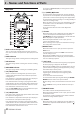
2 – Names and Functions of Parts Press when in OVERDUB (MIX) recording mode to mute the input sound. Top panel 7 ¤(HOME) [8] button Press this button during playback to cause the playback to pause at the current position. Press this button during pause time to return to the beginning of the playback file. Press this button during recording or recording standby to cause the recording to stop. When any other screen is open, press this button to return to the Home screen.
2 – Names and Functions of Parts During adjustment, a volume indicator will be displayed in a pull-up window. When the Playback Control screen is open, press to reduce the playback speed. When a setting screen is open, use the button to change the setting of the selected item. e Display Shows a variety of information. r PEAK indicator Lights when the input volume is too high. t REC MODE button Press this button to open the REC MODE screen.
2 – Names and Functions of Parts Front panel Left side panel s EXT MIC/LINE IN L/R jacks (XLR/TRS) These are balanced analog XLR/TRS combo jacks for microphone and line level inputs. XLR (1: GND, 2: HOT, 3: COLD) TRS (Tip: HOT, Ring: COLD, Sleeve: GND) CAUTION ii Confirm that phantom power is OFF before connecting a line level device to a EXT MIC/LINE IN jack. If you connect a line level device while phantom power is being supplied, that device and this unit could be damaged.
2 – Names and Functions of Parts Bottom Panel v Battery compartment Install batteries (3 AA) in this compartment to power the unit. (See "Using AA batteries" on page 16) ; Built-in mono speaker Use this built-in speaker to listen to recordings. The speaker will not produce sound in the following situations.
2 – Names and Functions of Parts 7 Recorder operation status Home Screen This icon shows the recorder operation status. Indication Explanation Home Screen when in ordinary operation mode 1 Playback area This shows the current playback file area. ALL: All files in the MUSIC folder FOLDER: All files in the selected folder P.LIST: All files added to the playlist 2 Loop/repeat playback status One of the following icons appears according to the playback speed setting.
2 – Names and Functions of Parts e Effect status Shows whether the effect function is ON or OFF. Recording screen : Built-in effect off : Built-in effect on r Peak value in decibels (dB) The maximum level that occurs in a fixed period of time is displayed digitally. t File name This shows the name of the file playing back or its tag information. ID3 tag information is shown when available for an MP3 file being played.
2 – Names and Functions of Parts 6 Input source q Tone output setting status This icon shows the input source. Indicator examples Meaning Input source set to built-in mics EXT MIC/LINE IN jack set as input source Second recording level setting (-6 – -12) when dual recording enabled When in OVERDUB SEPARATE mode, this shows that channels 1/2 are a playback file.
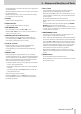
2 – Names and Functions of Parts Menu item list This list provides an overview of the various menu items. The menu items are as follows.
2 – Names and Functions of Parts CAUTION ii When recording or in recording standby, only the following screens and items are shown. LOW CUT and AUTO REC setting MODE and LEVEL items on the REC SETTING screen (AUTO REC settings are shown, but cannot be changed) EFFECT screen REVERB, PRESET, LEVEL and SOURCE items ii When the Playback Control screen is open, pressing the MENU button will not open the MENU screen. This turns the loop playback function on/off.
2 – Names and Functions of Parts Basic operation Use the following buttons to operate the various screens. MENU button: This opens the MENU screen. PB CONT button: This opens the Playback Control screen. ¤ (HOME) [8] button: When a settings screen is open, press the ¤ (HOME) [8] button to return to the Home Screen. Use this to answer “NO” to a confirmation message. ENTER/MARK button: 1/2 [SOLO] button Opens a meter display that shows the 1/2 input level setting status.
3 – Preparation Powering the unit This unit can operate on three AA batteries, using a TASCAM PS-P520E AC adapter (sold separately) or using a commercially-available USB cable (USB bus power). Alkaline or Ni-MH batteries can be used. To use USB bus power, see "Powering the unit with USB bus power" on page 65. Using an AC adapter (sold separately) As shown in the illustration, connect a TASCAM PS-P520E AC adapter (sold separately) to the unit's USB port and charge the unit.
3 – Preparation Turning the power on and off (standby mode) VCAUTION Do not wear connected headphones when turning the unit on or off (putting it in standby). Noise could damage the headphone driver unit or harm your hearing. You can also change the display language setting with the SYSTEM screen LANGUAGE item. (See "Setting the language" on page 69) 2) A screen for setting the built-in clock will open.
3 – Preparation Setting the date and time This unit uses its internal clock to record the date and time to the recorded files. 1. Press the MENU button to open the MENU screen. 2. Use the + or – button to select the OTHERS menu item (highlighted), and press the ENTER/MARK or / button. The OTHERS screen opens. 3. Use the + or – button to select the DATE/TIME menu item, and press the ENTER/MARK or / button. The DATE/TIME screen opens. 4. Use the .
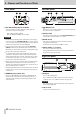
3 – Preparation Inserting and removing SD cards Inserting cards Card write protection SD cards have protect switches that prevent writing new data to them. 1. Open the SD slot cover on the right side. 2. Insert the SD Card into the slot as shown in the following illustration until it clicks into place. Writing possible Writing not possible If you slide the protect switch to the “LOCK” position, file recording and editing is not possible.
3 – Preparation Using the built-in speaker To listen to the playback sound from the built-in speaker, turn on the SPEAKER item on the I/O SETTING screen. Operation from the Quick menu 1. During playback when the Home Screen is open, press the QUICK button to open the Quick menu. NOTE Even if SPEAKER is ON, the unit will not play through the speaker when the unit is recording, in recording standby or when headphones or an external speaker system is connected. Operation from the MENU screen 1.
3 – Preparation Using the built-in microphone This unit’s built-in microphones can be adjusted, allowing the angles of the microphones to be changed. You can choose clear stereo sound or wide stereo sound according to considerations including the recording source and situation by opening or closing the microphone pair. Setting the mics to record a wide stereo sound (A-B position) Setting the mics to record a clear stereo sound (X-Y position) Close the mics (X-Y position).
3 – Preparation Swapping the left-right channels of the built-in microphone pair Swap the left and right mics according on the mic angle setting. When the mic pair is open, the left mic should be set to the left channel and the right mic should be set to the right channel (L-R when in A-B position). When the mic pair is closed, the left mic should be set to the right channel and the right mic should be set to the left channel (R-L when in X-Y position).
4 – Recording In addition to the built-in microphone, an external microphone or external audio device (i.e. CD player) can also be used for recording. You can select among MP3 (44.1/48 kHz, 32–320 kbps) and WAV/BWF (44.1/48/96 kHz, 16/24-bit) audio recording formats. Marks added when recording or playing a WAV file that is BWF-compatible can be used with software that supports this format, for example. This recorder has five recording modes.
4 – Recording Preparing the recording inputs Recording with the built-in mics Point the mics at the sound source and place the unit in a stable location where there is little vibration. Recording with external mics (EXT MIC IN) Connect external mics to the EXT MIC/LINE IN connectors. Point the mics at the sound source and place the unit in a stable location where there is little vibration.
4 – Recording Using phantom power When the EXT IN switch on the left side panel is set to MIC+PHANTOM, phantom power (+24V or +48V) is turned on and sent to the connected mics. CAUTION ii Confirm that phantom power is OFF before connecting a line level device to a EXT MIC/LINE IN jack. If you connect a line level device while phantom power is being supplied, that device and this unit could be damaged.
4 – Recording Setting the LEVEL MODE function from the Quick menu When you press the INPUT LEVEL + or – button on the left side of the unit, a pull-up with a meter showing the input level will appear at the bottom of the display. 1. Press the RECORD [0] button to start recording standby. The REC indicator will blink and the recording screen will open. 2. Press the QUICK button to open the quick menu. The PEAK indicator to the right of the display lights red when the input level is too high.
4 – Recording Independent L/R channel EXT IN input level setting function The EXT IN input levels can be set independently for the L and R channels. Use this function when, for example, using two different mics or when volume differences are great. 1. Press the REC MODE button to open the REC MODE screen. 2. Use the + and − buttons to select (highlight) the SOURCE Using the LEVEL MODE function Operation from the MENU screen 1. Press the MENU button to open the MENU screen. 2.
4 – Recording 4. Use the + or − button to select (highlight) a mode, and press the ENTER/MARK button to enable the mode and return to the recording screen. The selected mode is shown with an icon in the recording screen. MANUAL Overview of recording modes This recorder has five recording modes. Set the recording mode with the REC MODE item on the REC MODE screen. The settings available are different for each recording mode.
4 – Recording 6. Use the + and – buttons to set the input source. REC MODE MONO STEREO SOURCE (options) Explanation INT MONO (default) L/R signals of built-in mics are mixed and recorded in mono EXT IN 1 L external input is recorded in mono INT STEREO (default) Built-in mics are recorded in stereo EXT IN 1/2 External inputs are recorded in stereo EXT INDEP. Use two external input channels with independent level setting Starting the recording 1.
4 – Recording Simultaneously recording two files at different input levels (DUAL REC) This unit can simultaneously make two recordings at different input levels (dual recording). For example, when recording with mics, you can record the main recording with the input level set as high as possible while recording a backup recording with the input level set slightly lower to prevent the sound from distorting and record both at the same time. The main and backup recordings will each be saved as a separate file.
4 – Recording 14. When using MS mics, use the + and – buttons to select the MS DECODE item, and press the ENTER/MARK or / button. Use the + or – button to set MS DECODE to ON. (Default: OFF) 15. After completing the setting, press the ¤ (HOME)[8] button to return to the Home Screen. Starting dual recording 1. Press the RECORD [0] button to start dual recording. During dual recording, the recording screen appears as follows.
4 – Recording 6. Press the . button to return to setting item selection. 7. Use the + and − buttons to select (highlight) the EXT L DLY item, and press the ENTER/MARK or / button. 8. Use the + and − buttons to set the delay time for the EXT L channel. Range: - 150ms (51m) - 0ms (0m) (default) - +150ms (51m) 9. Press the . button to highlight the item. Starting 3/4-channel recording Press the RECORD [0] button to begin recording standby.
4 – Recording Recording playback and input sounds together (overdubbing) The overdubbing function has two modes. You can mix input signals with an already recorded file as it plays back and record either the combined signals or just the input signal as a new file, keeping the original recording as is. NOTE ii The prerecording and automatic recording functions are disabled in overdubbing mode. ii In overdubbing mode, you cannot start new files manually by incrementing.
4 – Recording Select the file you want to overdub Use the . and / buttons or the BROWSE screen to select the file that you want to overdub. NOTE See "5 – Working with Files and Folders (BROWSE screen)" on page 41 for selecting files using the BROWSE screen. Conducting overdubbing 1. Press the RECORD [0] button to begin recording standby. File names when overdubbing When overdubbing, file names are generated differently according to the DUB MODE setting. SEPARATE mode Playback file 180113_0004S12.
4 – Recording MIX mode Playback file 180113_0004S12.WAV File-A: The newly recorded file (recorded with the playback signal (File-A)) 180113_0005S12.WAV File-E: Using the automatic recording function (AUTO REC) This function starts and pauses recording, starts new files, and sets marks automatically according to the input signal level. 1. Press the MENU button to open the MENU screen. 2. Use the + or − button to select REC SETTING, and press the ENTER/MARK or / button. The REC SETTING screen will open.
4 – Recording 10. Recording operation changes according to the MODE setting. NEW FILE mode If the input signal level falls below the standard level set by LEVEL for more than five seconds, the unit enters recording standby. When the input signal level becomes higher than the standard level, the unit starts recording a new file.
4 – Recording Using the low-cut filter The low cut filter can reduce noise such as offensive wind noise from air-conditioners and projectors. Operation from the MENU screen 1. Press the MENU button to open the MENU screen. 2. Use the + or − button to select REC SETTING, and press the ENTER/MARK or / button. The REC SETTING screen will open. 3. Use the + or − button to select LOW CUT, and press the ENTER/MARK or / button. 4.
4 – Recording Setting the AUTO TONE length Using tone output The tone output function can be used to automatically insert a tone signal whenever recording starts and stops. By connecting the /LINE OUT jack on the left side of the unit and the external mic input jack of a video camera or digital camera capable of recording video and using the AUTO TONE function, the same tone signal can be recorded to files on both units.
4 – Recording Self-timer function Similar to a camera, the DR-40X has a self-timer function to begin recording after a set period of time. 1. Press RECORD [0] button when stopped or playing to put the unit in recording standby, and press the PB CONT button. Solo function Press and hold the 1/2 [SOLO] or 3/4 [SOLO] button to enable the solo function. Use this in 4-channel mode and other cases when multiple inputs are being recorded to monitor only one of the inputs.
4 – Recording Recording duration The table below shows the maximum recording time on SD/SDHC/SDXC cards of different capacities for different file formats for recording. File format (recording setting) WAV/BWF 16-bit (stereo) WAV/BWF 24-bit (stereo) MP3 (stereo/mono) SD/SDHC/SDXC card capacity (hours: minutes) 1GB 2GB 4GB 8GB 44.1 kHz 1:41 3:22 6:44 13:28 48kHz 1:33 3:06 6:12 12:24 96kHz 0:46 1:33 3:06 6:12 44.
5 – Working with Files and Folders (BROWSE screen) On the BROWSE screen, you can view the contents of the MUSIC folder, which contains audio files, on the SD card. On this screen, you can also play and erase selected audio files, create folders, add files to the playlist and so on. (See "Using the playlist" on page 46.
5 – Working with Files and Folders (BROWSE screen) ADD PLAYLIST FILE DELETE Add the selected file to the playlist. (See "Using the playlist" on page 46) A message appears to confirm that you want to delete the file. Press the ENTER/MARK button to delete the file and the ¤ (HOME) [8] button to cancel deletion. FILE SWAP Files recorded during the following recording modes can be swapped.
5 – Working with Files and Folders (BROWSE screen) Folder operations Select (highlight) the desired folder on the BROWSE screen and press the QUICK button to open the following pop-up window. Use the + or − button to select an item, and press the ENTER/ MARK button to cause the unit to execute that operation as follows. Creating a new folder NEW FOLDER appears at the bottom of each folder list. Select (highlight) NEW FOLDER, and press the ENTER/MARK or / button.
6 – Playback On the Home screen, you can use the . and / buttons to select the playback file. The files that you can select are determined by the playback area setting. Limiting the playback area makes file selection easier when you have numerous recorded and copied files on the SD card. On the PLAY SETTING screen, you can select all files, the current folder or the playlist as the playback area. You can also use the BROWSE screen to set a folder as the playback area.
6 – Playback Selecting a folder for the playback area (1) Selecting a folder for the playback area (2) Regardless of the current playback area, if you select a folder on the BROWSE screen, the playback area changes to the selected folder. When the playback area is set to FOLDER, if you select a file on the BROWSE screen, the folder that contains the selected file becomes the playback area. 1. Press the MENU button to open the MENU screen. 1. Press the MENU button to open the MENU screen. 2. 2.
6 – Playback Using the playlist You can make a list of files for playback (playlist). On the PLAY SETTING screen if you select PLAYLIST for the AREA item, you can set playback to just the files in the playlist. Adding files to the playlist 1. Press the MENU button to open the MENU screen. 2. Use the + or − button to select (highlight) BROWSE, and press the ENTER/MARK or / button. The BROWSE screen will open. Editing the playlist You can view and edit the playlist you have made on the PLAYLIST screen.
6 – Playback 6. Use the + and− buttons to select an item, and press the ENTER/MARK button to cause the unit to execute that operation as follows. MOVE Select this to change the order of files in the playlist. In addition to the file name, the file number also appears highlighted in inverse. ii Use the + or − button to move the selected track to a different position in the playlist. Selecting files for playback (skipping) When the Home Screen is open, use the .
6 – Playback Repeating playback (REPEAT) You can repeatedly play one file or multiple files within a designated area. 1. Press the MENU button to open the MENU screen. 2. Use the + or − button to select PLAY SETTING, and press the ENTER/MARK or / button. This opens the PLAY SETTING screen. 3. Use the + or − button to select REPEAT, and press the ENTER/MARK or / button. Special playback control functions The unit has some special playback control functions.
6 – Playback 3. Press the ENTER/MARK button at the end point of the section that you want to play repeatedly. The current position is set as OUT (end) point. During loop playback the indicator appears. Press the PB CONT button to return to the Home Screen while maintaining the IN (start) and OUT (end) point and loop settings. NOTE ii The I/O Too Short pop-up message appears if the section between the IN and OUT points is too short. Set them again. The section should be 1 second or longer.
6 – Playback Setting the playback equalizer You can choose from different sound equalization settings to enhance listenability (PLAY EQ). Use the PLAY EQ item on the I/O SETTING screen or the Quick menu to set the playback equalization. Increasing perceived sound pressure to enhance listenability (LEVEL ALIGN) If the playback sound is very small and indiscernible, the perceived overall sound pressure can be increased to enhance listenability.
6 – Playback 4. Use the + or − button to select ON, and press the ENTER/ MARK button to enable the level alignment function. To disable the level alignment function, select (highlight) OFF and press the ENTER/MARK button. NOTE The level alignment function might not have much effect depending on the source of the sound (for example, a music file that has already had sound pressure adjusted).
6 – Playback Setting the jump forward time Operation from the MENU screen 1. Press the MENU button to open the MENU screen. 2. Use the + or − button to select PLAY SETTING, and press the ENTER/MARK or / button. This opens the PLAY SETTING screen. 3. Use the + or − button to select (highlight) JUMP FWD and press the ENTER/MARK or / button. 4. Use the + and - buttons to set the jump forward time. 5. After completing the setting, press the ¤ (HOME) [8] button to return to the Home Screen.
7 – Quick Operations Features of the QUICK button The QUICK button can be used for the following functions. The functions of the QUICK button for different screens and states are as follows. Screen State Stopped/ paused Home Screen Playing back Recording Standby Home Screen DICTATION PLAY mode Playback Control screen When file selected BROWSE screen When folder selected Mixer Screen Menu item Action Page DELETE Delete the current file. see page 55 DIVIDE Divide the current file.
7 – Quick Operations Screen State OVERWRITE MODE 54 TASCAM Menu item Action Page TO EDIT POINT Move to where overwrite recording started. see page 57 UNDO Restore to state before most recent overwrite recording. see page 57 MODE EXIT Exit OVERWRITE mode.
7 – Quick Operations Quick menu Press the QUICK button to open the Quick menu when you want to use it. The content of the Quick menu differs according to the recorder status and operation mode. Press the QUICK or ¤ (HOME) [8] button to close the Quick menu. Quick menu when playback is stopped or paused Deleting files Dividing the selected file (DIVIDE) A recorded file can be divided into two at a specified position. 1. Select a file to be divided using the . and / buttons or the BROWSE screen. 2.
7 – Quick Operations NOTE ii When the DIVIDE screen is open, you can press the PLAY [7] button and set the divide position while playing the file. ii When the DIVIDE screen is open, press the PLAY [7] button to pause/resume playback and press . to move to the beginning or / to move to the end of the playback file. Adjust the position for file division using the + or − button. Press and hold the + or - button to move the position continuously.
7 – Quick Operations TIP Add marks during recording or playback at positions where you want to divide a file. (See "8 – Mark functions" on page 60) Conducting overwrite recording 1. Press the RECORD [0] button. The following pop-up window appears. Overwrite recording A recorded file can be overwritten from a desired position. Selecting a file to overwrite record On the BROWSE screen, select the file to overwrite record. NOTE File skipping cannot be used to select files in overwrite recording mode.
7 – Quick Operations Transcribing recorded files (DICTATION PLAY) The DICTATION PLAY mode allows you to search for the parts of the selected file that you want to hear during playback, making it useful for transcribing meeting minutes, for example. In DICTATION PLAY mode, the file skip function is disabled to prevent accidentally moving to the previous or next file. Select the file before enabling DICTATION PLAY Mode. Enabling DICTATION PLAY mode 1.
7 – Quick Operations Mixdown This function combines three or four channels (a file each for channels 1/2 and channels 3/4) into one two-channel L/R file. At this time, you can adjust the effect level (SEND), left-right balance (PAN or BAL when mono), volume balance (LVL) for each channel freely on the MIXER screen. (See "10 – Mixer" on page 62) 1. Select a file to mix down using the . and / buttons or the BROWSE screen. 2.
8 – Mark functions Adding marks manually When playing, recording or recording is paused, press the ENTER/MARK button to add a mark at the current point. When a mark is added, a pull-up appears at the bottom of the display. NOTE ii Mark information is stored in each file with numbers from 01 to 99. ii As the unit is compatible with the BWF format for WAV files, marks added to a WAV file during recording are stored in the file.
9 – Using effects This unit has a built-in effect. They can also be applied to the output signal during playback. When the effect is on, appears at the top of the Home Screen as light on dark ( ). Effects indication Setting the effect press the ENTER/MARK or / button to open the OTHERS screen. 3. Use the + or − button to select EFFECT, and press the ENTER/MARK or / button. The EFFECT screen will open.
10 – Mixer This recorder has a mixer function that allows you to set the built-in effect, stereo balance and volume level for each channel. During mixdown (See "Mixdown" on page 59) and playback, you can make fine adjustments to the recorded sound by using this. 4. Use the + and – buttons to change the setting value. Item SEND Making mixer settings 1. From the Home screen, press the MIXER button to open the Mixer Screen. PAN/BAL LVL Setting range Operation details Adjusts the send level (0 (min.
10 – Mixer Using the MS decoder When using MS mics to record, you have two decoding options. You can decode the input sound as you record or you can record as is and decode during playback. Decoding the input sound as you record 1. Connect MS mics to the external input connectors. Connect the mid mic to the EXT MIC L connector and the side mic to the EXT MIC R connector. Decoding cannot be conducted properly if the mid and side mics are connected in reverse. 2.
11 – Tuning Instruments This unit has a built-in tuner. By inputting sound from a musical instrument, you can tune it accurately while viewing the tuning meter shown in the display. Using the tuner Setting the tuner Tuning a musical instrument 1. Open the Tuner Screen and play a note on the instrument. The closest pitch name will be shown above the center of the meter. 2. Tune the instrument so that the target pitch name appears and the center of the tuner lights. 1.
12 – USB Connections By connecting this unit with a computer using a USB cable, you can power the unit with USB bus power, and use the unit as an SD card reader and as a USB audio interface. Computer Micro-B USB plug Using as an SD card reader By connecting this unit with a computer using a USB cable, you can use it as an SD card reader. You can transfer recorded audio files to a computer and also transfer audio files from a computer to the unit. When the unit is off 1.
12 – USB Connections Disconnecting the unit from a computer Before disconnecting the computer and the unit, use the proper procedures for the computer to unmount the unit, and press the . button. Press the . button to disconnect from the computer and return to the Home Screen. Transferring files from a computer Using as a USB audio interface By connecting this unit with a computer using a USB cable, you can use it as a USB audio interface. When the unit is off 1.
12 – USB Connections Setting the connected device type 1. When the AUDIO I/F screen is open, use the + or – button to select (highlight) CONNECT TO, and press the ENTER/MARK button. 2. Use the + and – buttons to set the type of connected device. Options: PC/Mac (default), iOS NOTE ii With Windows, an ASIO driver for the DR-X series can be used. Check the page for this product on the TASCAM website (https://tascam.com/us/) for details.
13 – Settings and Information Viewing information (INFORMATION) Use the INFORMATION screen to view various types of information about this unit. Follow the procedures below to view the INFORMATION screen. Card information page (CARD) The CARD page shows the status of the currently inserted SD card. 1. Press the MENU button to open the MENU screen. 2. Use the + and – buttons to select the OTHERS menu, and press the ENTER/MARK or / button to open the OTHERS screen. 3.
13 – Settings and Information System Settings On the SYSTEM screen, you can change various settings to optimize the device for the use environment and conditions. You can also restore factory default settings and format SD cards, for example. You can also initialize the unit and format the SD card. 1. Press the MENU button to open the MENU screen. 2. Use the + or – button to select (highlight) SYSTEM and press the ENTER/MARK or / button. This opens the SYSTEM screen.
13 – Settings and Information Restoring the factory settings Use the INITIALIZE item to restore the various settings of this unit to their factory settings. 1. Use the + or − button to select INITIALIZE, and press the ENTER/MARK or / button to highlight Exec. 2. Press the ENTER/MARK button again to open a confirmation pop-up window. Completely formatting SD cards Use the FULL FORMAT item to completely format an SD card.
13 – Settings and Information Setting the file name format You can select the format of names given to files recorded by this unit. Resetting the number Select COUNT INIT, and press the ENTER/MARK button to execute it. The next file created after this will have the number “0001” after the characters set using the WORD item. 1. Press the MENU button to open the MENU screen. 2. Use the + and – buttons to select the OTHERS menu, and press the ENTER/MARK or / button to open the OTHERS screen. 3.
14 – Using the REMOTE jack This unit has a REMOTE jack This unit can be operated with a connected TASCAM RC-3F footswitch remote control (sold separately) or TASCAM RC-10 wired remote control (sold separately). Footswitch (TASCAM RC-3F) 7. Use the + or – button to change the MODE item. Options: PLAY (default), RECORD1, RECORD2, MINUTES MODE C R .
14 – Using the REMOTE jack Remote control (TASCAM RC-10) Using the wired remote control Press the function buttons (F1 – F4) on the wired remote control to use the function assigned on the REMOTE screen. Overview of mode functions MODE Wired remote control TASCAM RC-10 (sold separately) --- Function buttons F1 F2 1/2 [SOLO] 3/4 [SOLO] F3 F4 INPUT VOL INPUT VOL + - Setting the wired remote control Use the REMOTE Screen to set the wired remote control. 1.
15 – Messages The following is a list of pop-up messages. Refer to this list if one of these pop-up messages appears on the DR-40X and you want to check the meaning or determine a proper response. Message Details and responses File Name Err The DIVIDE function cannot be used if the file name is 197 characters or more. Connect the unit to a computer and edit the file name to 196 characters or less.
15 – Messages Message Details and responses File Protected The file is read only and cannot be erased. No Card No SD card is loaded in the unit. Insert a recordable SD card. No PB File There is no file that can be played back. The file might be damaged. No MUSIC File There is no playback file, so DIVIDE cannot be executed. Cannot overdub! See REC setting You cannot overdub when there are two 96kHz WAV/BWF or MP3 format playback files. Mix them down to one file before overdubbing.
16 – Troubleshooting If you are having trouble with the operation of this unit, please double-check the following before seeking repair. If these measures do not resolve the issue, please contact the retailer where you purchased this unit or a TASCAM customer support service service. Power will not turn ON. ii Confirm that batteries are installed correctly. The unit is not recognized by a computer connected using a USB cable. ii Confirm that the HOLD switch is not set.
17 – Specifications Ratings Recording media SD card (64 MB - 2 GB) SDHC card (4 GB - 32 GB) SDXC card (48 GB - 128 GB) Recording/playback formats BWF: 44.1/48/96kHz, 16/24 bit WAV: 44.1/48/96kHz, 16/24 bit MP3: 44.1/48 kHz, 32/64/96/128/192/256/320 kbps Number of channels 4 channels (stereo × 2) Input/output ratings Analog audio input and output ratings EXT MIC/LINE IN jacks (XLR connectors can provide phantom power) Connector: XLR-3-31 (1: GND, 2: HOT, 3: COLD) (phantom power supported) 6.
17 – Specifications Battery operation time (continuous operation) ii Using NiMH batteries (eneloop) ii Using alkaline batteries (EVOLTA) Format Continuous operation Note time When recording 2-channel 96kHz/24-bit WAV About 14.5 hours With built-in stereo mic input When recording 2-channel 44.1kHz/16-bit WAV About 18 hours With built-in stereo mic input When recording 2-channel 44.1kHz/16-bit WAV About 6.5 hours When supplying phantom power (+48V, 3mA load × 2) When recording 2-channel 44.
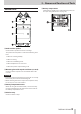
17 – Specifications Dimensions (W x H x D) 70 × 155 × 35mm (2.67" x 6.22" x 1.02") (when the microphone pair is closed) 90 × 155 × 35mm (3.54" x 6.22" x 1.02") (when the microphone pair is open) Weight 282g (including batteries)/213 g (not including batteries) Operating temperature 0°C–40°C (32°F–104°F) Dimensional drawings 90mm 70mm 4mm 155mm Opened mic dimension 35mm 2mm ii Illustrations and other depictions may differ in part from the actual product.
TEAC CORPORATION Phone: +81-42-356-9143 1-47 Ochiai, Tama-shi, Tokyo 206-8530 Japan TEAC AMERICA, INC. Phone: +1-323-726-0303 10410 Pioneer Blvd. Suite #1 and #4, Santa Fe Springs, California 90670, U.S.A. https://tascam.jp/jp/ https://tascam.com/us/ TEAC UK Ltd. Phone: +44-1923-797205 Meridien House, 69-71 Clarendon Road, Watford, Herts, WD17 1DS, United Kingdom https://tascam.eu/ TEAC EUROPE GmbH Phone: +49-611-71580 Bahnstrasse 12, 65205 Wiesbaden-Erbenheim, Germany https://tascam.