
Reference Guide


8
TASCAM DR-40X
2 – Names and Functions of Parts
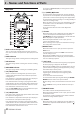
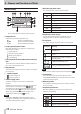
Front panel
s
EXT MIC/LINE IN L/R jacks (XLR/TRS)
These are balanced analog XLR/TRS combo jacks for
microphone and line level inputs.
XLR (1: GND, 2: HOT, 3: COLD)
TRS (Tip: HOT, Ring: COLD, Sleeve: GND)
CAUTION
i
Confirm that phantom power is OFF before connecting a
line level device to a EXT MIC/LINE IN jack. If you connect
a line level device while phantom power is being supplied,
that device and this unit could be damaged.
i
Do not connect or disconnect mics with the EXT MIC/
LINE IN jacks when the phantom power switch is set to
ON. Doing so could cause a loud noise and might damage
this unit and connected equipment.
i
Set the phantom power switch to ON only when using
a condenser microphone that requires phantom power.
Turning phantom power on when a dynamic mic or other
mic that does not require it is connected could damage
this unit and connected equipment.
i
When using condenser mics that require phantom power
and dynamic mics together, be sure to use balanced
dynamic mics. Unbalanced dynamic mics cannot be used
when phantom power is enabled.
i
Supplying phantom power to some ribbon mics will break
them. If you are unsure, do not supply phantom power to
a ribbon mic.
d REMOTE jack (φ2.5mm TRS)
Connect a TASCAM RC-3F footswitch or TASCAM RC-10
wired remote control (both sold separately) here. This
enables remote starting and stopping of playback and
other functions.
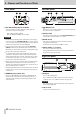
Left side panel
f /LINE OUT jack
Use this to connect with headphones or the line input jack
of an amp or other equipment.
g EXT IN switch
Use this to set the input type of the EXT MIC/LINE IN jacks
and whether phantom power is on or off.
h HOLD switch
Shift to the left end (in the direction of the arrow) to
engage the hold function.
No buttons can be used when HOLD is active.
j INPUT LEVEL (+/–) buttons
Use these to adjust the input level.
During adjustment, the input level setting status will be
displayed in a pop-up window.
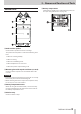
Right side panel
k USB port
This is a Micro-B USB port.
Use a USB cable (A to Micro-B) to connect the unit to a
computer. (See "12 – USB Connections" on page 65)
CAUTION
The unit should be connected directly to the computer,
not through a USB hub.
l SD card slot
Insert an SD card into this slot.