» D00414800A MD-801R@#/ MD-801P@# MD Recorder/Player OWNER’S MANUAL Ü ÿ Ÿ CAUTION: TO REDUCE THE RISK OF ELECTRIC SHOCK, DO NOT REMOVE COVER (OR BACK). NO USER-SERVICEABLE PARTS INSIDE. REFER SERVICING TO QUALIFIED SERVICE PERSONNEL.
Important Safety Precautions IMPORTANT (for U.K. Customers) TO THE USER DO NOT cut off the mains plug from this equipment. If the plug fitted is not suitable for the power points in your home or the cable is too short to reach a power point, then obtain an appropriate safety approved extension lead or consult your dealer. If nonetheless the mains plug is cut off, remove the fuse and dispose of the plug immediately, to avoid a possible shock hazard by inadvertent connection to the mains supply.
IMPORTANT SAFETY INSTRUCTIONS CAUTION: … Read all of these Instructions. … Save these Instructions for later use. … Follow all Warnings and Instructions marked on the audio equipment. 1) Read Instructions — All the safety and operating instructions should be read before the product is operated. 2) Retain Instructions — The safety and operating instructions should be retained for future reference. 3) Heed Warnings — All warnings on the product and in the operating instructions should be adhered to.
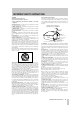
SAFETY INFORMATION This product has been designed and manufactured according to FDA regulations "title 21, CFR, chapter 1, subchapter J, based on the Radiation Control for Health and Safety Act of 1968", and is classified as class 1 laser product. There is not hazardous invisible laser radiation during operation because invisible laser radiation emitted inside of this product is completely confined in the protective housings. The label required in this reguration is shown 1.
Table of Contents 1 - Introduction 1.1 About the MiniDisc format ................1-1 1.1.1 ATRAC compression .......................... 1-1 1.1.2 Buffer memory .................................... 1-1 1.1.3 Random access and U-TOC............... 1-1 1.1.4 Track titling, etc. ................................. 1-2 1.2 Care of MD media...............................1-2 1.3 About the MD-801R/P Mk II................1-2 1.3.1 Unpacking the unit.............................. 1-3 1.3.2 Rack-mounting the unit......
Table of Contents 4.2.1 Playing back a whole disc.................. 4-1 4.2.2 Playback outputs ................................ 4-1 4.2.3 Monaural playback.............................. 4-1 4.2.4 Playing back a single track ................ 4-2 4.2.5 Entering the A and B location points 4-2 4.2.6 Playback between two location points ......................................................... 4-2 4.2.7 The CALL function .............................. 4-2 4.2.8 Relative time display ..........................
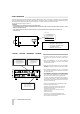
1 - Introduction This manual covers the two models of the MD-801 Mk II product line: the MD-801R Mk II, which is capable of recording and playing back on MiniDisc media, and the MD-801P Mk II, which is for playback only of such media. Apart from the recording and associated facilities provided on the MD-801R, the functionality and specifications of the two units are identical.
1 - Care of MD media disk from the user, and a file appears as one contiguous block of data (even though it may be spread over many tracks and sectors of the disk), the MD player allows separated audio data to appear as a continuous audio track. The MD-801 allows the creation and reading of a User Table of Contents (U-TOC) on recordable discs, which contain instructions to the player on the logical arrangement of the tracks, where to find the next audio segment to be played, etc.
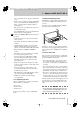
1 - About the MD-801R/P Mk II to be conveniently carried out using a standard keyboard • Remote control possible from dedicated TASCAM remote control units (RC-801, RC-FS10/20, and RC-8), or through industry-standard parallel or serial interfaces • Tally signals sent to controlling device at the end of each track played back 1.3.2 Rack-mounting the unit The MD-801 is equipped with integral rack-mount ears, and may be installed in any standard vertical 19” rack.
1 - About this manual 1.3.4 Backup memory When the unit is powered down, the following settings are memorized. • • • • • • • • AUTO READY status (see [20]) AUTO CUE settings and status (see [21]) The last used PLAY mode (see [22]) The two LOC points (A and B) (see [24]) Pitch control settings and status (see [25]) REPEAT status (see 4.2.9, "Repeat playback") Menu settings (see 3, "Menu items") If the resume function is turned on, the resume point is memorized 1.
1 - Hookup Examplel 1.
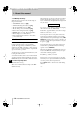
2 - Front and rear panel features 2–1 TASCAM MD-801R/P Mk II
2 - Front and rear panel features [4] TRACK keys This section, as well as giving a description of the controls and features of the MD-801, also provides many descriptions of basic operations. These keys are used to move the playback position backwards or forwards a track at a time. Their use is detailed in 4.2, "Playback of discs". The section on the rear panel also contains advice on setting up and connecting the MD-801 as part of an audio system.
2 - Front panel To start recording, press the PLAY key [6]. To stop recording, press the STOP key [5]. After the STOP key has been pressed, the words TO C E D I T will flash on the display, which will also show UTOC Writing as the U-TOC is written to disc. continuous. The further the shuttle wheel is turned from the center position, the faster the shuttle playback speed. When the unit is in menu mode, this wheel is used in the MD-801’s menu system.
2 - Front panel • R E M A I N —the total time remaining on the disc for further recording (the length of the blank portion of the disc) • TOTA L —the total elapsed time from the start of the disc • TOTA L R E M A I N —the total time remaining on the disc for further recording (the same as R E M A I N ) If the MEMO IN/CAPS indicator [23] is lit, the unit is in play or play ready mode, and the TIME key is pressed, the lower (alphanumeric dot-matrix) part of the display may be used to give timing information.
2 - Front panel these edits cannot be committed to disc using the TOC WRITE function (see below). [19] TOC WRITE key and indicator After an edit operation has been selected and performed from the EDIT key [18], the TOC WRITE indicator will light, and the TO C E D I T indicator in the display will be lit. This is a reminder that the disc should not be ejected before the U-TOC has been written to disc.
2 - Display mode, the R E P E AT indicator will be shown on the display. See 4.2.9, "Repeat playback" for further details of this mode. R [27] INPUT LEVEL controls These controls adjust the level of the signal at the analog connectors selected using the INPUT selection switch [28] (either the balanced inputs [36] or the unbalanced inputs [37]) when the ANALOG INPUT switch [31] is set to UNCAL.
2 - Rear panel (6) TRACK TITLE indicator Lights when track titles are being entered or displayed. See 5.11, "Track and disc title entry" for details. (7) DISC TITLE indicator Lights when the title of the disc is being entered or displayed. See 5.11, "Track and disc title entry" for details. (8) TRACK NO. display and indicator This 3-digit 7-segment display usually shows the current track. It may also be used to show a track number other than the current one, depending on the mode.
2 - Rear panel 1 If switch 4 of the MODE SET DIP switch bank [43] is set off, the signals input here are echoed at the digital outputs [33] and [35] without passing through the frequency converter. [35] DIGITAL OUTPUT (COAXIAL) This RCA connector outputs digital audio data in IEC 60958 (consumer) format (SPDIF). 2 The output sampling frequency will always be 44.1 kHz, ±9.9%, as determined by the pitch control (see both 4.2.13, "Varispeed mode" and 3.2, "Pitch control").
The wiring is, as marked on the rear panel: 1=ground, 2=hot (+), 3=cold (–). No 2 - Rear panel OFF (up) ON (down) As shipped, the trimmers are set to the standard +4 dBu level. [41] WORD SYNC IN This BNC connector accepts a 44.1 kHz word clock (impedance 75 Ω) at 44.1 kHz (±6%). [42] WORD SYNC THRU This self-terminating BNC connector echoes the word clock signal received at [41].
3 - Menu items The selections that can be made using the MD-801’s menu system affect the operation of many other functions. We suggest that you take the time to look through this section and familiarize yourself with the basic contents, so that you have an idea of some of the options available to you. 3.3 Auto cue A The menu system is entered using the MENU key [15]. Pressing this key brings up a menu in the display. 2 The JOG/DATA dial [12] is used to select a menu.
3 - Resume setting The minimum length for the jog loop is 12 frames, and the maximum value is 32 frames. The value is set in 1-frame steps. 3.6 Resume setting RESUME SEL ? When the resume setting is turned on, playback restarts from the point at which it was stopped (or the point at which playback was taking place when the power was cut off). The default is off, which means that when playback is stopped, it will start at the beginning of the disc, unless a track number is explicitly specified.
3 - Incremental play When this sub-menu is opened, the baud rate can be selected and set. The default value is 9600. 3.10Incremental play INCR PL SEL? This function allows auto-cueing of the playback point to the start of the next track when the STOP key [5] is pressed, or a fader stop command is received (on pin 8 of the parallel remote control port [47]).
3 - Auto track numbering level 3.12.1Spindle motor time S_TIME> R 3.14Copy ID 121 Use this to check how many hours the spindle motor has been in operation. R 3.12.2Laser pickup time R_TIME> 43 This indicates how many hours the laser pickup has been used for recording. 3.12.3System software version SYS> 01.00 This allows you to check the current system software version. R 3.
4 - Basic operations This section gives you informstion about the basic operations using the MD-801. Press the PLAY key [6]. Playback will start from the beginning of the disc. It assumes that you have connected the MD-801 to all the other equipment that you will be using. If you have not already made these connections, read 2.3, "Rear panel" for details of the rear panel connections, and connect the other equipment appropriately. Stop playback with the STOP key [5]. 4.
4 - Playback of discs 4.2.4 Playing back a single track 2 When the disc has been loaded and the TOC has been read, use the PLAY MODE key to select the S I N G L E play mode (see [22]). Press the PLAY MODE key [22] so that the display shows A - B . 3 Press LOC A/DEL [24]. The unit will locate to the first point, and start playing until it reaches the second point, and then stop. Use the TRACK keys [4] to move the playback position to the start of the desired track.
4 - Playback of discs 4.2.9 Repeat playback Use the REPEAT key [26] to enable the repeat mode as shown in the display (R E P E AT ). The three different repeat modes available correspond to the three playback modes set with the PLAY MODE key [22] (whole disc, S I N G L E track or A - B points, as set above). NOTE For A-B repeat to be effective, location point A must be before location point B, otherwise AB repeat cannot take place. 4.2.
4 - Recording operations NOTE The point at which the JOG key was pressed will not be included in the jog loop. To include this point in the loop, you must turn the JOG dial counterclockwise. 4.2.15Shuttle mode The SHUTTLE wheel [13] allows you to perform fast cue or review operations, moving forwards or backwards through the program material at high speed. The further the wheel is moved from the central position, the faster the cue or review speed.
4 - Recording operations MD-801R model only. 4.3.1 General notes on recording using the MD format Because the MD method of recording is somewhat different to a linear recording method, such as tape, you should note the following points. • The message Disc Full may appear on the display before the available recording time on the disc has all be used. This may be because more than 255 tracks have been recorded on the disc.
4 - Recording operations 1 2 3 Select the recording method (digital or analog) and the appropriate input source. Make sure the unit is stopped. Press and hold down the RECORD key [8] and press the READY key [7]. 4 Adjust the recording level (analog, UNCAL only) so that the meters do not read OV E R , even in the loudest passages. 5 6 Start recording by pressing the PLAY key [6]. When recording is finished, press the STOP key [5]. After recording is finished, the TOC is updated.
4 - Recording operations 2 Cue the playback point to the place that you want to start recording. 3 Press the READY key [7] to put the MD-801 into play ready mode. This step is the primary difference between replace recording and ordinary post-script recording. 4 Press and hold down the RECORD key [8] and press the READY key. The display will show: Replace 5 REC To start recording, press PLAY [6]. When you have finished recording, press STOP [5].
4 - Recording operations vious one. If the digital signal is not resumed within 30 seconds of interruption, recording will stop. As mentioned earlier, 4.3.4, "Track number incrementing", when digital recordings are made through the COAXIAL inputs, track numbers are incremented automatically as PQ code is read from CD or MD, or START IDs are read from DAT. However, if a source track is less than three seconds in length, a new track will probably not be started on the MD-801. 4.3.
5 - Editing operations Unlike tape or other linear media, the MD-801 provides you with a wide range of editing tools, allowing you to make arbitary cuts, “splices” and rearrangements of running order without having to re-record any parts of the material.
5 - Erasing a track of the loop is the point at which you want to divide the track. 2 After pressing the EDIT key, turn the DATA dial until the display shows: ERASE NOTE You can set the length of the jog loop in the menu system (see 3.5, "Jog loop length"). 3 When the start of the jog loop is correctly positioned, turn the SHUTTLE wheel clockwise. The display shows Now Editing, and Complete when the editing operation has finished.
5 - Moving tracks The PLAY indicator above the PLAY key will flash, as will the E D I T indication in the display, to show that rehearsal mode has been entered. In this rehearsal mode, the last 4 seconds (approximately) of the previous track and the first four seconds (approximately) of the current track are continuously repeated, so that you can audition the “join” between the tracks. 4 5 At this point, it is still possible to use the TRACK keys to select another track to be combined.
5 - A and B point erase operations of operation is the same, the function is so flexible that it can be used for many different purposes. In order to be used for editing in this way, the following conditions must be met: • Point A must not be at the same location as point B • At least one of the two points must be marked • Point B must come after point A If any of these conditions are not met, the display will show A-B Error!. All data between these points is erased. 1 Track number 2 3 4 5.6.
5 - Moving an A-B point If the A point is set at the start of a track, and the B point at the end of another track, the whole of the tracks containing and between these points will be erased (in the example above, tracks 2 and 3 will be erased. Track number 1 2 them: • Point A must not be at the same location as point B • At least one of the two points must be marked • Point B must come after point A If any of these conditions are not met, the display will show A-B Error!.
5 - Restoring erased material bers are renumbered accordingly. See the diagram above for an example. If you need to make the new track (formerly the A-B portion) into part of the preceding and/or following track, use the track combine facility (see 5.4, "Combining tracks") to turn these tracks into one track. The A and B points are lost after this edit operation, and will have to be re-entered if they are to be used again.
5 - Erasing a complete disc 3 Turn the SHUTTLE wheel clockwise. The display changes: Track 4 OK ? Turn the SHUTTLE wheel clockwise once again to change the current track from mono to stereo or vice versa . The display will show Now Editing, followed by Complete. This function may also be used to “un-protect” a track if the following message appears at any time in the edit mode: T_Protected! This signifies that the track cannot be edited.
5 - Track and disc title entry tion will move the cursor more than one position. 1 Move the cursor to the character following the position where a character is to be inserted: K_ 7 Continue using the DATA dial and SHUTTLE wheel to enter characters, until the title is complete. Koto 8 Koto Sonata_ To store the title, press the EDIT key. The title will scroll across the display if it is too long to fit on one line, allowing you to check it.
5 - Track and disc title entry 5.11.6Copying disc and track titles When two MD-801 units are connected together using the optional PW-1XMD serial cable, disc and track titles can be copied from one unit (master) to the other (slave), as described in 4.3.10, "Track title copying together with audio", with the following procedure. 1 After pressing the EDIT key on the slave unit, turn the DATA dial until the display shows: TITLE 2 ? Turn the SHUTTLE wheel clockwise.
7 - Remote control of the MD-801 The MD-801 can be controlled by a number of different sources, including the PS/2 keyboard described in 6, "Use of a keyboard with the MD801". In addition, the REMOTE (SERIAL) [45] and REMOTE (PARALLEL) connectors [47] can be used to connect compatible equipment, and the REMOTE CONTROL terminal [46] allows connection of an optional TASCAM RC-801 or RC-FS10/ 20 remote control unit.
7 - REMOTE (PARALLEL) connector To connect two units for sequential playback, connect the End of Message Tally (pin 20) of the first unit to the PLAY Command pin (pin 1) of the second unit. You should also link together the two ground pins (pin 36). For details of the timing of the EOM tally signal (pin 20), see 3.7, "EOM disc" and 3.8, "EOM track". 7.1.2 Fader start Pin 8 is a special case. If this input is brought low (for more than 50 ms), playback starts.
8 - Specifications, etc. This section provides reference material concerning the error and informational messages that may appear on the display of the MD-801 under certain circumstances, as well as the specifications of the unit. Message Disc Error! The disc inserted is of the wrong type (it may be an MD data disc) or the U-TOC has become damaged or is otherwise unreadable. Try again with another disc. Disc Full! You are trying to record or split a track on a disc where there is no space.
8 - Specifications Message R R R Meaning and possible remedy Not Audio!! No digital audio is available when recording. Check the source disc. Not Execute! You attempted to perform an invalid editing operation. Read this manual to see what you might have done to cause this error message to appear. PGM Empty!! You are attempting programmed playback with no program steps specified. PGM Full!! You have attempted programmed playback with more than the maximum permissible number of tracks (see 6.2.
8 - Specifications R COAXIAL output RCA pin jack, IEC60958 (consumer) format (SPDIF) R AES/EBU input XLR-3-31 type, AES3-1992 format. Valid sampling frequencies from <32 kHz to 48 kHz R COAXIAL input RCA pin jack, IEC60958 (consumer) format (SPDIF). Valid sampling frequencies from <32 kHz to 48 kHz Error correction ACIRC (Advanced Cross Interleave Reed-Solomon Code) Frequency response 20 Hz – 20 kHz ±0.
8 - Dimensional drawing 8.
Index A - E A A and B point erase operations 5-3 A-B erase 5-4 A-B indicator 2-7 A-B point, moving 5-5 About the MD-801R/P Mk II 1-2 About the MiniDisc format 1-1 AES/EBU DIGITAL INPUT 2-7 DIGITAL OUTPUT 2-7 Alphanumeric display (dot-matrix) 2-7 Analog I/O 8-3 ANALOG INPUT switch 2-6 ANALOG INPUTS (UNBALANCED) 2-8 ANALOG INPUTS and trimmers (BALANCED) 2-8 Analog output function DIP switch bank 2-8 ANALOG OUTPUTS (LINE) and trimmers 2-8 ANALOG OUTPUTS (MONITOR) 2-8 Analog recording 4-8 ATRAC compression 1-1
Index F - P without saving the edits to disc 5-1 Editing a programmed sequence 6-2 Editing operations 5-1 EJECT key 2-2 Ejecting discs 4-1 End of track, erasing to 5-4 Entering the A and B location points 4-2 EOM disc 3-2 track 3-2 Erased material restoring 5-6 Erasing complete disc 5-7 from the start of a track 5-4 more than one track at a time 5-4 normal A-B 5-4 to the end of a track 5-4 track 5-2 Error messages and troubleshooting guide 8-1 F Fader start 7-2 First audio position in track, cueing to 4-3
Index R - T Pickup time 3-4 PITCH CONT key and indicator 2-5 Pitch control 3-1 PLAY key and indicator 2-1 PLAY MODE key 2-5 Playback 4-1 between two location points 4-2 displaying track titles during 4-4 entering programmed 6-1 incremental 3-3 monaural 4-1 outputs 4-1 repeat 4-3 timer-controlled 3-2 Playback and recording (sequential) 7-2 Playing back a single track 4-2 Playing back a whole disc 4-1 Point erase operations 5-3 “Post-Script” recording 4-6 “Post-script” recording 3-4 ~ IN (power in connector)
Index U - W erasing from the start 5-4 erasing to the end 5-4 moving 5-3 playing back single 4-2 protect 5-7 splitting 5-1 titles 1-2 Track and disc title editing with the keyboard 6-3 Track and disc title entry 5-7 Track auto-numbering level 3-4 Track entry, direct 6-3 TRACK keys 2-2 TRACK NO.
» MD-801R@#/ MD-801P@# TEAC CORPORATION Phone: (0422) 52-5082 3-7-3, Nakacho, Musashino-shi, Tokyo 180-8550, Japan TEAC AMERICA, INC. Phone: (213) 726-0303 7733 Telegraph Road, Montebello, California 90640 TEAC CANADA LTD. Phone: 905-890-8008 Facsimile: 905-890-9888 5939 Wallace Street, Mississauga, Ontario L4Z 1Z8, Canada TEAC MEXICO, S.A. De C.V Phone: 5-658-1943 Privada De Corina, No.