
Solid State Stereo Audio Recorder Owner's Manual
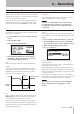
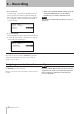
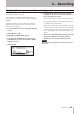
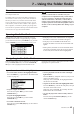
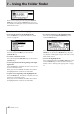
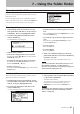
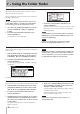
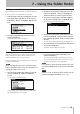
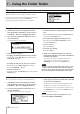
Table Of Contents
- Contents
- 1 − Introduction
- 2 − Controls and connectors
- 3 − Menu screens
- 4 − Preparations
- 5 − Playback
- Files that can be played
- Play area
- Basic playback operations
- Selecting a track
- Fast-forward/rewind search
- Time search
- Time skip
- Playback modes
- Program play
- Switching the playback time display mode
- Power-on play
- Repeat play
- Pitch Control play
- Key Control play
- Auto Cue function
- Auto Ready function
- Call function
- Incremental Play function
- Playing in monaural
- Resume Playback
- Flash Start function
- End of disc/track message (EOM)
- 6 − Recording
- Selecting the input source
- Specifying the recording file format
- Using the sampling rate converter
- Monitoring the input signal
- Adjusting the input signal level and balance
- Basic recording operation
- Switching the recording time display mode
- Sync recording
- Sync Record operation
- Auto Track function
- Assigning a new track number manually
- Applying the compressor while recording
- Specifying the name of the recorded file
- 7 − Using the folder finder
- 8 − Using the playlist finder
- 9 − Other settings
- 10 − Operation using a computer keyboard
- 11 − Using the RS-232C connector
- 12 − Messages
- 13 − Troubleshooting
- 14 − Specifications

6 − Recording
TASCAM SS-R1 43
Applying the compressor while recording
You can apply the SS-R1’s built-in compressor to the
recording source while you record.
A compressor is an effect that holds down peaks in the
audio, making the overall level more consistent and more
listenable.
You’ll use the menu to turn the compressor on/off (for
details on menu operations, refer to “Operations in the
menu screens” on page 16).
1 Press the MENU key to access the main menu list
screen.
2 Select the REC menu.
3 Highlight the PREFERENCE item.
4 Press the front panel ˚ key (or the remote’s
CURSOR ¥ key) to proceed to the REC PREF-
ERENCE screen.
5 Select COMP.
6 Turn the MULTI JOG dial (or use the remote’s
CURSOR § , ¶ keys) to select one of the follow-
ing as the compressor mode.
OFF
: The compressor will not be used when recording.
SOFT
: Light compression will be applied. This setting
is suitable when recording music.
HARD
: Strong compression will be applied. This setting
is suitable when the audio source you’re recording has a
low volume. Since the recording volume will be boost-
ed, it is also suitable when recording a meeting or con-
ference.
7 When you’ve finished making settings, press the
front panel TIME (ESC) key (or the remote’s
CLR/ESC key) to return to the home screen.
NOTE
This setting is remembered even when you turn off
the power.